Let’s get one thing straight right out of the gate: you do not need a culinary degree to make restaurant-quality food at home. You don’t need a kitchen that looks like a sterile laboratory, and you certainly don’t need to spend your entire paycheck on pretentious gadgets. But if there is one universal tragedy I witness time and time again in the home kitchen, it is the absolute massacre of perfectly good rice.
You know exactly what I am talking about. You buy the premium jasmine or the expensive Japanese short-grain rice. You follow the cooking instructions to the letter. You carefully pan-sear a beautiful piece of salmon, steam some crisp asparagus, and then you lift the lid on your rice pot only to discover a solid, gelatinous block of starch. It is gummy. It is mushy. It looks less like a delicate side dish and more like industrial spackle.
If you are tired of serving sad, gluey mounds of carbohydrates, it is time for a brutal reality check. Your rice cooker isn’t broken, and your stove isn’t cursed. The problem is your prep work. More specifically, the problem is that you are either skipping the wash entirely, or you are trying to wash your rice using standard Western kitchen tools that were fundamentally never designed for the job.
Today, we are putting an end to the madness. We are going to dive deep into the science of surface starch, explore the magic of rinsing your grains, and introduce you to the ultimate, inexpensive prep tool that will permanently upgrade your weeknight dinners: the Japanese rice washing bowl.
The Anatomy of a Rice Disaster: Why Your Grains Are Gummy
To fix the problem, you have to understand the science of the enemy. And in the world of rice cooking, the enemy is excess surface starch.
When rice is harvested, it is encased in a protective husk. Once that husk is removed, you have brown rice, which still retains its bran layer and germ. To get white rice, the grain undergoes a rigorous milling and polishing process to strip away the bran and germ, exposing the starchy endosperm inside. During this heavy mechanical polishing, and later during packaging and shipping, the grains constantly rub against one another. This friction creates a fine, microscopic coating of starch dust that clings to the exterior of every single grain.
The Starch Science: Amylose vs. Amylopectin
Rice starch is primarily composed of two different molecules: amylose and amylopectin.
Amylose is a long, straight-chain molecule. It does not gelatinize easily, and it helps rice grains maintain their distinct, separate shape after cooking. Long-grain varieties like basmati have a high amylose content, which is why they tend to cook up fluffy and separate.
Amylopectin, on the other hand, is a highly branched molecule. Because of its branching structure, it easily traps water and breaks down into a sticky, viscous gel when heated. Short-grain Japanese rice (often colloquially called “sticky rice” or sushi rice) has a very high amylopectin content.
The Gelatinization Process
When you take unwashed white rice—covered in that fine dust of highly refined surface starch—and throw it into a pot of water with heat, you are essentially creating a hot starch slurry. As the water temperature rises above 140°F (60°C), that loose surface starch rapidly hydrates and gelatinizes. It swells, bursts, and forms a literal glue that binds all the individual grains together into a dense, mushy cake.
This is why unwashed rice turns into a gummy nightmare. You aren’t just boiling rice; you are boiling rice in a bath of homemade adhesive. To get fluffy, distinct grains that have a pleasant chew, you must remove that surface starch before the heat is ever applied.
The “Colander Conundrum”: Why Standard Kitchen Gear Fails
At this point, you might be thinking, “Okay, Chef, I get it. I need to wash my rice. I’ll just grab my trusty metal colander.”
Stop right there. If you are using standard Western kitchen strainers to wash your rice, you are setting yourself up for frustration. Having the right beginner kitchen tools is the difference between a stressful chore and an effortless prep routine. Let’s look at why your current equipment is failing you.
The Pasta Colander Trap
The traditional metal or plastic colander you use for draining spaghetti is practically useless for rice. The drainage holes are simply too large. The moment you pour your rice into it and run the tap, a quarter of your expensive grains will slip right through the holes and vanish down the garbage disposal. You end up trying to cup your hands over the holes, making a massive, wet mess in your sink.
The Fine Mesh Strainer Disaster
“Fine,” you say. “I will use my wire mesh sieve.” This is arguably worse. While the fine wire mesh will indeed stop the rice from falling through, it creates two new, highly irritating problems. First, wet rice grains act like little wedges; they will get hopelessly lodged in the tiny wire squares, requiring you to violently bang the strainer against the trash can to get them out.
Second, the wire mesh is abrasive. As you aggressively swirl the rice around in the strainer, the sharp wire acts like a cheese grater against the delicate grains. You end up scratching and breaking the rice, which—you guessed it—releases more interior starch, entirely defeating the purpose of washing it in the first place. Good luck scrubbing that gelatinized starch paste out of the wire mesh later.
The Pot-Swirling Mess
The most common fallback method is swirling the rice directly in the cooking pot, tilting it precariously over the sink, and trying to pour out the milky water while using your hand as a dam to hold the rice back. We have all done this. We have all subsequently watched in horror as the dam breaks and a waterfall of wet rice splatters across the sink basin. Furthermore, because you can never drain the pot completely dry between rinses, the rice continues to sit in a pool of dirty, starchy water. You can rinse it ten times, and the water will never run truly clear.
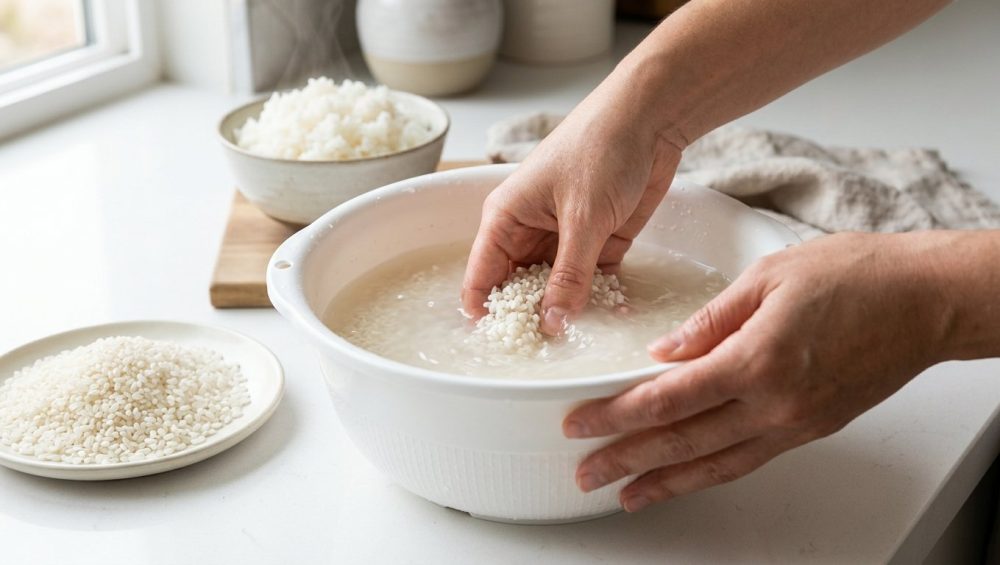
Enter the Hero: The Japanese Rice Washing Bowl
If you want to cook rice like a professional without losing your mind, you need the tool specifically engineered for the job. In Japan, where rice is a foundational pillar of the culinary culture, washing rice (a process known as togu, which translates closer to “polishing” or “sharpening”) is taken very seriously. To facilitate this, they invented the Japanese rice washing bowl.
This is not just a bowl with holes in it. It is a masterpiece of simple, highly effective kitchen engineering.
Precision Engineering for Grains
A traditional Japanese wash bowl, such as the widely popular models made by Inomata or Maruefu, features a very specific, multi-zone design.
First, the bottom of the bowl is solid. This is crucial because it allows you to submerge the rice completely in a pool of water, giving you the space to vigorously agitate the grains with your hands.
Second, the drainage system is positioned strategically. Most high-quality models feature a series of precision-cut, vertical slits along the side of the bowl, near the rim. As you run water into the bowl, the loose starch, floating rice bran, and any microscopic husks naturally rise to the top and gracefully flow out through the side drains. You never have to tilt the bowl precariously, and you never risk spilling your grains.
Many models also feature a secondary drainage zone with micro-perforations at the very base of a sloped bottom. This allows you to tilt the bowl slightly to drain out the absolute last drops of starchy water, leaving your rice perfectly drained and ready for the crucial soaking phase.
The “No-Go” Rule: Safe Materials Only
If you have read my guides before, you know my strict rule: I absolutely despise cheap, toxic kitchenware. I have zero patience for mystery metals that rust after two washes or cheap, peeling non-stick coatings that leach chemicals into your dinner. We are entirely committed to banishing toxic kitchen gear from our lives.
Thankfully, authentic Japanese rice washing bowls pass the safety test with flying colors. The plastic models, like the Inomata speed washer, are manufactured in Japan using high-grade, BPA-free, food-safe Polypropylene (PP). This material is incredibly durable, lightweight, heat-resistant, and top-rack dishwasher safe. It also won’t scratch the delicate non-stick inner pot of your expensive Zojirushi rice cooker when you transfer the grains.
If you prefer to avoid plastics entirely, the Japanese market also offers stunning 3-Way stainless steel washing bowls. These are crafted from premium 18-8 culinary-grade stainless steel. They feature a dual-directional sloped bottom—one side is solid for soaking, and the other side is micro-perforated for draining. They are rust-resistant, indestructible, and look gorgeous sitting on an open kitchen shelf.
A Masterclass in Rice Washing: The Sassy Sous-Chef Method
Having the right tool is only half the battle; you also need the right technique. Washing rice is not about gently giving it a bubble bath. It is a physical process of friction. You are using the grains to polish each other, scrubbing away the stubborn starch clinging to their exteriors. If you master this, you will never have to wonder why your fried rice is always mushy the morning after.
Here is the definitive, step-by-step masterclass on washing rice like an expert.
Step 1: The Initial Fast Rinse
Measure your dry rice into the solid-bottom section of your wash bowl. Turn your faucet on cold (never use hot water, as it will prematurely trigger starch gelatinization). Fill the bowl rapidly.
The moment the water covers the rice, it will turn incredibly milky and opaque. Do not let the rice sit in this water. Dry rice is highly porous and immediately begins absorbing liquid. If you let it sit in that initial bath, it will absorb the dirty, starchy water right back into the core of the grain. Swirl it once, and immediately tilt the bowl to let the water flush out through the side and bottom drains.
Step 2: The “Claw Hand” Agitation Technique
Now that the rice is wet but the bowl is mostly drained, it is time to polish. Form your hand into a loose claw shape, as if you are holding a tennis ball. Plunge your claw into the damp rice and begin rapidly swirling your hand in a circular motion.
You should press down slightly, allowing the grains to grind against each other and against the textured bottom of the bowl. You are not trying to crush or mash the rice—be firm but gentle. Do this for about 15 to 20 seconds. You will hear a satisfying, rhythmic shhh-shhh-shhh sound as the grains polish each other.
Step 3: The Drain and Repeat Cycle
After polishing, turn the cold water back on and fill the bowl. Swirl your hand a few times to lift the newly freed starch into the water, and then let it drain out through the side slits.
Repeat the claw-hand polishing and rinsing cycle three to four times. How do you know when you are done? A common myth is that the water must be crystal clear. This is false. If you wash the rice until the water is perfectly transparent like glass, you have likely over-washed it and stripped away too much flavor and nutrients. You are looking for water that is mostly clear, with just a slight, hazy milkiness to it.
Step 4: The Crucial Soaking Phase
This is the step that 90% of home cooks skip, and it is a massive mistake. Once your rice is washed and thoroughly drained, you must let it soak in its measured cooking water before you apply heat.
Why? Because rice grains dry out from the outside in, meaning the core of the grain is dense and hard. If you immediately blast the rice with boiling heat, the outside of the grain will cook and turn to mush before the heat can penetrate and hydrate the hard center. By soaking the rice for 20 to 30 minutes, you allow the moisture to gently permeate all the way to the core. This ensures that when you do cook it, the grain cooks evenly from edge to center, resulting in a plump, flawless texture.
Advanced Strategies: Customizing the Wash for Different Rice Varieties
Not all rice is created equal. A true understanding of your ingredients is essential for mastering the art of the home kitchen. Your washing technique should adapt based on the variety of grain you are preparing.
Short-Grain Japanese Rice (Sushi Rice)
Short-grain rice is the most demanding when it comes to washing. Because it is naturally so high in sticky amylopectin, failing to wash it properly will result in an inedible brick of starch. Follow the masterclass method above strictly. Three to four rigorous polishing cycles, followed by a mandatory 30-minute soak in cold water. If you are making sushi, this step is absolutely non-negotiable for achieving those glossy, distinct grains that hold together without turning to paste.
Jasmine and Basmati (Long-Grain Varieties)
Long-grain aromatic rice like Jasmine and Basmati have a higher amylose content, meaning they are naturally less prone to sticking. They also have a more delicate physical structure. For these varieties, you should be gentler. Skip the aggressive “claw hand” grinding. Instead, submerge the rice in the wash bowl and gently swish the grains through the water with your fingers to release the starch. Two to three gentle rinses are usually sufficient. Basmati benefits immensely from a 20-minute soak to help the grains elongate to their maximum potential during cooking.
Brown Rice and Wild Grains
Brown rice still has its bran layer intact, which acts like a waterproof jacket. Because the starchy endosperm is protected, brown rice does not release massive amounts of milky starch water when washed. However, you absolutely still need to wash it in your Japanese bowl.
Washing brown rice removes residual dust, chaff, and naturally occurring phytic acid on the bran layer, which can taste bitter and inhibit nutrient absorption. Give it a thorough rinse, and remember that because of that tough bran layer, brown rice requires a much longer soaking time—ideally 45 minutes to an hour—to properly hydrate before cooking.
Weekday Efficiency: More Than Just a Rice Washer
I can hear the minimalists groaning. “Chef, I don’t have space for a unitasker.”
Let me stop you right there. I am the biggest advocate for ruthless kitchen efficiency. When you are trying to master simple weeknight dinners after a grueling nine-to-five workday, you do not have time for useless clutter. The Japanese wash bowl is not a unitasker. It is one of the most versatile prep tools you will ever own.
Quinoa, Lentils, and the Tiny Grain Dilemma
If you have ever tried to wash quinoa in a standard strainer, you know the pain. The tiny seeds instantly clog the mesh or wash right down the sink. But quinoa must be washed. It is naturally coated in saponins—a bitter, soapy-tasting chemical defense mechanism designed to deter birds from eating the seeds.
The micro-drainage holes of a Japanese wash bowl are perfectly sized to contain quinoa. You can vigorously rub the quinoa in the bowl under running water, easily stripping away the saponins without losing a single seed down the drain. The same applies to farro, barley, millet, and dried lentils.
Berries, Greens, and Delicate Produce
The solid bottom and side-drain design make this bowl the ultimate tool for washing delicate produce. Dump a pint of expensive raspberries or blueberries into the bowl, fill it with cold water and a splash of white vinegar, and let them soak. The dirt, mold spores, and debris will float to the top and gracefully exit the side drains.
You can use it to vigorously swish sandy spinach leaves, soak chopped leeks to remove the grit hidden in their layers, or quickly rinse a batch of cherry tomatoes. It is a high-speed, high-efficiency prep station that never leaves a mess in your sink.
Choosing the Ultimate Wash Bowl: What to Look For
If you are ready to take the plunge and upgrade your kitchen arsenal, you need to know what to look for. Spending twenty bucks on a high-quality wash bowl is a tiny investment that pays massive dividends in your daily routine, especially if you are serious about breaking your takeout habit and cooking better food at home.
Sloped Bottoms and Drainage Physics
The hallmark of a premium wash bowl is the sloped bottom design. Look for a bowl that is intentionally asymmetrical. When you set it flat on the counter, the water pools in the solid section for soaking. When you tilt it forward, the water rushes toward the micro-perforated drainage zone. This dual-zone physics allows you to seamlessly transition between soaking and straining without ever needing to transfer the food to a different vessel.
Material Matters: Stainless Steel vs. High-Grade Plastics
Your choice of material comes down to your personal workflow and aesthetic preferences.
The Plastic Route (e.g., Inomata):
Do not let the word “plastic” scare you away, provided you are buying an authentic, made-in-Japan model. These are constructed from thick, rigid, BPA-free Polypropylene. The primary advantage of the plastic bowl is that it is incredibly lightweight. Furthermore, if you use a high-end rice cooker with a non-stick inner pot, a plastic wash bowl is safer. You can confidently pour the washed rice from the plastic bowl into your cooker without any fear of accidentally scratching the non-stick coating.
The Stainless Steel Route (e.g., Maruefu 3-Way):
If you prefer a buy-it-for-life aesthetic, the 18-8 stainless steel models are stunning. They are virtually indestructible, will never stain or hold onto food odors, and double beautifully as standard mixing bowls for baking or tossing salads. Just be mindful not to bang the metal rim against your rice cooker pot.
Troubleshooting Your Rice: Beyond the Wash
Alright, you bought the bowl. You washed the rice perfectly. You soaked it. But what if it still comes out a little wonky? Even the best prep work can be derailed by basic beginner cooking mistakes during the actual heating phase. Let’s troubleshoot the final steps.
The 1:2 Water Ratio is a Lie
If you take away nothing else from this masterclass, let it be this: the standard Western advice of using 1 cup of rice to 2 cups of water is a complete myth, and it is the primary reason your rice is soggy.
If you have properly washed and soaked your rice, the grains have already absorbed a significant amount of water. If you then add two full cups of water to the pot, you are drastically over-hydrating the grains. For properly washed and soaked short or medium-grain white rice, the ratio is actually closer to 1:1.1 or 1:1.2 (one cup of rice to just over one cup of water). Jasmine and Basmati usually require a 1:1.25 ratio.
If you are using a rice cooker, ignore cup measurements entirely. Pour your washed, drained rice into the pot, and simply fill the water up to the etched line that corresponds to the number of cups you used. The engineers who built your machine already did the math for you.
Steam Control and the Resting Period
If you are cooking on the stovetop, you must control the steam. Once the pot comes to a boil, drop the heat to the absolute lowest setting and put a tight-fitting lid on it. Do not lift the lid. Every time you lift the lid to “check” on the rice, you release the trapped steam that is essential for cooking the top layer of grains.
Finally, once the cooking time is up and the water is absorbed, turn off the heat. Do not touch the rice yet. Let the pot sit, covered and off the heat, for a mandatory 10 to 15 minutes. This resting period allows the remaining ambient steam to evenly redistribute throughout the grains, and it allows the starches to cool slightly and firm up. If you aggressively stir the rice while it is still boiling hot, you will smash the fragile grains and create a mushy texture. Let it breathe, then gently fluff it with a rice paddle or a fork.
Final Thoughts: Elevate Your Everyday Cooking
Cooking should not be a source of stress. It shouldn’t be a chaotic, messy chore that leaves you frustrated and reaching for delivery menus. By understanding the science of your ingredients and investing in smart, efficient tools, you can easily survive the kitchen without ordering takeout.
The Japanese rice washing bowl is a perfect example of this philosophy. It takes a messy, annoying, and often skipped prep step and turns it into a fast, satisfying, and highly effective process. It eliminates the gummy, starchy disasters that ruin dinners, and it respects the integrity of the ingredients you paid good money for.
Stop settling for mediocre, mushy carbohydrates. Grab a proper wash bowl, give those grains the rigorous polishing they deserve, and watch how quickly you can transform your chaotic cooking routine into a peaceful daily habit. You have the knowledge, you have the science, and now you have the technique. Now get into the kitchen and show that rice who is boss.


