Picture this: It’s Friday night. You’ve invited your friends over for an interactive, DIY pizza night. You’ve prepared the dough, set out an aesthetic spread of toppings, and poured the wine. You’re feeling like an absolute culinary goddess. Your friend carefully constructs a beautiful, artisan pie on the pizza peel. They walk up to the scorching hot oven, give the peel a confident shove, and… nothing happens. The toppings fly off into the 500-degree abyss. The sauce splatters onto the oven door. The dough? It is cemented to the wooden paddle like it’s been secured with industrial-grade construction adhesive. The smoke alarm starts screaming its head off, and suddenly, your relaxed gathering has turned into a chaotic, smoky kitchen nightmare.
We have all been there. I have scraped enough burnt mozzarella off the bottom of my oven to build a life-sized sculpture of a cow. But listen to me: you do not need a culinary degree or a custom-built backyard brick oven to host a flawless pizza night. You just need a basic understanding of kitchen physics, the right ingredients, and gear that isn’t actively working against you.
When you plan mindful gatherings around interactive food, the host’s stress level dictates the vibe of the entire room. If you are panicking, your guests are panicking. The goal of a DIY pizza night is for the host to stay present, sip their drink, and enjoy the communal process without micromanaging a disaster.
In this exhaustive, no-stone-unturned masterclass, we are going to dissect the exact reasons why your pizza dough sticks, tears, and ruins your weekend. We will cover the science of moisture control, the great debate over dusting flours, the metallurgical realities of your baking surfaces, and the strict rules for avoiding toxic kitchenware. Grab your bench scraper—the kitchen’s unsung hero—and let’s get into it.
The Physics of the Stick: Why Dough Hates You
Before we can solve the problem, we have to understand the enemy. Pizza dough is not just a mixture of flour and water; it is a living, breathing, highly reactive web of gluten and moisture. When you stretch out a beautiful, hydrated ball of dough and place it onto a surface, a microscopic battle begins immediately.
Hydration, Gluten, and Capillary Action
Modern pizza recipes, especially those chasing that airy, blistered Neapolitan-style crust, call for high hydration. We are talking anywhere from 65% to 75% water to flour ratio. This water is essential for creating steam inside the dough during the bake, which puffs up the crust and gives you those gorgeous, cavernous bubbles. But high hydration also means high stickiness.
When wet dough sits on a porous surface (like a wooden peel) or a smooth, non-porous surface (like a metal peel), two things happen. First, the proteins in the gluten matrix begin to physically bond with the microscopic imperfections in the surface. Second, capillary action draws the moisture from the dough downward, creating a vacuum seal. The longer the dough sits, the stronger this bond becomes. It is literal chemistry working against your dinner plans.
The Temperature Trap
Temperature plays a massive role in this equation. Cold dough is firm, easy to handle, and relatively dry to the touch. But as dough comes up to room temperature—which it absolutely must do if you want to stretch it without it snapping back like a rubber band—the starches relax and the surface moisture increases.
If your kitchen is warm, or if your guests are taking twenty minutes to meticulously arrange their pepperoni slices into a perfect mandala, that dough is sweating. It is warming up, relaxing, and sinking its microscopic claws into your pizza peel. You might be able to master simple weeknight dinners by taking your time, but when it comes to launching raw pizza dough, time is your absolute worst enemy.
The Peel Problem: Wood vs. Metal
One of the most common rookie mistakes I see is a fundamental misunderstanding of pizza peels. A peel is the giant paddle you use to transfer the pizza in and out of the oven. If you are using the wrong material for the wrong step of the process, you are doomed before you even spread the sauce.
Why Building on Metal is a Rookie Mistake
Let’s get this straight: you should never, ever build a raw pizza on a metal peel. Metal peels are fantastic for retrieving a cooked pizza from the oven because they are incredibly thin and can slide right under the baked crust. But raw dough hates raw metal.
Metal is highly conductive and prone to condensation. When you place room-temperature dough on a cold metal peel, the temperature differential and the completely non-porous surface create an immediate vacuum seal. No amount of flour dusting will save you if the dough decides to sweat on a sheet of aluminum. If your non-stick skillets are losing their slip, just imagine how poorly a raw, sticky web of gluten is going to fare on bare metal.
The Toxicity Rant: Say No to Cheap Coatings
Since we are talking about metal peels, I need to address a massive red flag in the kitchenware industry. I am an absolute stickler for banishing toxic kitchen gear from my house, and cheap, coated pizza peels are at the top of my hit list.
Many budget-friendly metal peels on the market are coated in cheap, mystery non-stick materials (often containing PFAS or PFOA derivatives) designed to mimic professional gear. These “forever chemicals” are notorious for breaking down under high heat. Your pizza oven or baking steel is hitting temperatures of 500°F (260°C) or higher. When you shove a cheaply coated peel into that inferno, the coating degrades, releasing toxic polymer fumes into your kitchen and flaking microscopic bits of synthetic chemicals right onto your beautiful, organic heirloom tomatoes.
Never buy a peel with a painted or cheap synthetic non-stick coating. If you want a non-stick metal peel for retrieving pizzas, invest in a high-quality, hard-anodized aluminum peel. The anodization process changes the molecular structure of the metal itself, creating a durable, non-toxic, stick-resistant surface that won’t off-gas into your dinner.
The Winning Peel Strategy
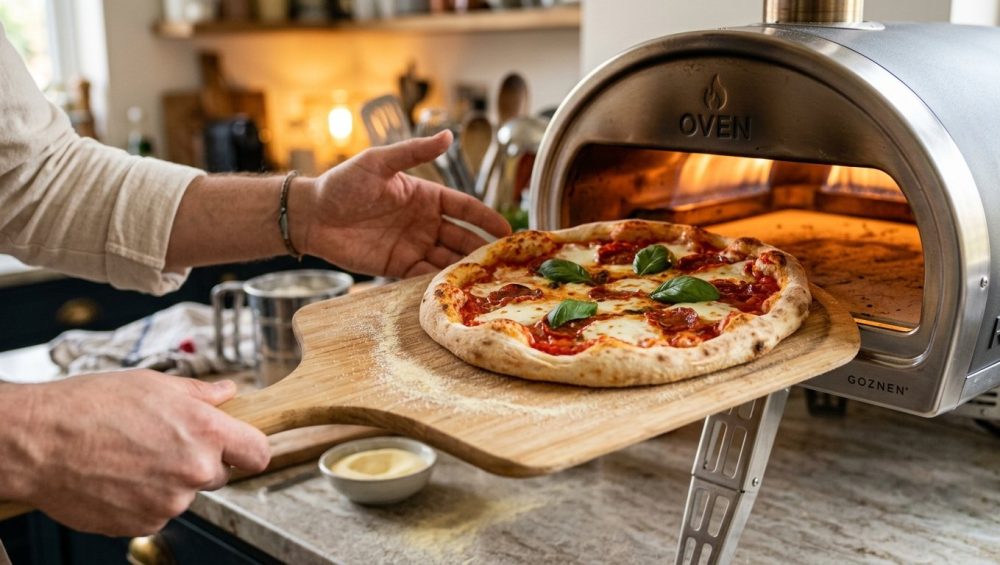
The professional, stress-free method requires two peels.
- The Prep Peel (Wood): You build your pizza on a wooden peel. Wood is slightly porous, which means it absorbs a tiny bit of the surface moisture from the dough, and its micro-texture allows dusting flour to create a barrier rather than just sliding off.
- The Turning/Retrieving Peel (Metal): You use a thin, hard-anodized metal peel to rotate the pizza while it cooks and to pull it out of the oven.
If you don’t want to buy two peels, just build your pizzas on a sheet of parchment paper over an inverted baking sheet. Slide the whole thing (parchment and all) onto your baking stone. After two minutes, the crust will have set enough that you can yank the parchment paper out from underneath it. It is a brilliant, zero-stress shortcut for home cooks.
The Magic Dust: Flour, Cornmeal, or Semolina?
If you are building your pizza directly on a wooden peel, you need a release agent. This is the barrier between the wet dough and the wood. But choosing the wrong dust is the second biggest reason your pizza ends up looking like a modern art disaster.
Why Regular Flour Becomes Glue
Most beginners instinctively reach for regular all-purpose (AP) flour to dust their peel. It makes sense, right? The dough is made of flour, so use more flour. Wrong.
All-purpose flour is milled incredibly fine. When it comes into contact with the moisture from the raw dough, it hydrates almost instantly. Within minutes, that dry barrier of flour turns into a wet, sticky paste. Instead of acting as a lubricant, it acts as a glue, bonding the dough to the peel. By the time your guest finishes adding their toppings, the pizza is permanently anchored.
The Cornmeal Myth (And Why It Tastes Like Gravel)
The next logical step for many home cooks is cornmeal. A lot of old-school recipes swear by it, and it does prevent sticking because the granules are large and don’t hydrate quickly. But cornmeal comes with a massive downside: it burns terribly at high temperatures.
When cornmeal hits a 500°F baking steel, it scorches almost immediately, filling your kitchen with acrid smoke and leaving a bitter, burnt residue on the bottom of your crust. Furthermore, biting into a delicate, airy Neapolitan crust only to crunch down on hard, gritty pieces of cornmeal completely ruins the textural experience. It tastes like you dropped your pizza on a gravel driveway. Stop doing this.
The Champion: Semolina Flour and the Ball-Bearing Effect
The absolute, undisputed champion of pizza peel dusting is semolina flour. Semolina is made from hard durum wheat and is significantly coarser than regular flour, but much finer and more palatable than cornmeal.
Because of its coarse grind and specific protein structure, semolina absorbs moisture very slowly. It refuses to turn into glue. Instead, it acts like hundreds of thousands of microscopic ball bearings underneath your dough. When you give the peel a shake, the dough literally rolls on top of the semolina granules.
Furthermore, semolina doesn’t burn as aggressively as cornmeal, and it actually adds a beautiful, subtle nutty flavor and a satisfying micro-crunch to the bottom of your crust. For the ultimate pro-move, use a 50/50 blend of semolina and all-purpose flour. The AP flour fills in the microscopic gaps, while the semolina provides the rolling action. This is the exact secret used by top-tier pizzerias.
Moisture Control: The Enemy of the Slide
You can have the perfect wooden peel and the finest semolina dust in the world, but if you screw up the moisture control on top of the pizza, you are going to have a bad time. A pizza is a delicate balancing act of weight and hydration.
The Sauce Barrier: Less is More
Americans have a terrible habit of treating pizza sauce like soup. They ladle a massive pool of crushed tomatoes onto the dough until it resembles a swimming pool. This is a fatal error.
Pizza dough is thin. When you overload it with heavy, watery sauce, that moisture rapidly seeps through the porous dough structure. Within a few minutes, the bottom of the dough becomes saturated, turning the semolina barrier underneath into sludge.
You need far less sauce than you think. Two to three tablespoons of sauce is more than enough for a 12-inch pizza. You should be able to see the dough peeking through the sauce in certain areas. Just like how a rich dinner actually needs acid to balance the fat, a good pizza needs restraint to balance the hydration.
Fresh vs. Low-Moisture Mozzarella
The cheese you choose will make or break your pizza night. There are two main players here: fresh mozzarella (fior di latte) and low-moisture mozzarella.
Fresh mozzarella is gorgeous. It comes suspended in brine and has a delicate, milky flavor. But it is essentially a water balloon. If you slice a ball of fresh mozzarella and immediately throw it onto a pizza, it will release all of its internal water the second it hits the heat of the oven. This creates a swamp on top of your pizza, turning the center of the dough into a soggy, unbaked mess. If you absolutely must use fresh mozzarella, you need to slice it, lay it out on paper towels, and let it drain for at least 30 to 60 minutes before your guests arrive.
For a relaxed, stress-free DIY pizza night, low-moisture mozzarella is your best friend. This is the dense, block-style cheese you find in the dairy aisle. It has a moisture content of around 45-52% (compared to fresh mozzarella’s 52-60%), meaning it melts beautifully, gives you that iconic, stretchy “cheese pull,” and releases zero water onto your crust. Buy it in a block and shred it yourself; pre-shredded cheese is coated in anti-caking agents (like cellulose) that prevent it from melting smoothly.
Prepping Wet Toppings (Mushrooms, Pineapple, and Veggies)
Toppings are another massive source of hidden moisture. If you put raw mushrooms, bell peppers, or onions on a pizza, they will steam in the oven, releasing all their cellular water directly into your cheese and dough.
You must pre-cook your watery vegetables. Sauté your mushrooms until they release their liquid and brown. Caramelize your onions. Roast your bell peppers. If you are serving pineapple, blot it aggressively with paper towels to remove the excess juice. The rule is simple: if a topping is wet, it does not belong on raw pizza dough.
The “Time is Sticking” Rule: Speed is Everything
This is the golden rule of pizza making: once the wet dough hits the floured peel, a countdown timer starts. The longer the dough sits on the peel, the more moisture it releases, and the higher the probability that it will stick.
During a DIY pizza night, guests love to take their sweet time. They want to chat, sip their wine, and meticulously arrange their olives into smiley faces. You must politely, but firmly, rush them. A pizza should not sit on a peel for more than three minutes.
The “Shimmy” Test
To ensure the pizza hasn’t bonded to the wood, you must perform the “shimmy” test. Before you add the sauce, give the peel a quick back-and-forth shake. The dough should easily slide around on the semolina bearings. Add the sauce, and shimmy again. Add the cheese, shimmy again.
If at any point the dough stops moving, you have a sticky spot. Do not proceed! Gently lift the stuck edge of the dough with your fingers or a bench scraper, toss a pinch of semolina underneath, and shimmy until it releases. If you wait until the pizza is fully loaded to discover a stuck spot, you are going to end up launching half a pizza into the oven while the other half folds over onto itself into a tragic, messy calzone.
Oven Setup and Surface Heat: Steel vs. Stone
If you want a professional, blistered crust that releases effortlessly from the peel and bakes in minutes, you need the right thermal surface in your oven. You cannot bake a good pizza on a thin aluminum baking sheet. If you’re wondering why your baking sheets keep warping under intense broiler heat, it’s because they lack the thermal mass required for high-temperature baking.
Thermal Conductivity: Why Steel Wins
For decades, the standard advice was to buy a ceramic or cordierite pizza stone. Stones are fine—they mimic the floor of a traditional brick oven and are highly porous, which helps draw moisture away from the crust. But in a standard home oven that maxes out at 500°F to 550°F, stones have a fatal flaw: they are terrible conductors of heat.
When you place a cold, wet pizza onto a ceramic stone, the stone transfers its heat to the dough very slowly. It takes 8 to 10 minutes to bake the pizza, and by the time the crust is crispy, the toppings are often overcooked. Furthermore, a stone takes 4 to 6 minutes to recover its heat after you remove a pizza. If you are hosting a party and baking pizzas back-to-back, the second and third pizzas will take longer and come out pale and soggy because the stone is exhausted.
Enter the Baking Steel. A pizza steel is a thick, solid slab of highly conductive carbon steel. Steel is approximately 18 times more conductive than ceramic. When cold dough hits a 500°F steel, the thermal energy is violently and rapidly transferred into the crust. This causes an explosive “oven spring” (the dough puffing up) and creates a deeply charred, crispy undercarriage in just 4 to 6 minutes.
Even better, steel has massive thermal mass and recovers its heat in just 75 to 90 seconds. You can bake six pizzas in a row, and the last one will be just as crispy as the first. Much like seasoning cast iron skillets, taking care of your pizza steel ensures it will literally outlive you. It is practically indestructible.
The Dangers of Cheap Glazed Stones
If you do opt for a stone over a steel (perhaps for budget reasons), you must be hyper-vigilant about what you are buying. The market is flooded with cheap, imported ceramic stones that feature smooth, shiny glazes.
Do not buy glazed baking stones from unverified, discount manufacturers. Some of these cheap glazes have been found to contain lead or other heavy metals to achieve that glossy finish. When heated to 500°F, these toxic glazes can break down, off-gas, or leach directly into the porous crust of your food. A proper pizza stone should be made of unglazed, food-safe cordierite or natural clay. It should look dull, porous, and utilitarian. If it looks like a shiny, decorative serving platter, it does not belong in a 500-degree oven.
Preheating Protocols for Maximum Spring
Whether you use steel or stone, you must preheat it aggressively. Turning the oven on and waiting for the little “beep” that says it has reached 500°F is not enough. That beep only means the air in the oven is 500°F. Your dense steel or stone is likely still sitting at a lukewarm 200°F.
You must place your steel or stone on the top rack of the oven (about 6 to 8 inches below the broiler) and let it preheat at your oven’s absolute maximum temperature for a minimum of one full hour before you launch the first pizza. This guarantees the thermal core of the material is fully saturated with heat.
Step-by-Step Guide to a Flawless Launch
Alright, we have covered the science, the gear, and the ingredients. Now, let’s put it all together into a foolproof, actionable checklist for the host. If you follow these exact steps, your pizza will slide off the peel like an Olympic figure skater.
Actionable Checklist for the Host
- Preheat the Core: Place your pizza steel in the oven and crank it to 500°F (or higher, if your oven allows) for at least one hour.
- Prep the Toppings: Pre-cook wet vegetables, drain your fresh mozzarella (or better yet, shred low-moisture block mozzarella), and have all your toppings laid out in an organized assembly line.
- Dust the Peel: Take your completely dry wooden prep peel and dust it generously with a 50/50 blend of semolina and all-purpose flour. Rub it in slightly with your hand to coat the wood grain.
- Stretch and Drop: Stretch your room-temperature dough on a separate countertop. Once it is stretched to the desired size, gently transfer it to the dusted wooden peel.
- The First Shimmy: Immediately give the peel a shake. The dough should glide. If it doesn’t, lift the edge and add more semolina.
- Dress Quickly: Apply a modest amount of sauce (leave the edges bare for the crust), sprinkle your cheese, and add your dry, pre-cooked toppings. Do not overload the pizza with weight.
- The Final Shimmy: Give the peel one last shake to ensure the pizza is completely free-floating.
- The Launch: Open the oven door. Rest the front edge of the wooden peel on the back edge of the scorching hot pizza steel. Angle the peel upward at a 15-degree angle. Give the peel a confident, quick jerk backward. The pizza will slide right off the semolina ball-bearings and onto the steel. Close the door immediately.
Emergency Protocols: How to Save a Stuck Pizza
Despite your best efforts, mistakes happen. Maybe your friend spilled an entire ladle of sauce off the edge of the dough, cementing it to the peel. Maybe the dough sat for ten minutes while someone took photos for Instagram. Whatever the reason, you go to do the final shimmy, and the pizza is stuck fast.
Do not panic. Do not try to forcefully scrape it into the oven. You will end up with a smoking, burning mess of cheese on your oven floor. You have two emergency protocols.
The Dental Floss Trick
If the pizza is only stuck in one or two small spots, you can perform a surgical intervention. Grab a piece of unflavored dental floss (do not use mint, unless you want a very weird dinner). Pull the floss taut between your hands and slide it underneath the dough, sawing back and forth to sever the gluten bonds holding it to the wood. Once you pass the stuck spot, immediately toss a pinch of semolina under the liberated dough and shimmy it to prevent it from re-sticking. (If you don’t have floss, a long, thin offset spatula works too, but don’t use cheap silicone brushes that make your food taste like soap).
The Calzone Pivot
If the pizza is hopelessly cemented to the peel, the bottom is saturated with sauce, and it is entirely immovable, it is time for the Calzone Pivot.
Accept that this will no longer be a flat pizza. Take a bench scraper or a spatula and gently lift one half of the dough. Fold it completely over the other half, trapping the sauce and toppings inside to form a half-moon shape. Crimp the edges together with your fingers or a fork to seal it.
Now, you have a massive, slightly messy calzone. Because you have folded it, the footprint is much smaller, and it is significantly easier to slide off the peel. Dust the newly exposed peel surface with semolina, shimmy the calzone, and launch it into the oven. Bake it for a few minutes longer than a flat pizza to ensure the thick, folded dough cooks through. Cut it into strips, call it “rustic stuffed pizza bread,” and serve it with a side of marinara for dipping. Your guests will think you are a culinary genius who planned this all along.
Conclusion
Hosting an interactive pizza night should be a joyous, wine-fueled, communal experience, not an exercise in stress management and smoke alarm testing. By understanding the science of hydration, respecting the thermal properties of your equipment, and banishing toxic, cheap gear from your kitchen, you can completely eliminate the friction—both literal and figurative—from your cooking.
Remember: prep your toppings meticulously, rely on the ball-bearing magic of semolina, keep the moisture levels in check, and move with purpose. Treat your dough with respect, invest in a heavy baking steel, and above all, never let a stuck pizza ruin your night. Just fold it, bake it, and pour yourself another glass of wine. You’ve got this. Now go preheat your oven.


