Listen, I know exactly why you are here. You just scraped another layer of charred, unrecognizable carbon off the bottom of your favorite pan, ordered lukewarm takeout for the third time this week, and stared blankly into the abyss of your kitchen wondering where it all went wrong. You are not alone. According to recent 2025 data, while roughly 65% of Americans are cooking at home at least four nights a week, a staggering number of us are absolutely miserable doing it. The average home cook spends nearly an hour a day preparing food, and if that hour is spent battling spitting oil, setting off smoke detectors, and chewing on dry, overcooked chicken, it is no wonder you treat your kitchen like a hostile work environment.
But here is the unfiltered truth: you do not need a culinary degree to make mind-blowing food. You do not need to spend your entire evening crying over a hot stove. As a home cook who learned the ropes by trial, error, and ruining more dinners than I care to admit, I can promise you that professional-level results are completely achievable in a standard home kitchen. You just need to stop making the same easily avoidable rookie kitchen mistakes that everyone else makes.
Weekdays are for survival. Time is money, and we need clever, ruthless efficiency to get dinner on the table. Weekends are when we can pour a glass of wine, play perfectionist, and tackle those intimidating three-page recipes. But before we get to the fun stuff, we need to completely overhaul your baseline kitchen survival skills. We are going to strip away the fluff, throw out the toxic garbage you call cookware, and rebuild your culinary foundation from the ground up. Grab your apron. Class is in session.
The Science of the Sear (Why Everything You Touch Turns to Charcoal)
Let’s talk about heat. The biggest lie ever sold to the home cook is that “high heat equals fast cooking.” No, it does not. High heat equals a burned exterior and a raw interior. Your stove’s dials are not volume knobs; you do not need to crank them to ten just to hear the food sizzle. Understanding thermal dynamics is the first step to taking control of your kitchen.
The Myth of “High Heat Equals Fast Cooking”
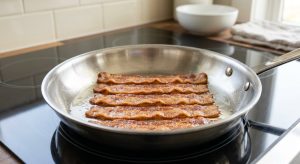
When you drop a piece of food into a hot pan, heat transfers from the burner, through the metal, into the fat, and finally into your food. This is called conduction. The problem is that heat takes time to travel from the surface of the food to its center. If your pan is screaming hot, the outside of your chicken breast will turn to literal ash before the heat has enough time to penetrate the center. You are left with a piece of poultry that is charcoal on the outside and a salmonella hazard on the inside. You must learn to manage your temperature gradients. Medium-high heat is usually the maximum you need for searing, while medium to medium-low is where the actual cooking happens.
The Maillard Reaction Explained for Normal People
Let us take a moment to decode pretentious recipe jargon. You constantly hear TV chefs babbling about the “Maillard reaction.” What is it? Discovered in 1912 by French chemist Louis Camille Maillard, it is the complex chemical reaction between amino acids and reducing sugars that gives browned food its distinctive, savory flavor. It is the reason a seared steak tastes infinitely better than a boiled one, and why the golden crust of a baked loaf of bread is so irresistible.
But here is the kicker: the Maillard reaction happens rapidly in a very specific temperature window, generally between 280°F and 330°F (140°C to 165°C). Once your pan pushes past 350°F (176°C), you are no longer browning; you are burning. You are creating bitter, acrid carbon.
Furthermore, water is the mortal enemy of the Maillard reaction. Water boils and evaporates at 212°F (100°C). If you take a wet piece of meat straight from the packaging and throw it into a pan, the heat energy goes entirely into boiling off that surface moisture rather than browning the meat. You are essentially steaming your steak. Always, always pat your proteins bone-dry with a paper towel before they hit the heat.
Oil Smoke Points: Your Kitchen’s Early Warning System
Why is your kitchen always filled with smoke? Because your smoke alarm is not a kitchen timer, and you are using the wrong fat for the job. Every cooking oil has a smoke point—the exact temperature where it stops shimmering and starts breaking down, releasing visible smoke and bitter, harmful compounds.
If you are trying to sear a pork chop in standard butter, you are doomed from the start. The milk solids in butter burn at a measly 302°F to 350°F. Extra virgin olive oil is fantastic for a gentle sauté or a vinaigrette, but its unrefined nature means it taps out around 325°F to 400°F. If you want to blast something with high heat without triggering your fire alarm, you need a refined oil with a high smoke point. Refined avocado oil is the undisputed king here, holding strong up to 520°F (271°C). Refined safflower oil (up to 510°F) and peanut oil (450°F) are also excellent choices for high-heat applications. Memorize these numbers. Your choice of fat dictates whether you get a golden crust or a kitchen smelling like a tire fire.
Knife Skills That Won’t End in an ER Visit
Cooking should not be a blood sport. If you are terrified of your own knives, it is because you are using them incorrectly, or worse, you are using the wrong knives altogether.
Why Your Dull Knife is a Menace
A dull knife is infinitely more dangerous than a razor-sharp one. This sounds counterintuitive until you understand the physics of chopping. A dull blade requires you to apply excessive downward force to break the skin of a tomato or an onion. When that dull edge inevitably fails to bite and slips off the vegetable, all of that pent-up kinetic energy sends the blade directly into your index finger. A sharp knife does the work for you; it glides through food with minimal pressure.
You do not need a massive wooden block containing 15 useless, serrated blades. You just need one high-quality, 8-inch chef’s knife. Keeping it honed and sharp is one of the most critical beginner kitchen tools and habits you can possibly develop. Pair it with a proper, heavy-duty wooden or plastic cutting board. Glass and marble cutting boards are aesthetic abominations that will instantly destroy your knife’s edge. Throw them away.
The “Claw” Grip: Protecting Your Digits
The way you hold your food is just as important as the way you hold your knife. Enter the “claw” grip. When holding an onion, curl your fingers inward like a bear claw. The tips of your fingers should be tucked away, resting firmly on the food, while the flat side of the knife blade rests gently against your knuckles. As you chop, you slide your claw hand backward. Your knuckles act as a physical shield, making it anatomically impossible to chop off a fingertip unless you actively try to. It feels awkward for the first ten minutes, but it will save you a trip to the emergency room.
Prep Like a Pro: The Magic of Mise en Place
Chaos in the kitchen is a choice. If you are constantly running around like a headless chicken, digging through your pantry for paprika while your garlic burns into bitter little ashes, you are failing at the most basic rule of cooking geometry.
Stop Chopping While the Pan is Smoking
Mise en place is a French culinary term that translates to “everything in its place.” It means you measure, chop, slice, and organize every single ingredient before you even think about turning on the stove. Professional kitchens operate with military precision because everything is prepped in advance.
If you are frantically trying to mince an onion while your oil is already smoking in the skillet, you have already lost the battle. Cooking requires your full attention. Take ten minutes to chop your vegetables, measure your spices into little bowls, and set your proteins on a plate. Once the heat is on, your only job is to orchestrate the cooking process.
Time-Saving Hacks for the Exhausted Weekday Cook
Remember my cardinal rule: time is money on a Tuesday night. If you want to master simple weeknight dinners without losing your mind, you need to minimize friction. You do not get a medal for peeling your own garlic when you are exhausted. Buy the jar of pre-peeled garlic cloves. Utilize frozen vegetables—they are flash-frozen at peak ripeness and are often significantly more nutritious than the sad, wilted broccoli that has been languishing in your crisper drawer for two weeks.
Furthermore, invest in a bench scraper. It is a cheap, flat piece of metal with a handle, and it is the kitchen’s unsung hero. Instead of awkwardly using the delicate edge of your expensive chef’s knife to scoop up piles of diced onions (which dulls the blade), you use the bench scraper to scoop up massive amounts of prep in one swift motion. It cuts your transfer time in half and effortlessly squeegees your cutting board clean.
The Equipment Intervention: Purging the Toxic Trash
I have zero patience for cheap, toxic kitchenware. If you are cooking on a scratched, peeling, $15 non-stick pan you bought at a big-box store half a decade ago, go to your kitchen right now and throw it in the garbage. I am not being dramatic; I am trying to save your physical health and the quality of your food.
The Dark Side of Cheap Non-Stick Pans
Let us look at the cold, hard facts. Traditional non-stick coatings are made from PTFE (polytetrafluoroethylene), commonly known by the brand name Teflon, which belongs to a class of synthetic “forever chemicals” called PFAS. When a cheap non-stick pan is heated past 500°F—which is terrifyingly easy to do if you accidentally leave an empty pan on a hot burner for just a few minutes—the coating begins to break down and release toxic fumes.
Furthermore, when that flimsy coating inevitably scratches or flakes from normal wear and tear, you are actively leaching millions of microplastics and nanoplastics directly into your scrambled eggs. Studies have consistently linked PFAS exposure to a horrifying laundry list of health issues, including liver damage, immune system suppression, reproductive harm, and certain types of cancer. The EPA even designated PFOA (an older PFAS chemical) as a hazardous substance in 2024. Even pans proudly labeled “PFOA-free” often just substitute one under-studied PFAS chemical for another in a shady, unregulated practice known as “regrettable substitution”. Having a reliable kitchen survival guide means knowing what tools can actively harm you and your family. Get this toxic garbage out of your house immediately.
The Holy Trinity of Safe, Indestructible Cookware
If you want professional results, you need professional-grade, non-toxic materials. You only need three types of pans to conquer 99% of your cooking needs. This trio forms the absolute bedrock of your beginner cooking essentials list.
First, Cast Iron. It is virtually indestructible, retains heat like an industrial furnace, and when properly seasoned with polymerized oil, it naturally becomes incredibly non-stick. It is the ultimate tool for achieving a hard sear on a steak or baking a crispy skillet cornbread. And yes, you can wash it with modern dish soap—the myth that soap destroys cast iron originated back when soaps contained harsh lye, which is no longer the case.
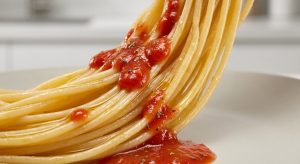
Second, Stainless Steel. It is non-reactive, meaning you can cook highly acidic foods (like a slow-simmered tomato sauce) without stripping the metal or leaching metallic flavors into your food. It is perfect for building rich pan sauces because it actively encourages the formation of a “fond”—those delicious, caramelized browned bits that stick to the bottom of the pan during cooking. You deglaze those bits with a splash of wine or broth, and you have instant culinary gold.
Third, Carbon Steel. It is the lightweight, nimble cousin of cast iron, widely used in professional restaurant kitchens and high-heat wok cooking. It seasons beautifully, becomes naturally non-stick over time, and responds instantly to changes in burner temperature, giving you ultimate control over your sautéing.
Salt, Acid, Fat, Heat: The Four Horsemen of Flavor
If your food tastes like a wet cardboard box, it is not because you lack talent. It is because you do not understand how to season. Cooking without proper seasoning is like trying to paint a masterpiece with invisible ink.
You Are Under-Salting Everything
Home cooks are terrified of salt. Unless your doctor has specifically put you on a low-sodium diet, you need to stop being so stingy. Salt does not just make food taste “salty”; it acts as a chemical amplifier for the natural flavors of the ingredients.
First, throw away your iodized table salt. It contains anti-caking agents and iodine that give food a harsh, metallic aftertaste. Switch exclusively to Kosher salt. Its large, flaky crystals are easy to pinch between your fingers, allowing you to visually gauge exactly how much you are adding. Furthermore, you need to season from up high. If you sprinkle salt from two inches above the pan, it clumps in one spot. If you sprinkle it from eight to ten inches above the food, it distributes in an even, uniform blanket. Season your food at every stage of the cooking process—season the onions when they hit the pan, season the sauce as it simmers, and taste it before you serve.
The Secret Power of Acid (Lemon/Vinegar)
Here is a culinary secret that will change your life: when a dish tastes “flat” or “heavy,” and you know you have already added enough salt, it does not need more salt. It needs acid.
Acid cuts through rich fats, brightens dull flavors, and balances the entire palate. Think about why we squeeze fresh lime juice over a heavy, fatty pork taco, or why a rich, creamy hollandaise sauce requires a splash of lemon. If your heavy beef stew or your rich pasta sauce feels like it is missing a certain je ne sais quoi, stir in a teaspoon of apple cider vinegar, a splash of balsamic, or a squeeze of fresh lemon juice right at the end of the cooking process. The transformation is instantaneous and miraculous.
Meat Mastery: Stop Making Shoe Leather
Cooking meat is the number one source of anxiety for kitchen newbies. There is a primal fear of giving your dinner guests food poisoning, which usually results in home cooks obliterating their chicken breasts into dry, stringy sawdust. It is time to stop the madness.
Why You Need a Meat Thermometer Yesterday
I am going to let you in on a horrifying statistical reality: according to recent consumer surveys, only about 27% of home cooks actually use a meat thermometer when preparing meals. Furthermore, a staggering 29% of people admit they “never” use one to check food temperatures. This is absolute, unadulterated madness. You cannot accurately tell if a thick chicken breast is safely cooked to 165°F by poking it with your index finger or by slicing it open to “see if the juices run clear.”
Cooking meat based on recipe times is a fool’s errand. Every oven is calibrated differently, the starting temperature of the meat varies wildly depending on how long it sat on the counter, and the thickness of the cut is never uniform. If you want to cure cooking anxiety instantly and permanently, spend $20 on a high-quality, instant-read digital meat thermometer. It takes the guesswork out of the equation entirely. You insert the probe into the thickest part of the meat, read the digital number, and you know with 100% scientific certainty whether your food is safe and perfectly cooked.
The Carryover Cooking Phenomenon
Here is the second reason your meat is always overcooked: carryover cooking. Heat does not magically stop transferring the second you pull a sizzling steak out of the pan. Because the exterior of the meat is exposed to direct heat, it is significantly hotter than the interior. Once removed from the heat source and placed on a cutting board, that exterior thermal energy continues to travel inward, raising the internal core temperature.
For small steaks, pork chops, or chicken breasts cooked over high heat, this carryover effect can raise the internal temperature by 5 to 13°F. For large beef roasts or whole Thanksgiving turkeys, the core temperature can jump anywhere from 8 to 14°F (or even up to 20°F depending on how aggressively high the oven temperature was).
If you wait until your steak hits a perfect 145°F in the pan before taking it out, carryover cooking is going to push it to 155°F while it rests, turning your beautiful medium-rare cut into a tragic, gray hockey puck. Always pull your meat off the heat 5 to 10 degrees before it reaches your final target temperature. And for the love of all things culinary, let the meat rest. If you slice into it immediately, the muscle fibers (which tightened up under the heat) will not have time to relax, and all the flavorful juices will bleed out all over your cutting board instead of staying inside the meat.
Rescuing Disasters: How to Pivot When Things Go South
Even the most experienced cooks mess up. Pans get too hot, hands slip with the salt shaker, and garlic burns. The difference between a novice who throws their hands up in defeat and an expert who saves the meal is simply knowing how to pivot.
Too Salty? Too Spicy? Too Bland? The Fixes.
If you accidentally over-salt a soup or a sauce, do not panic. You cannot chemically “remove” salt, but you can dilute the concentration. Add more unsalted broth, toss in some neutral starches (like diced potatoes) to absorb some of the liquid, or stir in a splash of heavy cream. A dash of acid (like vinegar or lemon juice) can also trick the palate and balance the aggressive salinity.
If you make a chili or a curry aggressively spicy to the point of pain, dairy is your best friend. A dollop of full-fat sour cream, yogurt, or a heavy pour of coconut milk contains casein, a specific protein that binds to capsaicin (the chemical compound that makes chilis hot) and literally washes it away from your taste receptors.
If your dish is just overwhelmingly bland and boring, refer back to the four horsemen of flavor. It likely needs a heavy pinch of Kosher salt and a bright, finishing squeeze of fresh lemon juice. If you burn the bottom of a stew, do NOT scrape the bottom of the pot. Immediately and gently pour the unburnt top portion into a clean pot, leaving the charred disaster behind. Learning these clever pivot techniques is the ultimate secret to surviving kitchen disasters without resorting to a desperate, tear-filled pizza delivery.
Conclusion: Your Kitchen, Your Rules
Cooking is not a genetic talent; it is a learned survival skill, much like driving a car or doing your taxes. It requires patience, a willingness to make mistakes, and the right foundational knowledge. You are going to burn a few more things. You are going to over-salt a sauce. That is part of the process.
But by understanding how heat actually works, ditching the toxic equipment that holds you back, investing in a thermometer, and respecting the chemistry of flavor, you are taking back control of your kitchen. Stop treating your stove like an enemy combatant. If you internalize these rules and give yourself a little bit of grace, you are well on your way to transforming your daily cooking from a dreaded, smoke-filled chore into a genuinely enjoyable, creative, and delicious daily habit. Now go sharpen your knife, throw away that peeling Teflon pan, and make yourself something amazing for dinner. You’ve got this.