The Heartbreak of the Oil Slick: Why Your Gravy Is Ruining Dinner
Let us set the scene. You have spent your entire Sunday afternoon lovingly tending to a gorgeous, expensive piece of meat. Maybe it is a butter-rubbed turkey, a pristine prime rib, or a perfectly trussed roast chicken. The house smells incredible. Your guests are salivating. You pull the roast from the oven, set it aside to rest, and turn your attention to the pan drippings. This is where the magic happens, right? This is where you transform those deeply caramelized, flavor-packed juices into a rich, glossy, mind-blowing pan sauce.
Except, that is not what happens.
Instead, you whisk up a concoction that looks less like a Michelin-starred sauce and more like a catastrophic crude oil spill. It is broken, it is heavy, and it coats the back of a spoon—and the roof of your mouth—with a thick, unctuous layer of pure grease. You try to whisk it back together, but it aggressively separates, mocking your culinary ambitions. You serve it anyway, watching your beautiful mashed potatoes drown in a puddle of translucent, floating fat.
Listen to me: you do not have to live like this. As a home cook, you are entirely capable of producing restaurant-quality, velvet-smooth sauces without a culinary degree. The problem is not your technique, your recipe, or your cooking skills. The problem is your equipment. Specifically, you are trying to fight the immutable laws of fluid dynamics with a tablespoon.
I have zero patience for pretentious chef-speak, but I also have zero patience for bad kitchen habits that ruin perfectly good food. Today, we are going to dive deep into the absolute genius of the bottom-release fat separator. We are going to explore the physics of liquid density, dissect the mechanical advantage of bottom-draining tools, and permanently eliminate the frustration of oily, broken gravies from your life. Grab a glass of wine, pull up a stool, and let us fix your pan sauces once and for all.
The Physics of Pan Drippings: Why Fat Always Wins
To understand why your gravy is greasy, we have to endure a brief, painless science lesson. Do not roll your eyes; understanding what is happening inside your roasting pan is the first step to mastering it.
When you roast a piece of meat, three primary elements render out and collect in the bottom of your pan:
- Water: Released from the muscle fibers of the meat as they contract under heat.
- Proteins and Carbohydrates: These undergo the Maillard reaction, browning and sticking to the bottom of the pan to create the “fond.”
- Lipids (Fat): The intramuscular fat and subcutaneous fat that melt down at high temperatures.
Here is where the physics come into play. Water has a specific gravity of 1.0. Animal fats (like beef tallow, chicken schmaltz, or pork lard) have a specific gravity ranging from 0.90 to 0.94 [1]. Because fat is less dense than water, it floats to the top.
In a perfect, static world, this would be easy to deal with. You would just wait for the two distinct layers to separate and pour the fat off. However, a hot roasting pan is not a static environment. When these liquids are hot, the kinetic energy creates convection currents. The fat and water are constantly swirling, intermingling, and attempting to form temporary, unstable emulsions.
If you try to make a gravy while the fat-to-liquid ratio is drastically skewed toward the fat, your emulsion will break. A standard gravy relies on a starch (like flour in a roux) to bind the fat and the aqueous stock together. But a roux can only absorb so much fat. If you introduce a massive slick of unseparated pan grease into your roux, the starch physically cannot encapsulate the lipid molecules. The result? The emulsion shatters, leaving you with a greasy, watery mess.
The Futility of Spoon-Skimming (And Other Terrible Hacks)
If you are like most home cooks, you were probably taught to separate fat using one of several deeply flawed, historically frustrating methods. Let us ruthlessly debunk them right now, because my number one rule for weeknight cooking is that time is money, and we do not have time for nonsense.
The Spoon-Skimming Method
This is the classic technique where you tilt the roasting pan and gently try to skim the floating fat off the top with a shallow spoon. This is an exercise in utter futility. Because the layer of fat is incredibly thin and spread over a wide surface area, you inevitably end up scooping up precious, flavor-packed stock along with the fat. It takes twenty minutes, your arm gets tired, the pan drippings get cold, and you still leave at least thirty percent of the grease behind.
The Freezer Trick
Some well-meaning food bloggers will tell you to pour your pan drippings into a bowl and stick it in the freezer for forty-five minutes until the fat solidifies into a hard disc that you can just lift off. This works wonderfully if you are making stock on a Tuesday for a soup on a Thursday. But if you have a hungry family staring at a resting turkey on Thanksgiving, you do not have forty-five minutes to wait for thermodynamics to do its job.
The Paper Towel Drag
I shudder even mentioning this one. The idea is to lightly drag a paper towel across the surface of the hot liquid to absorb the fat. Not only is this incredibly dangerous (you are dipping paper into boiling hot grease), but it is also wildly inefficient and leaves paper fibers in your sauce.
You need a mechanical solution that works instantaneously. You need gravity to do the heavy lifting for you.
Enter the Bottom-Release Fat Separator
A fat separator is a specialized pitcher designed to exploit the density differences between fat and water. But not all separators are created equal. We must draw a hard line in the sand between the traditional “spout” separator and the modern “bottom-release” separator.
The Problem with Traditional Spout Separators
For decades, the standard fat separator looked like a small watering can. It was a pitcher with a spout attached to the very bottom of the vessel. The idea was that the fat would float to the top, and when you tipped the pitcher to pour, the defatted juices would travel up the spout from the bottom.
In theory, this is fine. In practice, it is a design flaw nightmare.
When you pour hot, unseparated pan drippings into a spout separator, the liquid rushes into the pitcher and immediately fills the spout as well. Because the spout is exposed to the air, the fat inside the spout begins to cool and congeal, creating a greasy plug. When you finally go to pour your defatted liquid, the very first thing that hits your saucepan is that plug of pure fat that was hiding in the spout. Furthermore, as you tilt the pitcher further, the floating fat layer gets dangerously close to the spout opening, requiring a surgeon’s precision to stop pouring before the oil spills over.
The Genius of the Bottom-Release Mechanism
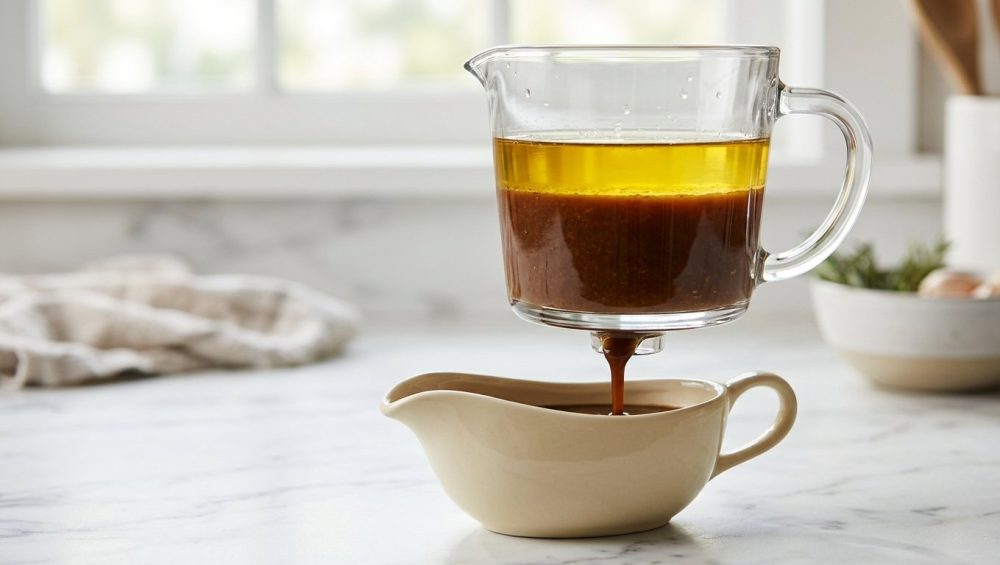
The bottom-release fat separator completely eliminates the spout. It is essentially a large, heat-proof measuring cup with a trap door at the very bottom.
Instead of tilting to pour, you grip a handle equipped with a spring-loaded trigger. When you squeeze the trigger, a silicone valve at the bottom of the pitcher lifts up. Because gravity dictates that the denser, flavor-packed stock sits at the bottom, squeezing the trigger releases only the good stuff straight down into your pan. The fat remains suspended at the top.
You simply watch the liquid level drop. The moment the floating fat layer reaches the bottom valve, you release the trigger. The valve snaps shut, instantly trapping the fat inside the pitcher. It is a flawless, foolproof mechanical operation that takes exactly five seconds. It is the ultimate kitchen hack, and it is the only way to guarantee a perfectly smooth pan sauce.
The Anatomy of a High-Quality Bottom-Release Separator
I am a stickler for quality. I have a strict “no-go” rule on toxic, cheap kitchen gear. If you buy a flimsy, discount-bin fat separator, you are asking for a disaster. Hot grease is dangerous, and cheap plastics will warp, crack, or leach chemicals into your food. Therefore, it’s time we start banishing toxic kitchen gear from our cabinets and investing in tools that actually perform safely under pressure.
When shopping for a bottom-release fat separator, you must scrutinize its anatomy. Here is exactly what you are looking for:
1. The Vessel Material: Tritan Copolyester or Borosilicate Glass
Never buy a standard polycarbonate or cheap acrylic fat separator. When exposed to boiling pan drippings (which can easily exceed 212°F/100°C due to the high heat capacity of the fat), cheap plastics will micro-fracture and leach BPA or BPS into your gravy.
You want a vessel made from either borosilicate glass (the original, thermal-shock-resistant Pyrex material) or Tritan copolyester. Tritan is a modern, hyper-durable, BPA-free polymer that is engineered to withstand high heat without warping or clouding. It gives you the shatter-resistance of plastic with the safety profile of glass.
2. The Oversized Top Strainer
A good separator is not just about isolating fat; it is about clarifying the stock. When you deglaze a roasting pan, you are scraping up caramelized bits of protein, rogue peppercorns, sprigs of thyme, and mushy onions.
Your separator must have a wide, deep, fine-mesh strainer basket that sits securely across the entire top of the pitcher. This basket catches all the solid debris as you pour the drippings in, ensuring you get a perfectly clear liquid in the chamber below. This step is essential for turning burnt bits into sauce with zero stress and maximum flavor extraction.
3. The Silicone Valve and Trigger Mechanism
The heart of the bottom-release separator is the valve. It must be made of high-grade, food-safe silicone. Silicone is heat-resistant and provides a watertight (and fat-tight) seal against the hard plastic or glass of the pitcher.
The trigger mechanism should feel robust and responsive. When you release your grip, the valve should snap shut immediately, without leaking or dribbling. A weak spring will allow precious drops of fat to sneak through, defeating the entire purpose of the tool.
The Masterclass: How to Use Your Separator Like a Pro
Having the right tool is only half the battle. Now, we are going to walk through the exact, step-by-step process of using this mechanical marvel to build a gravy that will make your dinner guests weep with joy.
Step 1: The Deglaze
You have removed your roast from the pan and set it on a cutting board to rest. Your roasting pan is now filled with fat, juices, and crusty brown bits (the fond). Place the roasting pan directly on your stovetop over medium heat.
Pour in a splash of liquid—wine, broth, or even water. As the liquid bubbles, use a wooden spoon to scrape up every single brown bit stuck to the bottom. Do not leave any flavor behind.
Step 2: The Pour
Place your bottom-release fat separator on the counter. Make sure the strainer basket is securely in place. Carefully pour the entire contents of your hot roasting pan through the strainer.
The strainer will catch the soggy mirepoix (onions, carrots, celery) and the large chunks of fond. The liquid—a chaotic mix of stock and fat—will pool in the pitcher below.
Step 3: The Settle
This is the hardest part for impatient cooks: you must do nothing for exactly three minutes.
Walk away. Wipe down a counter. Pour more wine. You must give the physics of density time to work. As the liquid sits undisturbed, the convection currents will slow down, and the golden, clear layer of liquid fat will rapidly rise to the top, leaving the dark, rich, murky stock at the bottom.
Step 4: The Release
Hold your fat separator directly over your saucepan or skillet. Squeeze the trigger.
Watch in awe as the dark, defatted stock drains out of the bottom of the pitcher. Keep your eyes firmly on the floating fat layer as it descends. The moment the fat layer touches the bottom valve, release the trigger. The valve slams shut. You have successfully captured 100% of the flavorful stock and left 100% of the greasy fat trapped in the pitcher.
Step 5: Building the Emulsion
Now you have pure, unadulterated meat jelly in your saucepan. To turn this into gravy, you need a thickener.
If you want a traditional gravy, you need to create a roux. You can actually use a couple of tablespoons of the fat you just separated (because now you control the ratio, not the pan), whisked with an equal amount of all-purpose flour over medium heat. Cook the raw flour taste out for about two minutes.
Next, slowly pour your defatted pan juices into the roux, utilizing the magic of a flat whisk to get into the corners of the pan and obliterate any lumps. The starch molecules will swell and gelatinize, trapping the liquid in a stable matrix. Bring it to a gentle simmer, and watch it thicken into a glossy, luxurious sauce.
If you find that your liquid volume is a bit low, you can supplement it with store-bought broth. Just remember that if you dilute the natural gelatin from the pan drippings too much, your sauce will lack body. If you run into this issue, you need to know how to fix it; otherwise, your pan sauces are watery and lack that luxurious, mouth-coating texture that makes restaurant food so good.
Beyond Gravy: The Hidden Versatility of the Separator
If you think I am telling you to buy a single-use kitchen gadget, you clearly do not know me. I despise clutter, and I demand that my kitchen tools pull their weight. The bottom-release fat separator is not just for Thanksgiving; it is a year-round workhorse that will elevate multiple aspects of your cooking.
Rescuing Heavy Braises and Stews
Weekend cooking projects often involve tough cuts of meat—like short ribs, pork shoulder, or chuck roast—slowly braised in liquid for hours. These cuts are inherently fatty, which is what makes them delicious. But as they braise, all that intramuscular fat melts out into your cooking liquid.
When the braise is done, nobody wants a situation where their beef stew is greasy and heavy on the palate. Instead of trying to skim the massive pot with a ladle, simply strain the braising liquid through your fat separator. Release the rich, deeply flavored wine and beef reduction back over the meat, and discard the cup of pure rendered fat. This is the ultimate secret to ensuring you get perfectly tender beef without a slick of oil ruining the final presentation of your dish.
Perfecting Homemade Bone Broth
If you are taking the time to simmer chicken carcasses or beef bones for 12 to 24 hours, you are extracting a massive amount of marrow and fat. While some fat is good for flavor, too much will cause your broth to emulsify violently if it boils too hard. In fact, aggressive boiling of un-skimmed fat is the exact mechanical action that forces lipids to permanently suspend in the water, and it’s the reason your homemade chicken broth turns cloudy despite your best efforts.
By passing your finished, strained broth through a bottom-release separator before storing it, you ensure a crystal-clear, professional-grade consommé that gels beautifully in the fridge.
Rendering Cooking Fats
Do not throw that separated fat away! If you roasted a chicken, the fat trapped in your separator is pure liquid gold: schmaltz. If you roasted a prime rib, you have freshly rendered beef tallow.
Pour this captured fat into a clean glass jar and store it in the fridge. You can use it later to roast potatoes, sear steaks, or even bake savory pastries. Because the separator removed all the water and meat particles from the fat, it will have a much longer shelf life and a higher smoke point.
The Art of the Pan Sauce: Why Temperature Control Matters
Let us return to the pan sauce for a moment, because simply separating the fat is only step one. A truly great pan sauce requires an understanding of thermal dynamics.
When you drain your defatted stock into a pan, the pan you choose matters immensely. A thin, cheap aluminum skillet will create hot spots that can scorch your delicate fond reduction. You want to be whisking in your curved saucier pan to ensure smooth, continuous agitation without any sharp corners where the sauce can burn and stick.
Furthermore, once your sauce is reduced and thickened, you must take it off the heat before the final, most crucial step: mounting it with butter (monter au beurre).
If you whisk butter into a boiling sauce, the butterfat will instantly melt and separate, breaking your emulsion and putting you right back where you started with a greasy slick. You must remove the pan from the heat, let the bubbling subside, and whisk in small cubes of heavily chilled butter. The cold butter lowers the temperature of the sauce slightly, allowing the butterfat to emulsify smoothly into the liquid, finishing it with the magic of cold butter for a glossy sheen and a velvety mouthfeel that cannot be replicated any other way.
Care, Maintenance, and Avoiding the Dishwasher Trap
A bottom-release fat separator is a precision tool, and it requires proper maintenance. Because you are dealing with liquid lipids, cleaning it can be annoying if you do not know what you are doing.
Fat is hydrophobic. Water alone will not clean it, and cold water will instantly solidify the fat inside the valve mechanism, clogging it permanently.
The Immediate Rinse
The moment you are done using your separator, you must rinse it with the hottest water your tap can produce. Squeeze the trigger and run boiling hot water directly through the silicone valve to flush out any residual grease.
The Soap Soak
To break down the lipid bonds, you need a high-quality, grease-cutting dish soap. Fill the separator with hot water and a generous squirt of dish soap. Use a sponge to wipe down the interior walls. If you let fat sit on plastic for too long, it will polymerize and create a sticky film, so your plastic containers stay greasy no matter how much you scrub them later.
The Dishwasher Warning
Many manufacturers claim their Tritan fat separators are “top-rack dishwasher safe.” As your sassy, skeptical sous-chef, I am telling you to ignore them.
The extreme heat of a dishwasher’s drying cycle, combined with harsh, abrasive enzymatic detergents, will eventually degrade the silicone seal on the bottom valve. Once that silicone warps or dries out, your separator will leak, rendering it useless. Hand wash this tool. It takes sixty seconds, and it will ensure your separator lasts for a decade.
The Home Cook’s Manifesto: Work Smarter, Not Harder
Cooking should be a joy, not a battle against the elements. When you struggle with a greasy gravy or a broken pan sauce, it is so easy to blame yourself. You think you did not whisk fast enough, or you used the wrong flour, or you just lack the “touch” that professional chefs have.
That is nonsense. Professional chefs do not rely on magic; they rely on an understanding of food science and the proper tools to execute their vision.
Spoon-skimming is a relic of the past. It is a tedious, inaccurate chore that punishes you for roasting a beautiful, well-marbled piece of meat. By investing in a high-quality, bottom-release fat separator, you are outsmarting the physics of your kitchen. You are using gravity to your advantage, effortlessly isolating the pure, concentrated flavor of your hard work from the heavy, cloying grease that threatens to ruin it.
You deserve to sit down at your dining table, pour a glass of wine, and serve a meal that looks and tastes like it came out of a high-end restaurant kitchen. You deserve a gravy that is silky, rich, and perfectly balanced.
So throw away the cheap plastic watering cans. Stop burning your fingers with paper towels. Stop waiting for the freezer to do your job. Get yourself a bottom-release fat separator, embrace the simple genius of mechanical advantage, and go make the best damn pan sauce of your life. You’ve got this.