
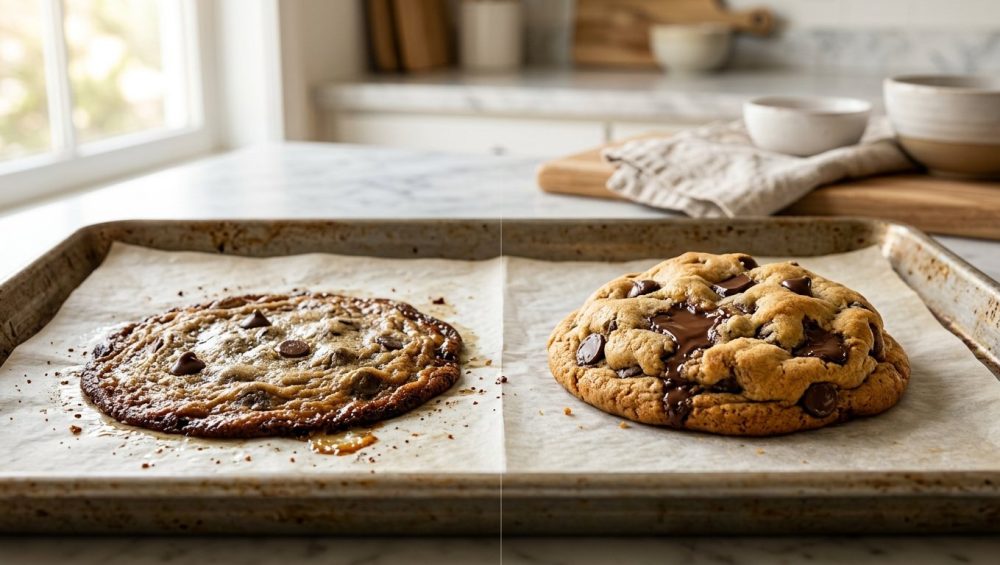
The Tragedy of the Flat Cookie Puddle
We have all been there. It is a Friday night. You have survived another soul-crushing week of endless emails, pointless meetings, and rush-hour traffic. The only thing standing between you and a complete mental breakdown is the promise of a warm, bakery-style chocolate chip cookie. You did everything right, or so you thought. You splurged on the good European butter, you bought the artisanal chocolate chunks that cost as much as a decent bottle of wine, and you even sprung for the real vanilla extract instead of that imitation nonsense.
You mixed the dough, scooped it onto the pan, and slid it into the oven with the eager anticipation of a child on Christmas morning. But twelve minutes later, the timer goes off, and you open the oven door to a scene of absolute culinary devastation. Instead of thick, chewy, beautifully domed cookies, you are staring at a singular, conjoined, greasy mega-puddle. The edges are burnt, the center is raw, and the chocolate chips are drowning in a shallow sea of melted butter.
It is a tragic, infuriating moment. You might even blame yourself, assuming you lack some innate baking gene that only pastry chefs possess. But let me stop you right there. If your spread into giant puddles, it is not a curse from the baking gods, and it certainly does not mean you are a bad cook. It is just basic thermodynamics.
As a home cook who has set off the smoke detector more times than I care to admit, I am here to tell you that professional-level baking does not require a culinary degree. It requires an understanding of how ingredients react to heat. Weekday dinners are all about speed and survival, but weekend baking? That is where we become absolute perfectionists. And the single most important secret to achieving that thick, chewy, gloriously craggly bakery-style texture has nothing to do with a secret ingredient. It has everything to do with temperature control. Specifically, the magical, transformative power of chilling your dough.
Grab a glass of wine, pull up a stool, and let us dive deep into the fascinating, slightly nerdy, but entirely accessible science of why your cookies melt, and how your refrigerator is about to become your best friend.
The Baking Science Behind the Slump
To understand why chilling works, we first have to understand why cookies spread in the first place. I promise I will not bore you with pretentious chef-speak, but we do need to talk a little bit of science. Baking is, after all, just edible chemistry.
When you put a ball of raw cookie dough into a hot oven, you are kicking off a high-stakes race between three major physical transformations: the melting of the fat, the swelling of the starches, and the setting of the proteins. Who wins this race completely dictates the final shape and texture of your dessert.
The Role of Butter and Melting Points
Butter is the undisputed flavor king of the pastry world, but it is also highly volatile. Standard butter has a melting point that hovers right around 90°F to 95°F (32°C to 35°C). If you are mixing your dough in a warm kitchen, or if you softened your butter in the microwave because you forgot to take it out of the fridge (do not lie, we have all done it), your dough is already dangerously close to that melting threshold before it even sees the inside of an oven.
When warm dough hits a 350°F oven, the butter liquefies almost instantly. As the butter turns to liquid, the structural integrity of the dough ball collapses. The dough spreads outward rapidly, carrying the sugar and flour along with it, creating a thin, flat disc.
The Role of Starch Gelatinization
While the butter is busy melting and running all over your baking sheet, the flour is desperately trying to build a structure to hold everything together. Flour contains starches, and when starches are exposed to moisture and heat, they swell and set in a process called gelatinization.
Here is the catch: flour starches do not begin to properly gelatinize until they hit about 140°F to 150°F (60°C to 65°C).
Do you see the problem here? The butter melts at 90°F, but the flour does not build its structural walls until 140°F. If your dough goes into the oven at room temperature (let’s say 72°F), the butter reaches its melting point in a matter of seconds, long before the starches can get their act together. The butter wins the race, the cookie slumps, and you are left with a sad, greasy puddle.
Egg Protein Coagulation
To make matters even more complicated, the eggs in your dough act as the ultimate binding glue, but egg proteins do not fully coagulate (set) until they reach temperatures between 145°F and 158°F (63°C to 70°C).
So, to summarize the oven dynamics: your butter is liquifying at 90°F, while your starches and proteins—the very things needed to hold the cookie up—are sitting around waiting for the internal temperature to hit 145°F. The only way to prevent the butter from melting out of the dough before the structure sets is to give the starches and proteins a massive head start. How do we do that? We make the butter freezing cold.
What Actually Happens When You Chill Dough?
When you take that bowl of freshly mixed dough, cover it tightly, and banish it to the back of the refrigerator, you are not just making it cold. You are fundamentally altering its chemical structure. If you want to stop baking flat cookies, you have to respect the resting period. Three incredible things happen during this time.
Fat Solidification: Building a Structural Fortress
The most immediate and obvious benefit of chilling your dough is that it re-solidifies the butter. When you chill dough down to an optimal core temperature of 38°F to 42°F (3°C to 6°C), the butter fat crystallizes and becomes rock hard.
When you eventually put this cold dough ball into the hot oven, the heat has to work much harder, and much longer, to penetrate the center of the dough and melt the fat. This delay is exactly what the flour and eggs need. By the time the cold butter finally reaches its 90°F melting point, the outer edges of the cookie have already reached 140°F. The starches have gelatinized, the egg proteins have coagulated, and a firm structural wall has been built around the cookie. The butter melts inside this newly formed fortress, keeping the cookie thick, tall, and beautifully dense in the center.
Flour Hydration: The Secret to Chewy Perfection
The second magical thing that happens in the fridge has nothing to do with temperature and everything to do with time. Flour is a dry, thirsty ingredient. When you first mix your dough, the flour coats the wet ingredients (the eggs and the water content in the butter), but it does not instantly absorb them.
Given time to rest in the refrigerator, the flour acts like a sponge, slowly and evenly absorbing the moisture in the dough. This hydration process does two things. First, it dries out the dough slightly, making it firmer and less prone to spreading. Second, fully hydrated flour starches create a remarkably chewier, more cohesive texture. Have you ever baked a batch of cookies right after mixing and noticed a slightly gritty, sandy texture? That is unhydrated sugar and flour. A chilled dough yields a smooth, luxurious, bakery-level chew.
Enzymatic Breakdown and the Maillard Reaction
This is where we separate the casual bakers from the weekend culinary artists. As the dough sits in the fridge, naturally occurring enzymes in the flour begin to slowly break down the complex carbohydrates (starches) into their component parts: simple sugars.
Why does this matter? Because simple sugars caramelize much faster and more beautifully than complex starches. When you bake a dough that has been resting for an extended period, these newly formed simple sugars undergo a spectacular Maillard reaction—the chemical reaction between amino acids and reducing sugars that gives browned food its distinctive flavor.
Culinary legend Kenji López-Alt famously tested this by chilling chocolate chip cookie dough for up to 72 hours, proving that this extended enzymatic activity creates a cookie with profound, toffee-like, butterscotch notes that a freshly baked cookie simply cannot replicate. The flavor becomes richer, deeper, and infinitely more complex.
Time vs. Temperature: The Ultimate Chilling Guide
So, we have established that chilling is mandatory for perfection. But how long is enough? Like most things in the kitchen, the answer depends entirely on how much time you have and what kind of result you are willing to accept.
The 30-Minute Emergency Chill
Listen, I get it. Sometimes it is a Wednesday night, you have had a terrible day, and you need a cookie immediately. Thirty minutes in the fridge (or 15 minutes in the freezer) is the absolute bare minimum.
Will this give you the deep, complex, toffee flavors of a fully aged dough? Absolutely not. Thirty minutes is nowhere near enough time for flour hydration or enzymatic breakdown. However, it is enough time to slightly drop the temperature of the butter. A 30-minute chill will prevent the cookie from spreading into a completely flat puddle, giving you a moderately thick result. It is a survival tactic, not a masterclass technique, but it works in a pinch.
The 2-Hour Sweet Spot
If you have a modicum of patience, two hours is the standard sweet spot for most home bakers. At the two-hour mark, the butter has fully solidified all the way to the core of the dough ball. The flour has had enough time to absorb a significant amount of moisture, meaning the texture will be noticeably chewier and less gritty. The cookies will bake up thick, with beautiful domed centers and crispy edges. If you are baking for a casual weekend gathering, a two-hour chill will yield fantastic results.
The 24 to 72-Hour Bakery Secret
Welcome to weekend perfectionist mode. If you want to make a cookie that will literally make your friends and family weep with joy, you must age the dough for 24 to 72 hours.
At this stage, the hydration is absolute. The enzymes have had days to break down the starches into simple sugars. When these cookies hit the oven, they brown incredibly evenly, developing a dark, craggly, caramelized exterior that tastes intensely of butterscotch and rich toffee. The texture is a masterclass in contrast: deeply crispy on the outside, yet dense, fudgy, and chewy on the inside.
Do not push it past 72 hours, though. After three days, the dough begins to dry out too much, and the leavening agents (baking soda and powder) start to lose their efficacy, resulting in a dense, heavy brick of a cookie.
The Toxic Gear Rant: Why Your Pans Are Ruining Your Life
Now, we need to have a serious conversation about the equipment you are using to bake these cookies, because I have absolutely zero patience for cheap, toxic kitchenware. You can chill your dough for three days and use the most expensive butter on the planet, but if you are baking on garbage equipment, you are wasting your time and risking your health.
Far too many home cooks are using flimsy, dark-coated, non-stick baking sheets they bought for ten dollars at a discount store. These pans are usually coated with PTFE (polytetrafluoroethylene), which belongs to a family of chemicals known as PFAS, or “forever chemicals”. Not only do these dark coatings absorb heat too quickly—causing the bottoms of your cookies to burn before the centers are cooked—but they are genuinely hazardous.
When cheap non-stick coatings are exposed to high heat, or when they inevitably begin to scratch, flake, and peel, they can release toxic fumes and leach microplastics directly into your food. If you have a baking sheet in your kitchen right now that is peeling, flaking, or scratched to hell, I want you to walk into your kitchen and throw it in the trash. Right now. I am serious.
What should you be using instead? You need a heavy-duty, commercial-grade bare aluminum sheet pan. Aluminum is an exceptional conductor of heat, meaning your cookies will bake evenly from edge to edge without scorching the bottoms. Furthermore, thick, heavy-gauge aluminum will not warp. If you have ever been terrified by a loud “POP” in the oven and wondered why your baking sheets keep warping, it is because cheap, thin metal cannot handle thermal expansion. Invest in a heavy bare aluminum pan; it will outlive you.
To prevent sticking on bare aluminum, use unbleached parchment paper. It is safe, non-toxic, and creates a perfect barrier that promotes even baking. I know silicone baking mats are incredibly trendy right now, and while they are safe and reusable, they have a hidden flaw for cookie baking. Silicone is an insulator. It actually slows down the transfer of heat from the pan to the bottom of the cookie. If you find that your cookies won’t crisp on the bottom and are spreading too much despite being chilled, ditch the silicone mat and go back to good old-fashioned parchment paper.
Other Culprits: When Chilling Isn’t Enough
Let’s play devil’s advocate. You followed the rules. You chilled the dough for 48 hours. You are using a pristine, heavy-duty bare aluminum pan with parchment paper. You bake the cookies, and… they still spread into puddles. What on earth happened?
Chilling the dough is the ultimate defense against spreading, but it cannot fix fundamental errors in your baking environment or your recipe execution. If your chilled cookies are still failing, one of these four culprits is to blame.
Your Oven is Lying to You
Home ovens are notorious liars. You might set the digital dial to 350°F, but the actual internal temperature could be 310°F or 390°F. If your oven is running too cold, the starches in the flour will not gelatinize quickly enough to set the structure, even if the dough was chilled. The butter will eventually melt in the low heat, and the cookie will spread.
Do yourself a massive favor and spend five dollars on a simple oven thermometer. Hang it from the center rack and let it tell you the truth. You will likely find that you need to adjust your oven’s setting to achieve a true 350°F.
You Botched the Flour Measurement
Baking is a science of ratios. The ratio of fat to flour dictates the structure of the cookie. If you do not have enough flour in your dough, there simply are not enough starches present to absorb the melting butter, and the cookie will spread regardless of how cold it is.
If you are measuring your flour by jamming a plastic measuring cup into a densely packed bag of flour, you are doing it wrong. This method packs the flour tightly, often resulting in 20% to 30% more flour than the recipe intended, which leads to dry, cakey cookies. Conversely, if you lightly sift it, you might have too little. You must stop scooping your flour blindly. The only foolproof way to measure baking ingredients is by weight. Buy a digital kitchen scale. It is the single most important tool for a home baker, ensuring your fat-to-flour ratio is mathematically perfect every single time.
The Butter Was Too Warm to Begin With
When a recipe calls for “room temperature” butter, it does not mean butter that has been sitting in a 80°F kitchen all afternoon until it resembles mayonnaise. Ideal room temperature butter for creaming is actually quite cool: between 62°F and 68°F. It should yield slightly to a firm press of your thumb, but it should not be greasy or melting.
If you cream butter that is too warm (over 70°F), the fat emulsion breaks, and it will not hold the air bubbles necessary for lift. The resulting dough will be permanently compromised, and even chilling it later won’t fully restore its structure.
Now, there are specific recipes that intentionally call for melted butter. Using melted butter makes cookies chewier and denser because it bypasses the aeration of creaming and fully hydrates the flour immediately. However, if you use a melted butter recipe, chilling the dough is absolutely non-negotiable, as the butter is already in a liquid state.
Expired Leavening Agents
Baking soda and baking powder provide the lift that keeps cookies from falling flat. If your baking soda has been sitting open in the back of your pantry since the last presidential election, it is dead. Without that chemical lift, the dough has no upward trajectory and will simply spread outward. Test your baking soda by dropping a spoonful into some vinegar; if it bubbles vigorously, it is alive. If it just sits there, throw it away.
The Step-by-Step Foolproof Weekend Cookie Protocol
Alright, we have covered the science, the gear, and the troubleshooting. Now, let us put it all together into a foolproof, step-by-step masterclass protocol for the ultimate weekend baking project. Follow these steps, and you will achieve bakery-level perfection in your own home kitchen.
Step 1: The Mise en Place
Weigh all of your ingredients using a kitchen scale. Ensure your butter is at a cool room temperature (around 65°F). Gather your heavy-duty bare aluminum sheet pans and parchment paper.
Step 2: The Creaming Process
Combine your butter and sugars in a stand mixer. Cream them together on medium speed for exactly 3 to 4 minutes. Do not rush this. You are punching microscopic air bubbles into the fat, which will later expand in the oven to give the cookie lift. If the butter looks greasy or is separating, it was too warm.
Step 3: The Hydration
Add your eggs one at a time, mixing until just combined. Then, gently fold in your dry ingredients (flour, salt, baking soda). Do not overmix here; you do not want to develop tough gluten strands. Fold in your chocolate chunks.
Step 4: The Pre-Portioning
Do not chill the massive bowl of dough as a single solid block, or you will need a jackhammer to scoop it later. Instead, portion the dough immediately while it is soft. Use a mechanical scoop to ensure every single dough ball is the exact same size; if you freehand it, your cookies bake unevenly, with small ones burning before the large ones are cooked.
Step 5: The Long Chill
Place the pre-scooped dough balls into an airtight container, or place them close together on a baking sheet and wrap the entire sheet tightly in plastic wrap to prevent them from absorbing fridge odors. Banish them to the refrigerator for 24 to 72 hours. Let the enzymes do their magical work.
Step 6: The Bake
When you are ready to bake, preheat your oven to 350°F (verified by your oven thermometer). Line your bare aluminum pan with parchment paper. Arrange the cold, rock-hard dough balls on the pan, leaving at least two inches of space between them. Do not let them sit on the counter to warm up; they must go from the fridge directly into the hot oven.
Bake until the edges are golden brown and set, but the centers still look slightly soft and underbaked. Remove them from the oven and let them sit on the hot baking sheet for exactly five minutes. The residual heat will finish cooking the centers gently. Finally, transfer them to a wire rack to cool completely.
Frequently Asked Questions (The Snarky Edition)
Because I know you are going to ask, here are the answers to the most common objections I hear from impatient home bakers.
“Can I just freeze the dough to speed up the chilling process?”
You can, but you are cheating yourself. Freezing the dough will rapidly solidify the butter, which will stop the cookies from spreading. However, freezing temperatures completely halt the enzymatic activity and slow down the flour hydration. You will get a thick cookie, but you will completely miss out on the deep, caramelized, toffee flavor development that only happens during a slow, 48-hour chill in the refrigerator.
“I chilled my dough in one giant bowl, and now it is a literal rock. What do I do?”
Congratulations, you skipped Step 4 of the protocol. Cold butter is as hard as a stone. You have two options: leave the bowl on the counter for 30 to 45 minutes until it softens just enough to scoop (which defeats the purpose of chilling it in the first place), or chisel away at it with a heavy-duty spoon and risk a repetitive strain injury. Always pre-scoop your dough before chilling.
“Does this chilling rule apply to all cookies?”
It applies to almost all drop cookies that rely on a high ratio of butter to flour, such as chocolate chip, oatmeal raisin, and snickerdoodles. It does not necessarily apply to delicate piped cookies (like spritz cookies) or macarons, which have entirely different structural rules. But if it contains a stick of butter and you drop it onto a pan, chill it.
“Can I bake the cookies straight from the freezer?”
Yes! If you have aged your dough in the fridge for 48 hours to develop the flavor, you can then transfer the scooped dough balls to a freezer bag and keep them frozen for up to three months. When the craving strikes, you can bake them directly from frozen. Just add 2 to 3 minutes to the total baking time.
Baking is not magic, my friends. It is a beautiful, predictable science. Respect the ingredients, respect the temperature, throw away your toxic non-stick pans, and give your dough the time it needs to rest. Your weekend baking projects will never be the same. Now get into the kitchen and show that butter who is boss.






