
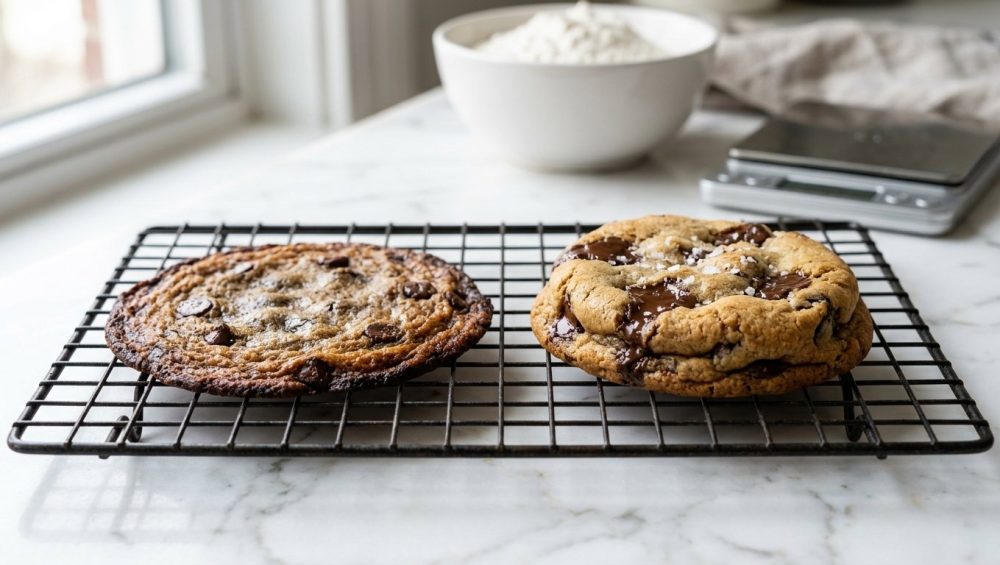
You spend twenty bucks on premium European butter, artisanal chocolate chips, and imported vanilla bean paste. You diligently mix your dough after a chaotic workweek, pop it into the oven, and wait for those thick, bakery-style mounds of perfection to emerge. Instead, the timer dings, and you pull out a baking sheet covered in one massive, greasy, conjoined mega-puddle. Congratulations, you have just baked a cookie crepe.
We have all been there, and it is infuriating. But before you throw your whisk across the kitchen and swear off baking forever, let’s get one thing straight: you do not need a culinary degree to fix this. You just need to understand a little bit of physics and chemistry.
As weekend culinary hobbyists, our time is precious. During the week, we survive on thirty-minute meals and ruthless efficiency, which buys us the luxury of treating our weekend baking as an elaborate, perfectionist project. We want professional-level results in a standard home kitchen, and the good news is that those results are entirely within your reach.
Recent industry data from 2026 shows a fascinating shift in our kitchens. While everyday casual baking has seen a slight dip, the demand for what experts call “intentional indulgence” is skyrocketing. We aren’t just baking to pass the time anymore; we want high-definition emotional experiences. We want the thickest, chewiest, most structurally sound cookies imaginable. But to achieve that, we have to stop treating baking like a casual suggestion and start treating it like the aggressive chemistry experiment it actually is.
In this definitive masterclass, we are going to leave absolutely no stone unturned. We will dissect the thermodynamics of butter, the hydration rates of flour, the hidden dangers of your baking sheets, and the exact thermal triggers that cause your dough to melt outward before it sets. Grab a coffee, put on your apron, and let’s fix your flat cookies once and for all.
The Thermodynamics of a Cookie (Or Why Baking is Just Aggressive Chemistry)
To stop your cookies from spreading into a sad, greasy puddle, you first have to understand what actually happens when a ball of dough enters a 350°F (175°C) oven. It isn’t magic; it is a rapidly ticking clock of thermal reactions.
When you put cookie dough into the oven, a precise, molecular sequence of events kicks off. First, the dough begins to heat up, and the fat (usually butter) starts to melt. At around 90°F (32°C), the butter transitions entirely from a solid to a liquid. As this happens, the dough loses its structural integrity and begins to spread outward. This is the danger zone.
At the same time, the sugar in your dough dissolves into the melting butter, turning into a liquid syrup. This further thins out the dough, encouraging even more lateral spread. If nothing else were to happen, your cookie would just melt into a thin glaze across the pan.
However, salvation is on the way. As the internal temperature of the cookie climbs past 144°F (62°C), the proteins from the eggs begin to uncoil and coagulate, forming a web that gives the cookie its permanent structure. Shortly after, around 158°F (70°C), the starches in the flour begin to gelatinize. They absorb the free moisture in the dough and swell up, locking the cookie’s shape into place.
Finally, as the surface temperature exceeds 300°F (150°C), the Maillard reaction occurs. Amino acids and reducing sugars break down and recombine to form hundreds of brand-new flavor compounds, giving the cookie its golden-brown edges and complex, caramel-like taste.
The battle against cookie spread is entirely about timing. It is a high-stakes race between the melting of the fat (which causes spreading) and the setting of the proteins and starches (which stops spreading). If your butter melts too quickly, or your proteins and starches take too long to set, the dough will spread into a puddle before the structure can lock it in. Every single trick, hack, and scientific principle we are about to discuss is designed to manipulate this timeline—slowing down the melt, speeding up the set, and giving you perfectly thick, chewy cookies.
Culprit 1: The Butter Temperature Traps
Let’s talk about the most common offender in the home kitchen: warm butter.
Butter is a delicate emulsion of butterfat (usually around 80% to 82%), water (around 15% to 18%), and milk solids. It is a fragile matrix that is highly sensitive to temperature. When a recipe calls for “room temperature” butter, it is setting a massive trap for the average home cook.
In a professional bakery, “room temperature” means 65°F to 68°F (18°C to 20°C). At this temperature, the butter is pliable enough to be indented with a gentle press of your finger, but it still holds its shape and feels distinctly cool to the touch. In your home kitchen in the middle of a sweltering July afternoon, “room temperature” might be 78°F (25.5°C).
At 78°F, the crystalline fat network of the butter is already beginning to collapse. The emulsion is breaking, and free oil is being released. If your dough temperature exceeds 75°F (24°C) before it even goes into the oven, that oil will migrate outward the second it hits the heat. The butter will melt long before the egg proteins have a chance to coagulate, causing excessive spread and a greasy, fried texture around the edges of the cookie.
This is why the temperature of your dough is non-negotiable. If you start with butter that is too soft, your cookies are doomed from the start. Furthermore, the creaming process—beating butter and sugar together to aerate the dough—relies entirely on the structural integrity of the fat. If the butter is too warm, it cannot trap the air bubbles created by the jagged edges of the sugar crystals. Without those air pockets, your leavening agents (like baking soda) have nowhere to expand, resulting in a dense, flat disc rather than a lifted, chewy mound.
While it is true that melted butter makes cookies chewier in certain specialized recipes, those specific formulas are mathematically calibrated for liquid fat and rely heavily on altering the flour ratios to compensate. For standard recipes, you must control the temperature.
The ultimate defense against warm butter is the refrigerator. Once your dough is mixed, you must chill it. This isn’t an optional step for overachievers; it is a chemical necessity. Chilling the dough drops the temperature of the butterfat back down, re-solidifying it into a firm state. When cold dough enters a hot oven, the fat takes significantly longer to melt, buying the proteins and starches the precious time they need to set the cookie’s structure before it spreads. This is exactly why relying on the secret power of chilling dough is absolutely critical for success. A minimum of two hours in the refrigerator is mandatory, but resting it for 24 to 72 hours is even better.
Culprit 2: Flour Hydration and Measurement Sabotage
If your butter is perfectly chilled but your cookies are still spreading into puddles, we need to have a serious conversation about how you are treating your flour.
Baking is a science of strict ratios. The relationship between the hydration (the moisture provided by eggs, butter, and vanilla) and the dry ingredients (flour, cocoa powder, leaveners) determines the viscosity of your dough. If your dough has too much moisture and not enough flour, it will spread uncontrollably.
The biggest rookie mistake in the home kitchen is measuring flour by volume. When you scoop a measuring cup directly into a bag of flour, you are compressing the flour into the cup. Depending on how heavily you scoop, a single “cup” of flour can weigh anywhere from 120 grams to 160 grams. If a recipe calls for two and a quarter cups of flour, and you are heavy-handed, you could accidentally add an extra 90 grams of flour—the equivalent of nearly three-quarters of a cup! Conversely, if you lightly spoon and level, you might under-measure. Too little flour means there aren’t enough starches to absorb the melting liquids in the oven, leading directly to a puddle.
You absolutely must stop scooping your flour out of the bag with measuring cups. It is an archaic, inaccurate method that guarantees inconsistent results. To bake like a pro, you must measure by weight. Once you experience the magic of a digital scale, you will never go back. A kitchen scale eliminates all guesswork, ensuring that your hydration ratios are mathematically perfect every single time. 120 grams of flour is always 120 grams, regardless of how aerated or compacted it is in the bag.
Once you have the correct amount of flour, you have to give it time to do its job. Flour is essentially a sponge, but it doesn’t absorb moisture instantly. The proteins (glutenin and gliadin) and starches need time to fully hydrate. When you mix a batch of dough and immediately bake it, the flour hasn’t had a chance to soak up the free water from the eggs and the butter. That free water turns into steam too quickly in the oven, or simply thins out the dough, causing rapid spread.
This brings us back to the refrigerator. While the fridge is solidifying your butter, it is also allowing the flour to fully hydrate. This is precisely why resting your dough in the refrigerator is mandatory for thick cookies. It gives the starches time to absorb the liquid, resulting in a thicker, firmer dough that holds its shape beautifully in the oven. It also allows the enzymes in the flour to break down complex carbohydrates into simple sugars, which accelerates the Maillard reaction and gives you a richer, more complex flavor profile.
Culprit 3: The Sugar Ratio and Hygroscopy
Sugar does a lot more than just make your cookies sweet. In the realm of baking chemistry, sugar is a structural component, a tenderizer, and a liquefier.
When sugar heats up in the oven, it melts into a liquid syrup. This means that, chemically speaking, sugar acts as a “wet” ingredient during the baking process. If your recipe has a disproportionately high amount of sugar compared to flour, that sugar will melt and thin out the dough, causing aggressive spreading.
But not all sugars behave the same way. The ratio of white granulated sugar to brown sugar in your recipe plays a massive role in the final architecture of your cookie.
White sugar (sucrose) is highly crystalline and neutral in pH. Because it does not contain molasses, it melts quickly and encourages spreading, leading to a crispier, thinner cookie with lacy edges.
Brown sugar, on the other hand, is simply white sugar that has been coated in molasses. Molasses is acidic and highly hygroscopic, meaning it actively attracts and holds onto moisture from the air and the surrounding dough. This hygroscopic nature means brown sugar holds onto water tightly, preventing it from thinning out the dough too rapidly.
Furthermore, the acidity in brown sugar is a crucial chemical trigger. When acidic molasses interacts with baking soda (an alkaline leavening agent), a chemical reaction occurs. This acid-base reaction creates carbon dioxide gas, which causes the cookie to puff up vertically rather than spread out horizontally.
If you are constantly battling flat cookies, take a close look at your recipe’s sugar ratio. Swapping out a portion of the white sugar for dark brown sugar will introduce more acidity, more moisture retention, and more vertical lift, resulting in a significantly thicker, chewier cookie.
Culprit 4: The Bakeware Betrayal (And My War on Toxic Pans)
Let’s move away from the ingredients and talk about your equipment, because this is where I usually lose my patience. You can have the most scientifically perfect, well-rested, temperature-controlled dough in the world, but if you put it on the wrong baking surface, you will ruin it.
First, we need to address the great debate between silicone baking mats and parchment paper. In recent years, silicone mats have become incredibly popular because they are reusable and completely non-stick. However, they are often the hidden culprit behind flat, greasy cookies.
Silicone is a fantastic insulator. It actively resists heat transfer. When you bake cookies on a silicone mat, the bottom of the cookie does not receive the immediate blast of conductive heat from the metal pan. This delays the setting of the bottom edges, allowing the cookie to spread for a longer period. Furthermore, silicone is incredibly slippery. As the butter melts and the dough begins to spread, there is absolutely no friction to stop it. The dough just glides outward into a puddle. This lack of friction is a massive flaw in silicone baking mats that ruins high-fat doughs.
Parchment paper, by contrast, provides a slightly textured surface that gives the spreading dough something to grip onto. It also allows for much better heat transfer from the pan to the cookie, ensuring that the edges set quickly. If you want thick cookies, ditch the silicone and use high-quality, unbleached parchment paper.
Now, let’s talk about the pans themselves. I have a strict, uncompromising “no-go” rule when it comes to cheap, toxic kitchenware. If you are baking on flimsy, dark-coated, mystery-metal non-stick pans that you bought for five dollars at a discount store, you are sabotaging your food and potentially your health.
Dark pans absorb heat aggressively, causing the bottoms of your cookies to burn before the centers can cook. More importantly, cheap non-stick coatings (often containing PFAS or Teflon) degrade at high temperatures. While cookies usually bake at 350°F, preheating these pans or using them for other high-heat roasting tasks can cause the toxic coatings to peel, flake, and off-gas into your food. I am fiercely dedicated to banishing toxic kitchen gear from my home, and you should be too.
Instead, invest in heavy-gauge, uncoated, light-colored aluminum half-sheet pans. Commercial-grade aluminum conducts heat evenly and predictably. It reflects heat just enough to prevent the bottoms from scorching while providing a stable, warp-resistant surface. If your cheap baking sheets keep warping under high heat with a loud “pop,” your cookies will slide to one side, pool together, and bake unevenly. Upgrading to heavy-duty aluminum is a one-time purchase that will instantly elevate your baking.
Culprit 5: Oven Lies and Thermal Mass
We need to have a serious talk about trust, specifically why you should never trust the digital display on your oven.
When you set your oven to 350°F (175°C), the oven eventually beeps to tell you it has reached that temperature. It is lying to you. Most home ovens are wildly inaccurate, often fluctuating by 25 to 50 degrees in either direction. Furthermore, ovens heat in cycles, turning the heating element on and off to maintain an average temperature rather than a constant one.
If your oven runs cool—say, it is actually at 310°F when it claims to be at 350°F—the cookies will sit in a warm environment where the butter melts slowly, but the temperature isn’t high enough to trigger the proteins to coagulate or the starches to gelatinize. The dough will just melt and spread endlessly.
To take control of your kitchen, you desperately need a simple oven thermometer to find the truth. This five-dollar tool hangs on the rack and tells you the actual ambient temperature of the oven cavity. If your oven says 350°F but the thermometer says 325°F, you know you need to adjust your dial up by 25 degrees.
Additionally, you must consider the thermal mass of your oven. When you open the door to put the cookies in, you lose a massive amount of heat. If your oven isn’t fully saturated with heat, the temperature will plummet, and your cookies won’t get the initial blast of thermal energy required to set the edges. Always preheat your oven for at least 20 minutes after it claims to be at temperature. The walls of the oven need to be thoroughly heated so they can radiate energy back into the center of the cavity.
Finally, be wary of convection settings. Convection ovens use a fan to blow hot air around the cavity, which is great for roasting a chicken but dangerous for cookies. The moving air speeds up the melting phase before the setting phase can catch up. Recent infrared thermography tests show that baking cookies at 375°F on convection triggers rapid Maillard browning before the internal starch gel sets, leading to burnt edges and raw centers. Stick to 350°F on a conventional bake setting for the best balance of spread and lift.
The Sassy Sous-Chef’s Foolproof Fixes for Thick, Chewy Cookies
We have covered the thermodynamics, the hydration ratios, the sugar chemistry, the equipment, and the oven calibration. Now, let’s distill all this aggressive science into a practical, foolproof action plan. When the weekend rolls around and you are ready to create a culinary masterpiece, follow these non-negotiable rules to ensure your cookies never turn into puddles again.
1. The 24-Hour Chill Rule
Do not bake room-temperature dough. Ever. Once your dough is mixed, wrap it tightly in plastic wrap (or place it in an airtight container) and put it in the refrigerator for a minimum of 24 hours. If you can wait 72 hours, even better. This solidifies the butterfat, fully hydrates the flour, and develops complex, toffee-like flavors that you simply cannot get from freshly mixed dough. When you are ready to bake, scoop the cold dough directly onto your parchment-lined baking sheet.
2. Measure by Weight, Not Volume
Throw your plastic measuring cups in the back of the drawer and use a digital kitchen scale. Weigh your flour, your sugar, and your butter in grams. Precision is the ultimate enemy of cookie spread.
3. The Tall Mound Technique
The physical shape of your raw dough dictates the final shape of the baked cookie. If you roll your dough into flat, even spheres, they will bake into flat discs. Instead, portioning your dough with a spring-loaded cookie scoop guarantees uniform size, but you should take it a step further. Gently mold the scooped dough into tall, vertical cylinders rather than round balls. By making the dough taller than it is wide, it takes longer for the heat to penetrate the center, which slows down the outward spread and results in a thicker center.
4. The “Pan Bang” Method
If you notice your cookies puffing up in the oven and you want to create a denser, chewier texture with crinkly edges, employ the pan-banging technique. About two-thirds of the way through the baking time, open the oven, carefully lift the baking sheet a few inches off the rack, and let it drop down with a firm bang. This forces the puffed center of the cookie to collapse, pushing the dough outward slightly and creating ripples of texture. Repeat this every two minutes until the cookies are done.
5. The “Scoot” Rescue Mission
Sometimes, despite your best efforts, a cookie will spread a little more than you wanted, or it will bake into an asymmetrical blob. You can fix this the second the pan comes out of the oven. While the cookies are still boiling hot and pliable on the baking sheet, take a large round biscuit cutter (or a large mug) that is slightly larger than the cookie. Place it completely over the hot cookie and swirl it around in a rapid circular motion. The edges of the cookie will hit the inside of the cutter, pushing the dough inward and molding it into a perfectly thick, uniform circle.
Baking does not have to be a source of stress, and you certainly don’t have to settle for sad, flat puddles of dough. By respecting the temperature of your butter, giving your flour time to hydrate, ditching your toxic bakeware, and understanding the thermal mechanics of your oven, you can master the art of the perfect cookie. Now get into the kitchen, turn on your scale, and show that dough who is boss.






