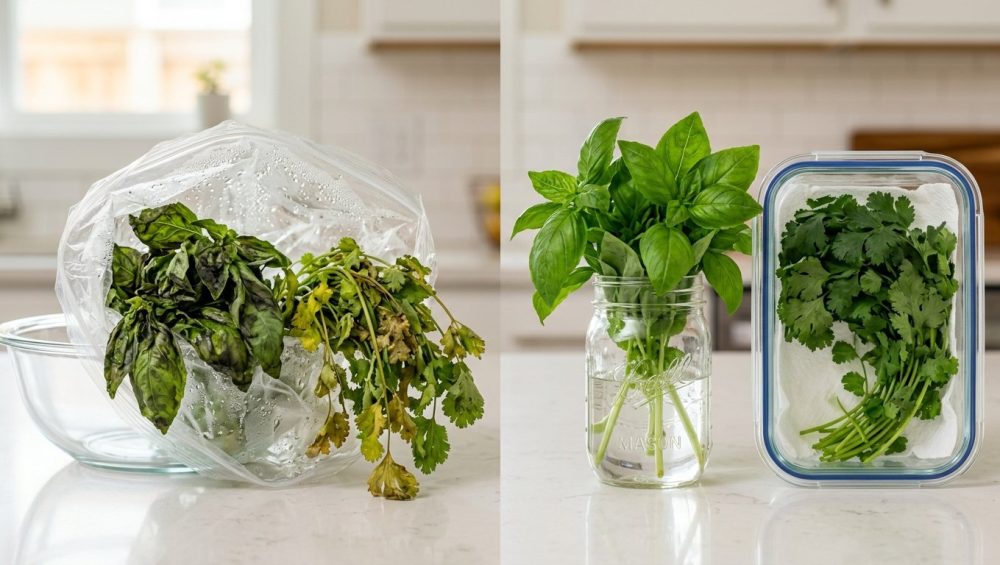
You know the drill. You’re at the grocery store on Sunday, feeling incredibly ambitious. You buy a beautiful, vibrant bunch of fresh cilantro for that weeknight taco Tuesday, and a lush bouquet of basil for a weekend pasta project. You get home, toss them into the crisper drawer in those flimsy plastic produce bags, and pat yourself on the back for being a culinary god. Fast forward to Wednesday. You open the drawer, and what do you find? A puddle of dark green, foul-smelling slime.
You just threw four dollars directly into the garbage. And you’re not alone. According to 2024 data from ReFED, the average American household spends over $760 annually on food that goes uneaten. In fact, consumers account for nearly 50% of all surplus food waste in the United States, costing a staggering $259 billion. Fresh produce, particularly delicate leafy greens and herbs, makes up a massive chunk of that waste. It’s infuriating, it’s expensive, and it’s entirely preventable.
As a home cook who relies on efficiency and flavor, I have zero patience for wasting time or money. I survive my weekdays using clever, time-saving cooking hacks, which buys me the time to be an absolute perfectionist with my elaborate weekend cooking and baking projects. Relying on simple weeknight dinners doesn’t mean you have to sacrifice fresh, vibrant flavors, but it does mean you need your ingredients to actually survive until you’re ready to cook them. We are going to put an end to the green sludge. This isn’t just about throwing away sad veggies; it’s about understanding the fundamental science of why your herbs are dying and implementing dead-simple, scientifically backed storage methods to massively extend their lifespan.
The Cellular Autopsy: Why Your Herbs Are Melting
To stop the rot, you need to understand the enemy. Fresh herbs don’t just “go bad” magically; they undergo specific physiological and chemical degradation processes. When you snip an herb from its root system, it doesn’t immediately die. It is still a living, breathing organism trying to survive. Unfortunately, the environment inside your standard kitchen refrigerator is basically a torture chamber for these delicate plants. Three primary assassins are responsible for turning your beautiful greens into slime: excess moisture, temperature shock, and ethylene gas.
The Drowning Effect: Moisture and Cellular Respiration
Let’s talk about cellular respiration. Even after harvest, herbs continue to take in oxygen and break down stored carbohydrates to produce energy, releasing carbon dioxide, heat, and water vapor in the process. When you leave herbs in a tightly sealed, unventilated plastic grocery bag, that water vapor has nowhere to go. It condenses on the inside of the bag and settles directly on the leaves.
Here is where the biology turns against you. Soft herbs like cilantro and basil have incredibly fragile cell walls. When these leaves are forced to sit in a pool of their own condensed respiration, the water creates a breeding ground for bacteria and mold. The excess moisture effectively suffocates the plant’s stomata (the microscopic pores on the leaves used for gas exchange). The cell walls begin to break down, rupturing and spilling their internal contents. This cellular lysis is exactly what creates that dark, gelatinous slime. It is quite literally the plant melting itself from the outside in.
If you’ve ever wondered why your berries mold so fast in their plastic clamshells, it is the exact same principle. Trapped moisture is the ultimate catalyst for decay.
Temperature Shock and Chilling Injury
Not all herbs belong in the refrigerator. In fact, putting certain herbs in the fridge is a guaranteed death sentence. The most notorious victim of temperature shock is sweet basil (Ocimum basilicum). Basil is a tropical plant. It thrives in warm, sunny environments. When you take a bunch of basil and shove it into a 38°F (3.3°C) refrigerator, it experiences severe physiological damage known as chilling injury.
According to postharvest physiology studies, basil develops moderate to severe chilling injury symptoms when exposed to temperatures below 50°F (10°C). At the cellular level, the cold temperature causes the lipid bilayer of the plant’s cell membranes to lose fluidity. The membranes become rigid and brittle, eventually cracking and leaking vital cellular fluids. This leakage mixes enzymes (specifically polyphenol oxidase) with phenolic compounds that were previously separated inside the cell. When these mix in the presence of oxygen, an enzymatic browning reaction occurs. This is why your basil leaves turn completely black and wither within 24 hours of being refrigerated. It isn’t rotting yet; it is oxidizing and suffering from acute frostbite.
The Ethylene Gas Assassin
The third, and perhaps most insidious, killer of fresh herbs is ethylene gas (C2H4). Ethylene is a naturally occurring, colorless, odorless plant hormone that regulates growth, development, and, most importantly, ripening and senescence (aging).
Many common fruits and vegetables—such as apples, bananas, avocados, tomatoes, and melons—are high ethylene producers. As they sit on your counter or in your crisper drawer, they constantly off-gas ethylene. Many fresh cut herbs are highly sensitive to this gas. When exposed to even minute concentrations of ethylene (as low as 0.1 parts per million), sensitive herbs like parsley, mint, and marjoram undergo rapid yellowing (chlorosis), leaf drop (abscission), and accelerated decay.
If you are storing your delicate parsley in the same crisper drawer as your ripening avocados or apples, you are effectively gassing your herbs to death. The ethylene signals the herb’s cells to rapidly age and die, cutting their shelf life in half, regardless of how well you manage their moisture levels.
Know Your Enemy: Soft Divas vs. Woody Survivors
Before we can implement the proper storage protocols, you must learn to categorize your herbs. You cannot treat a delicate wisp of dill the same way you treat a rugged sprig of rosemary. In the culinary world, we divide herbs into two distinct categories based on their physical structure and moisture content: soft herbs and hard (woody) herbs.
The Fragile Divas (Soft Herbs)
Soft herbs are characterized by their tender, flexible stems and delicate, high-moisture leaves. Because their physical structure is so fragile, they are highly susceptible to bruising, moisture damage, and rapid wilting. These are the herbs that usually end up as slime if you look at them the wrong way.
The primary soft herbs include:
- Cilantro: The quintessential diva. Prone to rapid wilting and highly sensitive to trapped moisture.
- Parsley (Flat-leaf and Curly): Slightly hardier than cilantro, but highly sensitive to ethylene gas.
- Basil: The tropical prima donna. Highly sensitive to cold temperatures and bruising.
- Mint: Aggressive grower, but fragile once cut. Prone to blackening if crushed.
- Dill: Feathery and incredibly delicate. Wilts almost instantly if left exposed to dry air.
- Tarragon: Anise-flavored and tender, requiring careful moisture balance.
- Chives: Hollow and moisture-rich; they turn to mush if stored wet.
The Woody Survivors (Hard Herbs)
Hard herbs, also known as woody herbs, originate mostly from hot, arid, Mediterranean climates. They have evolved to survive harsh conditions, which means they are naturally equipped to survive the harsh conditions of your refrigerator. They feature stiff, woody stems and tough, low-moisture leaves. Because they contain significantly less water than soft herbs, they are much less likely to turn into slime. Instead, their primary mode of failure is simply drying out and losing their essential oils.
The primary woody herbs include:
- Rosemary: Piney, tough, and incredibly resilient.
- Thyme: Tiny leaves on wiry stems; requires minimal babysitting.
- Sage: Velvety, thick leaves that hold up well to cold.
- Oregano: Hardy and robust, though slightly more prone to blackening than rosemary.
- Marjoram: The gentler cousin of oregano, but still structurally sound.
The Sassy Sous-Chef’s Prep Protocol: Immediate Post-Grocery Triage
If you want your herbs to last two to three weeks instead of two to three days, your work begins the absolute second you walk through the door with your groceries. You cannot just toss the plastic bags into the fridge and hope for the best. You need a triage protocol. This is how you avoid beginner cooking mistakes that ruin your ingredients before you even start cooking.
To Wash or Not to Wash?
This is one of the most hotly debated topics in home cooking. Should you wash your herbs as soon as you get them home?
My professional stance: Only wash your herbs if you are fully committed to drying them with absolute, ruthless perfection.
Remember the cellular autopsy? Excess moisture is the enemy. If you rinse a bunch of cilantro under the tap, shake it a couple of times, and put it in a container, it will be dead by morning. The water droplets will suffocate the leaves and invite bacterial rot.
If you choose to wash your herbs immediately (which is helpful for removing field dirt and pesticide residue), you must use a salad spinner. Spin them until you think they are dry, and then spin them again. After that, lay them out flat on a clean, dry kitchen towel or paper towels for at least 30 minutes to allow the ambient air to evaporate any remaining microscopic droplets. If you do not have the time or patience for this, do not wash them until right before you are ready to chop and use them.
The Snipping Technique (The Capillary Action Hack)
Whether you wash them or not, you must trim the stems. When herbs are harvested at the farm, the cut ends of the stems eventually dry out and seal themselves shut. This prevents the plant from absorbing any more water, leading to rapid dehydration and wilting.
Take a sharp chef’s knife or a pair of kitchen shears and snip about half an inch off the bottom of the stems. This exposes fresh, open capillaries in the plant’s vascular system, allowing it to drink water again. This step is non-negotiable for the hydration storage methods we are about to cover. And make sure your knife is sharp; dull blades will crush the capillaries rather than cleanly slicing them. If you find your knives get dull so fast, you need to invest in a honing rod and learn how to use it, because crushing herb stems will accelerate their decay.
The Definitive Storage Masterclass (Method by Method)
We have identified the scientific causes of herb death, categorized our greens, and prepped them for storage. Now, we execute the storage methods. There is no one-size-fits-all solution here. You must match the method to the specific biological needs of the herb.
Method 1: The Bouquet Method (Room Temperature)
Best For: Basil, Mint
Because basil suffers from severe chilling injury in the refrigerator, and mint is highly sensitive to cold-induced blackening, these herbs must be stored at room temperature, exactly like a bouquet of cut flowers.
The Execution:
- Trim the Stems: Snip the bottom half-inch off the stems.
- Strip the Lower Leaves: Remove any leaves that sit low on the stem. You do not want any leaves submerged in the water, as they will rot and foul the water quickly.
- The Jar: Fill a heavy-bottomed glass jar (like a Mason jar) with about two inches of fresh, room-temperature water. Place the herbs in the jar.
- The Greenhouse Effect: To prevent the ambient air in your kitchen from dehydrating the leaves, take a thin plastic produce bag (or a reusable silicone equivalent) and loosely drape it over the top of the herbs. Do not seal it tight at the bottom; you want some airflow to prevent condensation buildup, but enough coverage to trap a humid microclimate around the leaves.
- Placement: Keep the jar on your countertop, out of direct, harsh sunlight. Direct sunlight will act like an oven inside the plastic bag and cook the herbs.
- Maintenance: Change the water every two to three days, or whenever it starts to look cloudy. Snip another millimeter off the stems every time you change the water.
When executed correctly, this method can keep a bunch of sweet basil vibrant, green, and perky for up to two weeks.
Method 2: The Hydration Station (Refrigerator)
Best For: Cilantro, Parsley
Cilantro and parsley love the cold, but they are incredibly thirsty. If you just throw them in the fridge, the cold, dry air circulating from the compressor will suck the moisture right out of their leaves, leaving you with limp, sad greens. They need the cold to prevent rot, but they need continuous access to water to maintain their turgor pressure (the water pressure inside the plant cells that keeps them rigid).
The Execution:
- Trim and Strip: Snip the stems and remove any low-hanging leaves.
- The Jar: Fill a glass jar with an inch or two of cold water and place the herbs inside.
- The Cover: Loosely cover the top of the herbs with a plastic bag or a reusable cover. Again, do not seal it completely airtight; allow a small gap at the bottom for the plant to breathe.
- Placement: Place the jar in the refrigerator. Crucially, keep it away from the very back of the fridge, as the back wall is often the coldest spot and can accidentally freeze the delicate leaves. Also, ensure they are stored far away from any ethylene-producing fruits like apples or pears.
- Maintenance: Change the water every few days.
This method is nothing short of miraculous for cilantro. A bunch of cilantro stored this way can easily last three weeks, maintaining its crisp texture and bright flavor.
Method 3: The Damp Towel Wrap (The Swiss Army Knife of Herb Storage)
Best For: Chives, Dill, Tarragon, and any soft herbs when you don’t have vertical space for jars.
Some soft herbs are too delicate or awkwardly shaped for the jar method. Dill is too feathery, and chives are hollow and prone to waterlogging if stood in a jar. For these, we use the damp towel wrap to achieve the perfect balance of humidity and moisture control.
The Execution:
- The Towel: Take a high-quality paper towel or a clean, lint-free thin cotton kitchen towel. Run it under the tap, and then wring it out with extreme prejudice. You want it to be barely damp—just enough to feel cool to the touch, but absolutely not dripping wet. If it is too wet, you will induce the drowning effect we discussed earlier.
- The Roll: Lay the damp towel flat on your counter. Place the unwashed, dry herbs in a single layer across the towel. Gently roll the towel up into a loose cylinder, swaddling the herbs inside.
- The Container: Place the rolled towel into an airtight container or a high-quality, food-grade silicone bag. Seal it shut.
- Placement: Store it in the crisper drawer of your refrigerator.
The damp towel acts as a humidity regulator. It provides just enough ambient moisture to keep the herbs from drying out in the harsh fridge air, while simultaneously absorbing any excess condensation that the herbs produce through respiration.
Method 4: The Woody Herb Treatment
Best For: Rosemary, Thyme, Sage, Oregano
Woody herbs are tough. They don’t need the intensive hydration of cilantro, nor do they need the greenhouse effect of basil. Their main enemy is simply sitting in stagnant moisture, which will cause their hardy leaves to mold.
The Execution:
- The Dry Towel: Lay out a completely dry paper towel.
- The Wrap: Place the woody herbs on the towel and roll them up loosely.
- The Container: Place the roll into an airtight container or silicone bag.
- Placement: Store in the crisper drawer.
The dry towel will absorb any minor condensation, keeping the woody stems perfectly dry while the airtight container prevents the harsh fridge air from completely desiccating them. They will easily last three to four weeks this way.
The “No-Go” Rule: Ditching Toxic Gear for Herb Storage
As the Sassy Sous-Chef, I have a strict, uncompromising rule when it comes to kitchen equipment: I do not tolerate cheap, toxic garbage. If you are going to the effort of buying beautiful, organic fresh produce, putting it into mystery plastics is a culinary crime.
The Problem with Mystery Plastics and Cheap Bags
Those flimsy, single-use produce bags from the grocery store are not just terrible for the environment; they are terrible for your food. They offer zero structural protection against bruising, and they trap ethylene gas and moisture in the most inefficient way possible.
Furthermore, cheap plastic storage containers are notorious for degrading over time. They leach microplastics and endocrine-disrupting chemicals (like BPA and its equally shady cousins, BPS and BPF) into your food, especially when exposed to acidic ingredients or heat. Have you ever noticed how your plastic containers stay greasy even after you scrub them with dish soap? That’s because the porous nature of cheap plastic absorbs oils, odors, and bacteria. Storing delicate, fresh herbs in a container that harbors rancid oil residue from last week’s leftover spaghetti is a guaranteed way to accelerate rot and cross-contamination.
Safe, Durable Alternatives
If you are serious about banishing toxic kitchen gear from your life, you need to upgrade your storage solutions. Building a beautifully organized dream kitchen starts with investing in materials that are inert, safe, and built to last.
- Borosilicate Glass Containers: Glass is completely non-porous, meaning it will never absorb odors, stains, or bacteria. It provides excellent thermal mass, helping to maintain a consistent temperature for your herbs even when you open and close the fridge door. Look for containers with airtight, silicone-gasket locking lids.
- Food-Grade Platinum Silicone Bags: If you are short on space and want the flexibility of a bag without the toxic nightmare of cheap plastic, invest in 100% pure platinum silicone bags. They are endlessly reusable, dishwasher safe, and do not leach chemicals.
- Stainless Steel: While you shouldn’t store highly acidic foods in stainless steel for long periods, it is perfectly safe and highly effective for storing dry, wrapped woody herbs.
Stop buying gear that actively sabotages your ingredients. Buy it once, buy it right, and enjoy the peace of mind that comes with knowing your food is safe.
Emergency Rescue Protocols: When Your Herbs Are on the Brink
Despite your best efforts, sometimes life gets in the way. You get busy, you forget about that bunch of parsley, and you notice it is just starting to look a little sad and droopy. It isn’t slimy yet, but it has lost its vibrant crispness. Do not throw it away! There are brilliant ways to salvage these herbs before they cross the point of no return.
When weeknights get chaotic, many people resort to ordering out, but learning how to preserve your ingredients is a key step in conquering weeknight cooking anxiety. Here are my favorite emergency rescue protocols.
The Olive Oil Ice Cube Trick
If your soft herbs are starting to wilt, the best way to preserve their flavor is to freeze them in a protective layer of fat. Freezing herbs naked in a bag will cause them to turn black and mushy due to cellular expansion and bursting from ice crystals. But if you suspend them in oil, the fat protects the leaves from freezer burn and oxidation.
- Finely chop the wilting herbs (this works beautifully for basil, parsley, cilantro, and oregano).
- Divide the chopped herbs into the compartments of a silicone ice cube tray.
- Pour high-quality extra virgin olive oil (or melted unsalted butter) over the herbs, filling the compartments.
- Freeze until solid, then pop the cubes out and store them in a silicone freezer bag.
The next time you are making a soup, stew, pan sauce, or sautéing vegetables, just drop one of these flavor bombs directly into the hot pan. Just be careful not to use this method if you are searing meat on high heat, as you risk ruining your nonstick pans with rapidly burning oil and water splatters; use it for low-and-slow cooking or finishing sauces instead.
The Microwave Drying Hack
If you have woody herbs like rosemary, thyme, or oregano that are on their last legs, you can easily dry them yourself. Store-bought dried herbs are often stale and flavorless because they have been sitting in a warehouse for two years. Drying your own leftover fresh herbs yields a vastly superior product.
While you can hang them upside down in a dark room for two weeks, nobody has time for that. Use your microwave.
- Pick the leaves off the stems.
- Lay them in a single layer on a paper towel on a microwave-safe plate.
- Microwave on high in 30-second bursts. Check them after each burst.
- Depending on the moisture content, they will completely dehydrate and become brittle in about 1 to 2 minutes.
- Let them cool completely, crush them up, and store them in an airtight glass spice jar in a dark cupboard.
Compound Butters and Pestos
Fat and salt are the ultimate historical preservatives. If you have a massive amount of herbs that need to be used immediately, turn them into a condiment.
- Compound Butter: Soften a stick of high-quality butter. Finely chop your sad herbs (chives, parsley, and thyme are incredible for this). Mash the herbs into the butter with a heavy pinch of flaky sea salt and a squeeze of lemon juice. Roll the butter into a log using parchment paper and freeze it. Slice off coins of this compound butter to melt over steaks, roasted chicken, or baked potatoes.
- Pesto and Pistou: You don’t just have to use basil for pesto. You can make incredible green sauces using parsley, cilantro, mint, or a combination of whatever you have left. Blend the herbs with garlic, nuts (pine nuts, walnuts, or almonds), parmesan cheese, and a generous glug of olive oil. The oil coats the herbs and prevents oxidation. You can store pesto in the fridge for a week, or freeze it in ice cube trays for months.
Herb-by-Herb Quick Reference Master Guide
To make this completely foolproof, here is your cheat sheet. Print this out, tape it to your fridge, and never throw away green slime again.
Basil
- Category: Soft, tropical.
- Enemy: Cold temperatures (chilling injury at <50°F), bruising.
- Storage Method: Bouquet method. Trim stems, place in a jar of room-temperature water on the counter, drape loosely with a plastic bag. Do NOT refrigerate.
- Lifespan: 1 to 2 weeks.
Cilantro
- Category: Soft, cold-loving, moisture-sensitive.
- Enemy: Trapped moisture on leaves (rot), drying out.
- Storage Method: Hydration Station. Trim stems, place in a jar of cold water in the fridge, cover loosely with a bag.
- Lifespan: 2 to 3 weeks.
Parsley (Flat-Leaf and Curly)
- Category: Soft, cold-loving.
- Enemy: Ethylene gas, drying out.
- Storage Method: Hydration Station. Trim stems, place in a jar of cold water in the fridge, cover loosely. Keep away from apples and avocados.
- Lifespan: 2 to 3 weeks.
Mint
- Category: Soft, volatile oils.
- Enemy: Cold (turns black), bruising.
- Storage Method: Bouquet method (countertop) OR Damp Towel Wrap (fridge). Mint is adaptable, but prefers the jar on the counter if you have space.
- Lifespan: 1 to 2 weeks.
Dill
- Category: Extremely soft, fragile.
- Enemy: Dry air (wilts instantly).
- Storage Method: Damp Towel Wrap. Do not wash until ready to use. Roll gently in a barely damp towel, store in an airtight container in the fridge.
- Lifespan: 10 to 14 days.
Chives
- Category: Soft, hollow.
- Enemy: Excess moisture (turns to mush).
- Storage Method: Damp Towel Wrap. Keep them as dry as possible before wrapping in a barely damp towel. Store in an airtight container in the fridge.
- Lifespan: 10 to 14 days.
Rosemary, Thyme, Sage, Oregano
- Category: Woody, hardy.
- Enemy: Stagnant moisture (mold).
- Storage Method: Dry Towel Wrap. Roll in a dry paper towel, place in an airtight glass container or silicone bag in the crisper drawer.
- Lifespan: 3 to 4 weeks.
Tarragon
- Category: Soft, anise-flavored.
- Enemy: Bruising, dry air.
- Storage Method: Damp Towel Wrap. Treat it gently, roll in a barely damp towel, store in an airtight container in the fridge.
- Lifespan: 10 to 14 days.
Lemongrass
- Category: Woody/Fibrous.
- Enemy: Drying out completely.
- Storage Method: Wrap tightly in a damp towel or plastic wrap and store in the fridge. Can also be chopped and frozen very successfully.
- Lifespan: 3 to 4 weeks.
Conclusion: Stop the Slime, Save Your Dime
Cooking incredible, restaurant-quality food at home doesn’t require a culinary degree, a massive kitchen, or endless hours of free time. It requires a fundamental understanding of your ingredients and a refusal to accept mediocrity.
Allowing your fresh herbs to rot in the bottom of a crisper drawer isn’t just a waste of money; it is a waste of potential flavor. Those bright, aromatic oils are the difference between a heavy, boring weeknight meal and a vibrant, professional-tasting dish. By understanding the cellular mechanics of moisture rot, the dangers of temperature shock to delicate tropicals like basil, and the invisible threat of ethylene gas, you are now armed with the knowledge to stop the decay.
Take the extra five minutes when you get home from the grocery store. Trim the stems. Set up the hydration jars. Wrap the dill in a barely damp towel. Ditch the toxic, cheap plastic containers for high-quality borosilicate glass. Treat your ingredients with the respect they deserve, and they will reward you with weeks of fresh, mind-blowing flavor. Now go rescue that cilantro before it’s too late. Happy cooking.


