Listen up, weekend warriors. We need to have a serious chat about your baking habits. You know the scene all too well. You’ve spent your precious Saturday afternoon meticulously measuring flour, creaming butter and sugar until it’s perfectly fluffy, and folding in those expensive, artisanal chocolate chips you splurged on at the specialty market. You slide the pan into the oven, dreaming of thick, chewy, bakery-style perfection. But twenty minutes later, you peer through the oven glass and pull out a single, greasy, interconnected sheet of sadness. A literal cookie puddle.
If you are exhausted by watching your hard work melt away, and you are tired of seeing your cookies spread into giant puddles, you have come to the right place. I have zero patience for pretentious chef-speak, so I am going to give it to you straight. You do not need a pastry degree from a French culinary institute to fix this. You do not need magic. You just need to understand the secret power of temperature control.
Chilling your dough is the ultimate, non-negotiable trick to stop baking flat cookies, and it requires absolutely zero extra physical effort—just a little bit of patience. As a home cook, you have a distinct advantage over commercial bakeries: you control your own time. While weekdays are for rushing and surviving, the weekend is when we get to be absolute perfectionists. Today, we are going to dive deep into the thermodynamics, the chemistry, and the sheer culinary magic of what happens when you simply leave your dough alone in the refrigerator.
The Anatomy of a Cookie Puddle: Why Spreading Happens
Before we can fix the problem, we have to understand the crime scene. Why do cookies spread in the first place? It all comes down to a high-stakes race that happens the exact second your baking sheet enters a hot oven. It is a violent thermodynamic battle between the melting point of your fats and the setting point of your proteins and starches.
One of the most common rookie kitchen mistakes is assuming that the moment the dough comes together in the mixing bowl, it is perfectly ready for the oven. But raw cookie dough is essentially a fragile suspension of unhydrated flour, granulated sugar, and solid fat. When you put room-temperature dough into a 350-degree Fahrenheit oven, the structural integrity is immediately put under siege.
Butterfat and the Melt-to-Set Ratio
Let’s talk about butter. Standard American butter is roughly 80 percent butterfat, 16 to 18 percent water, and a small percentage of milk solids. Softened butter—the kind you use to cream your sugar—should actually be sitting right around 65 to 67 degrees Fahrenheit. At this temperature, it is pliable enough for the sharp edges of sugar crystals to cut into the fat and trap tiny air bubbles, but it is not melting. However, butter begins to fully melt and turn into a liquid puddle at around 90 to 95 degrees Fahrenheit.
Now, think about your oven. It is blasting ambient heat at 350 degrees. If your dough goes in at 68 degrees, it only takes a few minutes for the butter inside that dough to reach 90 degrees and liquefy. When the butter liquefies, the trapped air bubbles collapse, the structural integrity of the dough fails, and the cookie begins to spread outward across the hot pan.
Meanwhile, the structural components of your cookie—the egg proteins and the gluten network in the flour—do not begin to coagulate and set until they reach about 144 to 160 degrees Fahrenheit. Do you see the mathematical problem here? If the butter melts at 90 degrees, but the walls of the cookie don’t harden until 160 degrees, you have a massive temperature gap where the dough is essentially a free-flowing liquid. The longer it takes for the edges to set, the wider and flatter your cookie becomes.
The Role of Flour Hydration
The second culprit in the anatomy of a flat cookie is unhydrated flour. When you mix your wet and dry ingredients, the flour particles are suddenly introduced to the water content from the eggs and the butter. But flour is incredibly stubborn. It is extremely dry right out of the bag (usually containing only about 10 to 14 percent moisture), and it does not absorb liquid instantly.
If you bake the dough immediately after mixing, the flour hasn’t had time to soak up that liquid. The water remains “free” within the dough. When this free water hits the intense heat of the oven, it turns into steam and evaporates rapidly, while the unabsorbed sucrose (sugar) melts into a liquid syrup. The combination of rapidly melting butter, liquid sugar syrup, and unhydrated flour results in a structurally weak dough that immediately surrenders to gravity.
The Science of Chilling Dough: What Actually Happens in the Fridge
So, how does the refrigerator solve this thermodynamic nightmare? Chilling cookie dough is not just about making the dough cold; it is about fundamentally altering the chemical structure of the ingredients over time. When you place that bowl of dough into the fridge, three distinct, highly scientific processes begin to take place. If you want to turn your chaotic baking sessions into a peaceful daily habit where you consistently produce flawless results, you must respect these three phases.
Solidifying the Fat: Buying Time in the Oven
The most immediate benefit of chilling your dough is that it drops the temperature of the butterfat from a pliable 68 degrees down to a rock-solid 38 degrees Fahrenheit. This simple temperature shift completely rewrites the math of the melt-to-set ratio we talked about earlier.
When you put a 38-degree ball of dough into a hot oven, the ambient heat has to work significantly harder—and take significantly longer—to penetrate the dense center of the dough and melt the butter. By forcing the butter to start from a much colder temperature, you are buying precious time. As the butter slowly warms up and begins to melt, the outer edges of the cookie are already rapidly approaching that crucial 160-degree coagulation mark.
Because the edges set and harden before the center has a chance to fully liquefy, the cookie is physically trapped in a thicker, taller shape. The spread is halted in its tracks. This is the exact reason why professional bakery cookies are so impressively thick and dense, while immediate-bake home cookies look like sad, greasy crepes.
Hydrating the Starches: Chewier Texture and Concentrated Flavor
The second phase of the chilling process is where the texture truly transforms. As the dough sits in the cold environment of the refrigerator, the flour finally has the time it needs to act like a sponge. The starches slowly and methodically absorb the free water from the eggs and the butter.
This hydration process does two incredible things. First, it thickens the dough naturally. Because the water is now trapped inside the swollen starch granules rather than floating freely, the dough becomes remarkably firmer and inherently less prone to spreading. Second, it concentrates the flavor. As the free moisture is absorbed, the dough actually dries out very slightly. This lower moisture content means that when the cookie bakes, the sugars are more concentrated, leading to a much chewier, denser final texture.
Enzyme Activity: Breaking Down Carbohydrates
Now we reach the deepest, most fascinating layer of baking science: enzymatic autolysis. Let’s decode pretentious recipe jargon for a second. Autolysis simply means the self-digestion or breakdown of complex molecules by naturally occurring enzymes over a period of resting.
Flour contains enzymes called amylases and proteases. As the dough rests in the fridge, these microscopic workers go to work. Amylase breaks down the complex carbohydrates (starches) in the flour into simple sugars, primarily maltose. Meanwhile, protease breaks down the complex gluten proteins into simpler amino acids.
Why on earth do you care about this? Because simple sugars and amino acids are the exact chemical building blocks required for the Maillard reaction. The Maillard reaction is the complex chemical process responsible for browning and developing deep, savory, roasted flavors in cooked food. By allowing the enzymes to break down the starches into simple sugars, you are essentially supercharging the dough’s ability to caramelize. A cookie baked from aged dough will brown more evenly, crisp up beautifully on the edges, and develop profound, toffee-like, butterscotch notes that a freshly mixed dough simply cannot achieve.
The Optimal Chill Time: How Long is Long Enough?
At this point, you are hopefully convinced that the refrigerator is your greatest culinary ally. But exactly how long do you need to wait? The answer depends entirely on your schedule, your patience, and whether you are trying to survive a frantic Tuesday night craving or execute a flawless Sunday afternoon masterpiece.
The 30-Minute Rush (Weekday Acceptable)
Listen, I get it. Time is money. Sometimes it is a Wednesday night, you have had a terrible day at the office, and you need a warm chocolate chip cookie immediately to preserve your sanity. In these emergency scenarios, a 30-minute chill is the absolute bare minimum.
Thirty minutes in the fridge is not enough time to achieve meaningful flour hydration, and it certainly won’t trigger any deep enzymatic flavor development. However, it is enough time to drop the temperature of the butterfat. This brief chill will solidify the fat just enough to prevent the catastrophic, paper-thin spreading of a warm dough. You won’t get the complex, aged butterscotch flavors of a bakery cookie, but you will get a respectable, reasonably thick treat to salvage your evening.
The 24-Hour Sweet Spot (The Weekend Standard)
If you have the foresight to plan ahead, 24 hours is the golden standard for the home cook. This is where the magic truly begins to happen. At the 24-hour mark, the flour has fully hydrated. The dough will feel noticeably different in your hands—firmer, drier, and more clay-like.
During this window, the amylase enzymes have had enough time to break down a significant portion of the starches into simple sugars. When you bake a 24-hour dough, you will notice a dramatic improvement in the browning of the cookie. The edges will be perfectly crisp, the center will be dense and chewy, and the flavor will have a distinct, caramelized depth that makes your dinner guests ask for your secret recipe.
The 72-Hour Maximum (For the Truly Obsessed)
For the absolute perfectionists, the culinary hobbyists, and the weekend warriors who refuse to settle for anything less than extraordinary, we have the 72-hour chill. This is the benchmark established by legendary pastry chefs like Jacques Torres and heavily researched by food science experts like Kenji López-Alt.
At 72 hours, the dough has reached its absolute peak of flavor development. The enzymatic breakdown has produced a massive amount of simple sugars and amino acids, resulting in a cookie that tastes astonishingly complex. It will boast a rich, buttery, toffee-like crunch on the outside, with a center that bends and pulls like fresh caramel.
However, 72 hours is the absolute limit. Beyond three days, the dough begins to dry out too much, the hydration process tips over into staleness, and the raw eggs can begin to introduce funky off-flavors. If you haven’t baked the dough by day three, you need to transfer it to the freezer immediately.
Beyond the Fridge: Other Sneaky Culprits Behind Flat Cookies
Alright, so you’ve patiently chilled your dough for 48 hours. You bake it, and… it still spreads into a puddle. What gives? If you have strictly controlled the temperature of your dough but are still ending up with flat cookies, the problem is no longer your ingredients. The problem is your equipment.
Your Baking Sheets Might Be Betraying You
I have a very strict rule about banishing toxic kitchen gear from my house, and cheap, flimsy baking sheets are at the absolute top of the hit list. If you are baking on thin, dark-coated, non-stick baking pans you bought for five dollars at a discount store, you are actively sabotaging your own efforts.
Dark metal absorbs and conducts heat far more aggressively than light metal. When you put a dark pan into the oven, the bottom of the cookie heats up way too quickly, causing the butter to melt and the bottom to burn before the rest of the cookie can set. Furthermore, thin pans warp under high heat. If your baking sheets keep warping with a loud, violent “pop” the second they hit a 350-degree oven, they are creating an uneven, slanted surface that forces the melting dough to pool into the corners.
Throw out the flimsy dark pans. Invest in heavy-gauge, light-colored, uncoated aluminum half-sheet pans. They distribute heat evenly, they never warp, and they allow the cookie to bake gently and consistently.
The Silicone Mat Conspiracy
This is going to be controversial, but I need to speak my truth: silicone baking mats are highly overrated for cookies. Yes, they are reusable and eco-friendly, but there is a massive, hidden flaw in silicone baking mats that nobody talks about.
Silicone is a thermal insulator. It actually impedes the transfer of heat from the metal pan to the bottom of your cookie. Because the heat is blocked, the bottom of the cookie takes longer to set, which encourages spreading. Furthermore, the surface of a silicone mat is incredibly slick. When the butter melts, the dough has absolutely nothing to grip onto, so it just slides outward like a car on an icy road.
To make matters worse, silicone holds onto grease. Over time, these mats develop a microscopic layer of baked-on fat that is nearly impossible to wash off, making the surface even more slippery and causing your cookies to spread even further. Do yourself a favor and switch to unbleached parchment paper. Parchment provides just enough microscopic texture for the dough to grip as it expands, resulting in a thicker cookie with a beautifully crisp bottom.
Oven Calibration and Hot Spots
Never trust the digital display on your oven. Home ovens are notorious liars. You might set it to 350 degrees, but the internal temperature could be hovering anywhere from 315 to 385 degrees. If your oven is running too cool, the edges of the cookie won’t set fast enough to trap the melting butter, and the dough will spread. If you are using a convection setting (the one with the fan), the circulating hot air will melt the butter even faster, which is why you generally need to drop the temperature by 25 degrees when using convection.
Buy a cheap, independent stainless steel oven thermometer and hang it from the center rack. It is the only way to know the true temperature of your baking environment. Additionally, always bake cookies one sheet at a time on the middle rack. Overcrowding the oven disrupts the airflow and leads to wildly uneven baking.
The Masterclass Technique: Step-by-Step to Thick, Bakery-Style Cookies
Now that you understand the deep science of the chill and you have thrown your terrible dark pans in the trash, let’s walk through the exact, foolproof workflow for achieving bakery-level perfection.
Pre-Chill Prep: Mixing and Portioning
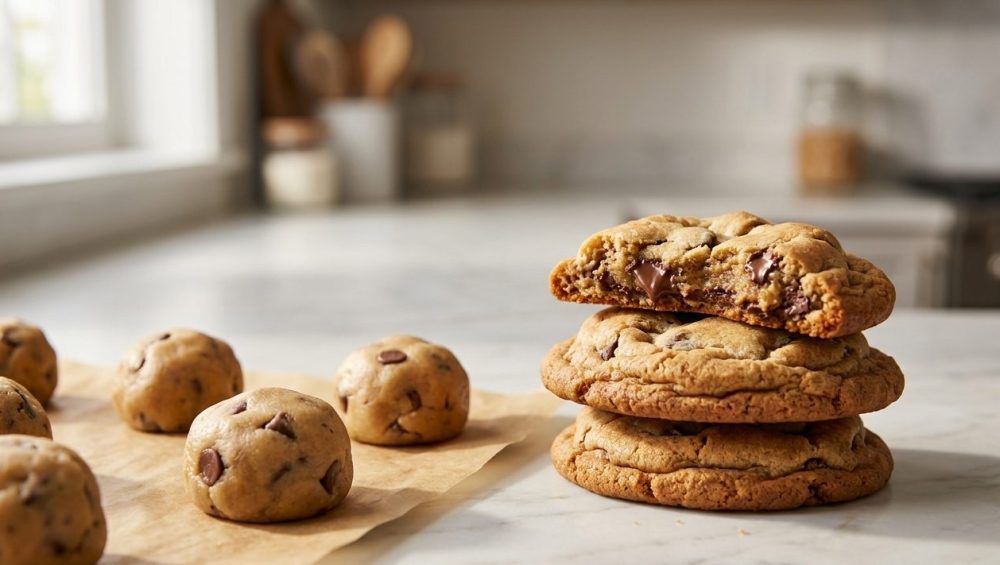
Once your dough is mixed, do not put the entire massive bowl into the fridge. Hydrated, chilled cookie dough is as hard as concrete. Trying to scoop 72-hour chilled dough out of a mixing bowl will result in bent spoons, sore wrists, and immense frustration.
Instead, portion your dough before you chill it. Use a spring-loaded cookie scoop to portion the soft dough into perfectly uniform balls. Place them close together on a parchment-lined tray or in an airtight container. Make sure you are using a high-quality bowl scraper or a sturdy wooden spoon to get every last bit of dough, unless you want to find out why your cheap silicone spatulas taste like soap when they begin to break down and leach into the fat of the dough.
The Chill Phase: Environment Matters
When you place your portioned dough balls into the fridge, you must protect them from the environment. Refrigerators are full of circulating odors from yesterday’s garlic chicken and that half-cut onion sitting on the bottom shelf. Fat is highly absorbent and will eagerly soak up those ambient smells.
Wrap the tray tightly in multiple layers of plastic wrap, or place the dough balls into a heavy-duty, airtight container. Let them rest undisturbed for your chosen timeframe—ideally between 24 and 72 hours. Let the enzymes do their job.
The Bake: Temperature and Timing
When it is finally time to bake, preheat your oven (and verify the temperature with your independent thermometer). Line a heavy-gauge aluminum baking sheet with fresh parchment paper.
Take the dough balls directly from the refrigerator and place them onto the baking sheet, leaving at least two to three inches of space between them. Do not let the dough sit on the counter and come to room temperature. The entire point of this exhaustive process was to get the butterfat freezing cold. Bake them straight from the fridge.
Because the dough is cold, you may need to add one or two extra minutes to your standard baking time. Watch the edges: you are looking for a deep, golden-brown ring, while the center should still look slightly puffy, pale, and underbaked. Pull the pan from the oven and let the cookies cool on the hot baking sheet for exactly five minutes. The residual heat of the pan will gently finish cooking the center without drying it out.
Frequently Asked Questions About Chilling Cookie Dough
To wrap up this masterclass, let’s address the most common questions I get from home cooks who are just starting to experiment with dough temperature. Consider this your essential kitchen survival guide for all things sugar, flour, and butter.
Can I Freeze the Dough Instead?
Yes and no. Freezing dough is a fantastic way to preserve it for future cravings, but freezing is not a substitute for the initial chill. The extreme sub-zero cold of the freezer actually halts the enzymatic activity and completely stops the hydration process. If you put freshly mixed dough straight into the freezer, you will successfully solidify the fat, but you will miss out on all the incredible flavor development and texture improvements of autolysis.
The best practice is to chill the dough in the refrigerator for 24 to 48 hours to let the magic happen, and then transfer the aged dough balls into a freezer-safe bag for long-term storage. When you want a cookie a month from now, you can bake them directly from frozen—just add a few more minutes to the timer.
Do I Bake Them Straight from the Fridge?
Yes. I cannot stress this enough. I see so many amateur recipes that tell you to chill the dough overnight and then let it sit at room temperature for an hour before baking. This completely defeats the primary structural purpose of the chill! We want that butterfat to be as cold as possible when it hits the hot oven so that the edges set before the center melts. Take the dough from the fridge, put it on the pan, and put the pan immediately into the oven. Period.
Does This Apply to All Types of Cookies?
This science applies primarily to “drop cookies”—anything that relies on heavily creamed butter, sugar, and flour. This includes your classic chocolate chip cookies, oatmeal raisin, snickerdoodles, and peanut butter cookies.
However, this rule does not universally apply to all baked goods. Delicate, piped cookies like French macarons rely on entirely different structural mechanics (whipped egg white meringues) and do not benefit from a multi-day fridge rest. Similarly, shortbread cookies, which contain no eggs and very little moisture, do not require extensive hydration times, though they do benefit from a brief chill to keep their sharp, cut-out shapes intact during the bake.
Baking is a science, but it is an incredibly rewarding, accessible science. You don’t need expensive equipment or professional training to achieve greatness in your home kitchen. You just need to respect the ingredients, understand the physics of your oven, and have the patience to let time do the heavy lifting. So go mix up a batch of dough, put it in the fridge, and walk away. Your weekend self will thank you.