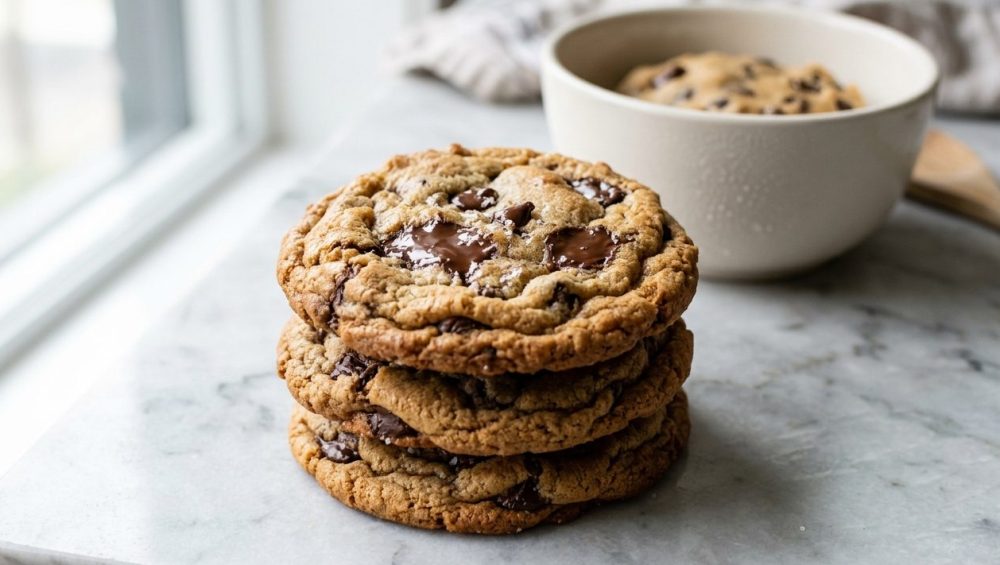
Listen up, weekend baking warriors. We need to have a serious heart-to-heart about the absolute tragedy that is pulling a tray of chocolate chip cookies out of the oven, only to find a singular, fused mega-puddle of sad, greasy dough. You followed the recipe. You bought the good chocolate. You even softened the butter exactly like the instructions demanded. So why are your cookies spreading into translucent discs that look like they belong under a microscope rather than on a dessert platter?
Because you were impatient.
I get it. When the cookie craving hits, the idea of waiting 24 hours to eat them feels like a personal attack. I survive my weekdays by hacking my way through 30-minute meals because, frankly, time is money and I have a life to live. But the weekend? The weekend is when we put on our perfectionist pants. The weekend is when we respect the process. And the process demands that you chill out—literally.
Resting your cookie dough in the refrigerator before baking isn’t some pretentious pastry chef flex. It is the fundamental, non-negotiable food science that separates the amateur home cook from the absolute kitchen legend. You don’t need a culinary degree to understand this, and you certainly don’t need to learn how to decode pretentious recipe jargon to execute it. You just need to understand the basic mechanics of hydration, fat solidification, and enzymatic flavor development.
Today, we are diving deep into the microscopic universe of your mixing bowl. We are going to dismantle the anatomy of a flat cookie, expose the cheap kitchen gear that’s actively sabotaging your efforts, and teach you the practical magic of the overnight chill. Grab a glass of wine, pull up a stool, and let’s fix your dessert game once and for all.
The Anatomy of a Cookie Puddle
To understand why resting your dough is the ultimate game-changer, we first need to autopsy the failure. Why do cookies spread in the first place?
When you slide a baking sheet into a 350-degree Fahrenheit oven, a chaotic, high-stakes race begins inside each ball of dough. It is a race between the melting of the fats and the setting of the structure.
Cookie dough is essentially an emulsion of fat (butter) and water (from the eggs and the butter itself), suspended in a network of flour and sugar. As the dough heats up in the oven, the butter begins to melt. When butter melts, the dough loses its structural integrity and begins to spread outward, seeking the path of least resistance. This is basic gravity and thermal dynamics at play.
Simultaneously, the heat is working on the flour and the eggs. The proteins in the eggs begin to coagulate, and the starches in the flour begin to gelatinize and set. This setting process is what ultimately locks the cookie into its final shape and stops the spread.
If the butter melts and liquefies before the outer edges of the cookie have had a chance to set, you get a puddle. The dough just keeps spreading and spreading until it’s paper-thin, resulting in crispy, burned edges and a greasy, dense center. The entire architecture collapses.
When you mix a batch of dough and immediately bake it at room temperature, you are giving the butter a massive head start in this race. The butter is already soft; it only takes a few minutes in the oven to turn into a complete liquid. The flour and eggs, however, take much longer to reach the temperature required to coagulate and gelatinize. The result? A flat, lackluster disc that lacks the chewy, lofty center you were dreaming of.
We fix this by manipulating the starting line of the race. And we do that by putting the dough in the fridge.
The Holy Trinity of Dough Resting (The Science)
I promised you no fluff, so let’s get straight to the hard science. When you wrap your freshly mixed dough and abandon it in the refrigerator for 24 to 48 hours, three distinct, magical processes occur. I call this the Holy Trinity of Dough Resting.
Flour Hydration: The Sponge Effect
When you first mix flour into your wet ingredients, the dough might look homogenous, but on a microscopic level, it’s a chaotic mess. The flour particles are dry, stubborn little sponges that have just been tossed into a pool of egg moisture and melted sugars.
Flour takes time to absorb liquid. It doesn’t happen instantaneously. When you bake dough immediately, the water in the eggs and the butter is still “free” moisture. It hasn’t been fully locked into the starches and proteins of the flour. In the oven, this free moisture turns into steam very quickly, escaping the dough and leaving behind a dry, brittle texture. Furthermore, because the flour hasn’t absorbed the liquid, the dough is physically wetter and slacker, which encourages rapid spreading.
When you rest the dough in the cold environment of your refrigerator, you give the flour the time it desperately needs to hydrate. The starches slowly absorb the moisture from the eggs and the butter. As this happens, the dough becomes noticeably firmer and less sticky. The moisture is now trapped within the cellular structure of the flour, meaning it won’t evaporate as violently in the oven.
This hydration process is the secret to a thick, chewy center. A fully hydrated dough holds onto its moisture during the bake, resulting in a cookie that is dense, fudgy, and substantial, rather than crumbly and dry. It also means the dough is physically stiffer when it hits the hot baking sheet, providing a crucial roadblock against the dreaded spread.
Fat Solidification: The Cold Butter Buffer
The second pillar of the Holy Trinity is the most mechanically obvious: making the butter cold again.
Remember that high-stakes race between the melting butter and the setting structure? Chilling the dough actively kneecaps the butter, forcing it to start the race from a dead stop. When you refrigerate the dough, the butterfat solidifies and crystallizes.
When this rock-hard, chilled dough enters the 350-degree oven, the butter takes significantly longer to melt. It has to absorb enough thermal energy to transition from a solid back to a liquid before it can even begin to spread. By the time the butter finally melts and the dough begins to expand, the outer edges of the cookie have already been exposed to the oven’s heat long enough to start setting.
The starches gelatinize, the egg proteins coagulate, and a sturdy outer wall forms, trapping the melting butter inside. This creates a beautifully thick, domed cookie with a soft, molten interior and perfectly set edges. If you want bakery-style loft, cold fat is your non-negotiable ticket to the show.
Enzymatic Flavor Development: The Maillard Prep
This is where the true magic happens. If hydration and fat solidification are responsible for the texture and shape of the cookie, enzymatic activity is responsible for the mind-blowing, professional-level flavor.
When you combine flour with water, you don’t just create a paste; you activate natural enzymes present in the wheat, specifically amylases and proteases. These enzymes are the microscopic sous-chefs of your dough, and they work the night shift while you sleep.
Amylase enzymes act like tiny scissors, snipping the long, complex starch molecules in the flour into shorter, simpler sugars. Protease enzymes do the same thing to the proteins, breaking them down into free amino acids. Over the course of 24 to 48 hours in the fridge, these enzymes slowly and steadily dismantle the complex carbohydrates and proteins, dramatically increasing the concentration of simple sugars and amino acids in the dough.
Why do we care? Because simple sugars and amino acids are the primary fuel for the Maillard reaction.
The Maillard reaction is the complex chemical process that occurs when proteins and sugars are subjected to high heat, resulting in browning and the creation of hundreds of new, incredibly complex flavor compounds. It is the reason a seared steak tastes better than a boiled one, and it is the reason a golden-brown cookie tastes like heaven.
Because your rested dough is now absolutely packed with these newly minted simple sugars and amino acids, the Maillard reaction goes into overdrive in the oven. The cookie doesn’t just taste sweet; it tastes rich, nutty, and deeply complex, with pronounced notes of toffee, butterscotch, and caramel. The browning is also far more even and beautiful.
When a recipe claims that resting the dough allows the flavors to “meld,” this is the actual science they are referring to. You are literally brewing flavor from scratch on a molecular level.
Time is Flavor: How Long is Long Enough?
So, we know we need to chill. But exactly how long do we need to wait before we can preheat the oven? The food science community has debated this endlessly, and culinary titans have baked thousands of cookies to find the definitive answer. Let’s break down the timeline so you know exactly what you are getting out of your patience.
The 30-Minute Emergency Chill
Look, we’ve all been there. It’s 9:00 PM, you’ve had a terrible day, and if you don’t consume a warm chocolate chip cookie immediately, you are going to lose your mind.
A 30-minute chill in the refrigerator is the absolute bare minimum. At this stage, you are primarily achieving fat solidification. The butter will firm up enough to significantly reduce the spread of the cookie in the oven, saving you from a complete puddle situation.
However, 30 minutes is nowhere near enough time for the flour to fully hydrate, and the enzymes haven’t even clocked in for their shift yet. You will get a cookie with a decent shape, but it will lack the chewy texture and the complex, caramel-forward flavor profile of a truly rested dough. It’s a survival tactic, not a masterclass technique.
The 24 to 48-Hour Sweet Spot
This is the promised land. If you want to bake cookies that make people close their eyes and sigh when they take a bite, you need to hit the 24 to 48-hour window.
At 24 hours, the flour is fully hydrated. The free moisture has been absorbed, resulting in a dough that will bake up intensely chewy and thick. The enzymes have had a full day to break down starches into simple sugars, meaning the dough is primed for aggressive, beautiful caramelization.
Pushing it to 48 hours is what many experts consider the absolute sweet spot. The flavor development peaks here. The sugars, butter, and vanilla have completely harmonized, and the concentration of amino acids guarantees a spectacular Maillard reaction. The dough is rock solid, ensuring maximum loft and zero uncontrolled spreading. If you are baking for a crowd or trying to impress someone, you plan two days ahead. Period.
The 72-Hour Diminishing Returns
Some legendary recipes suggest resting the dough for up to 72 hours. Is it worth it?
Honestly, for the everyday home cook, the difference between 48 hours and 72 hours is microscopic. Yes, the enzymes continue to work, and the dough continues to dry out slightly, concentrating the flavors even further. But the leap in quality from 0 to 24 hours is massive; the leap from 48 to 72 hours is negligible.
Furthermore, beyond 72 hours, you run the risk of the dough drying out too much, which can lead to a crumbly, brittle texture rather than a chewy one. The dough might also start picking up ambient refrigerator odors, and nobody wants a cookie that tastes faintly of yesterday’s leftover lasagna. Cap your chill at 48 hours and reap the rewards.
The Gear That Makes or Breaks Your Bake
I cannot write a masterclass on baking without addressing the elephant in the kitchen: your equipment. You can follow the science of resting dough perfectly, but if you put that beautifully aged dough onto garbage equipment, you are going to get a garbage result.
As your sassy sous-chef, I have a strict “no-go” rule on cheap, toxic kitchenware. I am constantly banishing toxic kitchen gear from my readers’ homes, and baking sheets are usually the first offenders to go in the trash.
Ditching the Warped, Cheap Metal
If your baking sheet sounds like a gunshot going off in your oven, we have a problem. You know exactly what I’m talking about—that terrifying BANG when the metal aggressively twists and bends under the heat.
If you are wondering why your baking sheets pop and warp, it is because they are made from thin, cheap, single-ply metals that cannot handle thermal expansion. When a pan warps, it creates an uneven cooking surface. The cookies sitting in the lowered corners will pool and burn, while the cookies on the raised center will underbake.
You also need to understand that thin, dark-coated non-stick pans absorb heat aggressively, incinerating the bottoms of your cookies before the centers even have a chance to warm up. Throw them out. Invest in heavy-gauge, bare aluminized steel half-sheet pans. They conduct heat evenly, they don’t warp, and they will literally outlive you. If your baking sheets keep warping, you are actively choosing to ruin your own desserts.
The Great Silicone Mat vs. Parchment Paper Debate
This is a hill I will absolutely die on. I know silicone baking mats are trendy. I know they are reusable and eco-friendly. But if you want thick, perfectly textured cookies, silicone is your worst enemy.
There is a massive flaw in silicone baking mats when it comes to cookie dough. Renowned pastry experts have extensively documented this. Silicone is incredibly slippery. It offers zero grip for the dough. When the butter melts and the dough begins to expand, the silicone actively encourages the cookie to slide outward, resulting in severe, uncontrollable spreading.
Furthermore, silicone is an insulator. It completely alters the thermal conductivity of your baking sheet, meaning the heat from the metal pan struggles to reach the bottom of the dough. This creates a weird, sweaty, steamy microclimate under the cookie. The result? Cookies baked on silicone are consistently flatter, denser, and greasier, often suffering from a damp, unappealing undercarriage.
Parchment paper, on the other hand, is a baker’s best friend. It provides a slightly textured surface that gives the expanding dough something to grip onto, physically holding the cookie back and encouraging it to rise upward rather than spread outward. Parchment is also slightly absorbent, wicking away excess grease and allowing the bottom of the cookie to crisp up beautifully.
And please, make sure you are using high-quality parchment. If your silicone spatulas taste like soap because they’ve absorbed dishwasher detergent, imagine what cheap, chemically treated silicone mats are leaching into your food. Stick to unbleached parchment paper. Your cookies will thank you.
Beyond the Chill: The Other Culprits Ruining Your Cookies
Okay, so you’ve committed to the 48-hour chill, you bought a heavy-gauge aluminum pan, and you lined it with parchment paper. But what if your cookies are still spreading into flat, sad puddles?
As much as I love a good overnight rest, it cannot fix fundamental errors in the dough itself. Even the most foolproof modern recipes will fail if you commit these cardinal baking sins.
Measuring by Volume Instead of Weight
If you are still measuring your flour by scooping a plastic measuring cup into a bag of all-purpose flour, we need to have an intervention.
Flour is incredibly compressible. Depending on how aggressively you scoop, a “cup” of flour can weigh anywhere from 4 ounces to 6 ounces. If a recipe was developed using a 4.5-ounce cup, and you scoop a dense 6-ounce cup, you have just added 33% more flour to your dough. Your cookies will be dry, cakey rocks.
Conversely, if you sift your flour or lightly spoon it into the cup, you might end up with far too little flour. Without enough flour to build a structural network, the dough has nothing to hold it together, and it will spread into a massive puddle regardless of how long you chill it.
Buy a digital kitchen scale. They cost twenty dollars. Weigh your ingredients in grams. It is the single most important upgrade you can make to your baking routine, and it instantly eliminates 90% of beginner errors.
The Oven Temperature Lies
Your oven is lying to you. When the digital display aggressively beeps to tell you it has reached 350 degrees, it is almost certainly lying.
Most home ovens are wildly inaccurate, often fluctuating by 25 to 50 degrees in either direction. If your oven is running cold—say, 315 degrees instead of 350—the butter in your dough will melt long before the outer edges of the cookie can set. The dough will just sit there, melting and spreading into a greasy disc, because the ambient heat isn’t intense enough to trigger the coagulation of the eggs or the gelatinization of the starches.
Buy a cheap, analog oven thermometer and hang it from the center rack. If you set the oven to 350 and the thermometer reads 325, you know you need to crank the dial up to 375 to compensate. It is a simple fix that will save you from a lifetime of frustrating, unpredictable bakes.
Expired Leaveners
Baking soda and baking powder are chemical leaveners. They react with acids and heat to create carbon dioxide gas, which provides the lift and loft that prevents your cookies from falling flat.
These powders do not last forever. If that orange box of baking soda has been sitting in the back of your pantry since the last presidential election, it is completely dead. It will provide zero lift, resulting in dense, flat cookies.
Test your baking soda by dropping a spoonful into a splash of vinegar; it should fizz violently. Test your baking powder by dropping a spoonful into hot water; it should bubble vigorously. If they don’t react, throw them out and buy fresh boxes.
The Sassy Sous-Chef’s Ultimate “Chill” Protocol
We’ve covered the science, we’ve banished the bad gear, and we’ve corrected your measuring habits. Now, let’s put it all together into a practical, step-by-step workflow. Here is exactly how to execute the perfect dough rest without driving yourself crazy.
Step 1: Mix and Portion Before You Chill
This is a rookie mistake that causes endless frustration. If you take a massive, solid bowl of freshly mixed dough, wrap it in plastic, and throw it in the fridge for 48 hours, you are going to pull out a literal boulder.
Cold butter is rock hard. Attempting to scoop and portion a solid block of 48-hour chilled dough will bend your spoons, break your ice cream scoops, and absolutely wreck your wrists.
Instead, portion the dough immediately after mixing, while it is still soft and pliable at room temperature. Use a spring-loaded cookie scoop to create perfectly uniform balls of dough. Place these dough balls closely together on a small baking sheet or plate.
Step 2: The Airtight Seal
Refrigerators are humid, flavor-stealing environments. If you leave your dough balls exposed to the circulating air, the outer layer will dry out too aggressively, forming a tough, leathery skin that won’t bake properly. Worse, the fat in the dough will act like a sponge, absorbing every ambient odor in the fridge.
If you don’t want your delicate, vanilla-scented cookies tasting like the leftover garlic salmon sitting on the shelf below, you need an airtight seal. Once your dough balls are portioned on a plate, wrap the entire plate tightly in two layers of plastic wrap. Alternatively, you can drop the pre-portioned balls into a heavy-duty, zip-top freezer bag, squeezing out as much air as possible before sealing. If your plastic containers stay greasy, avoid using them for dough storage as they can impart rancid oil flavors; stick to clean glass or fresh bags.
Step 3: Baking Straight from the Fridge
When the 48-hour mark hits and you are finally ready to bake, do not let the dough sit on the counter to warm up. That completely defeats the purpose of the fat solidification we worked so hard to achieve!
Preheat your oven (and verify the temperature with your thermometer). Line your heavy-gauge aluminum baking sheet with parchment paper. Take the rock-hard dough balls directly from the refrigerator, arrange them on the baking sheet with plenty of space to account for the slight spread, and immediately slide them into the hot oven.
The extreme temperature differential between the freezing cold dough and the scorching hot oven is exactly what creates that perfect, bakery-style texture. The edges will set instantly, trapping the slowly melting butter inside, resulting in a towering, chewy, deeply caramelized masterpiece.
Conclusion
Baking is often described as a science, and that intimidates a lot of home cooks. But you don’t need to be a chemist to make incredible food. You just need to respect the ingredients and understand how they interact with time and temperature.
The next time you mix up a batch of dough, resist the urge to turn the oven on immediately. It is easy to fall victim to the seven kitchen mistakes that plague impatient bakers, but skipping the chill is the most detrimental of them all. Wrap that dough up, put it in the fridge, and walk away.
Let the flour hydrate. Let the butter solidify. Let those microscopic enzymes do the heavy lifting of breaking down starches and proteins into the building blocks of pure flavor. Give the Maillard reaction the fuel it needs to transform your pale, sad puddles into golden, complex, bakery-worthy triumphs.
Patience isn’t just a virtue in the kitchen; it is an active ingredient. So chill out, let the dough rest, and get ready to eat the best cookies of your life. Now, if you’ll excuse me, I have a 48-hour timer going off, and my oven is calling. Happy baking!


