
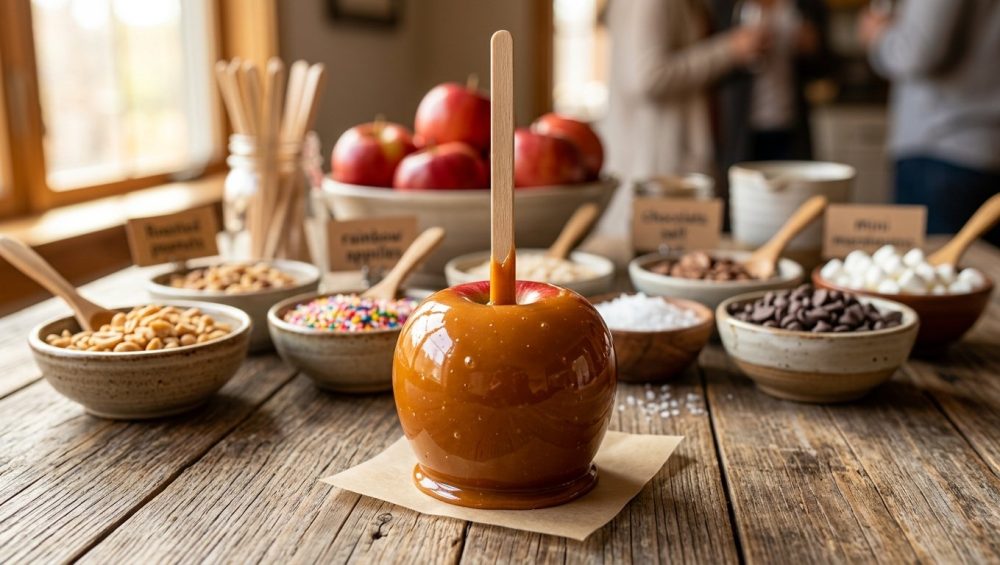
Listen up, weekend culinary warriors. We need to have a serious talk about the absolute tragedy that is the bald caramel apple.
It is a universally acknowledged truth that there is nothing sadder than watching a beautiful, glossy sheet of homemade caramel slowly slide off a pristine Granny Smith apple, pooling into a sad, sticky puddle on your parchment paper. You spent time carefully crafting that candy coating, only to have your fruit completely reject it. It is frustrating, it is messy, and quite frankly, it ruins the entire vibe of your autumnal dessert spread.
But here is the good news: you are not cursed, and your cooking skills are not to blame. The culprit is basic chemistry, and more specifically, the agricultural supply chain. I firmly believe that anyone can execute professional-level confections in a standard home kitchen, provided they understand the science behind the ingredients. We all know that a few rookie kitchen mistakes can ruin a weekend project, but once you learn the exact mechanics of wax removal and temperature control, you will never serve a naked apple again.
Today, we are leaving absolutely no stone unturned. We are going to dive deep into the botanical anatomy of grocery store fruit, the molecular behavior of boiling sugar, and the exact, foolproof protocol for engineering flawless caramel adhesion. By the end of this masterclass, you will be fully equipped to host a stress-free, interactive DIY dessert station that will blow your guests’ minds. Grab your candy thermometer, and let’s get to work.
The Anatomy of the Apple: Why the Grocery Store is Sabotaging You
To understand why your caramel is running away, you first have to understand what you are actually buying at the supermarket. When you pick up a shiny, flawless apple from the produce aisle, you are not just holding a piece of fruit; you are holding a heavily processed agricultural product coated in a microscopic layer of engineered armor.
The Natural Bloom vs. The Synthetic Shield
Apples naturally produce their own waxy coating as they grow on the tree. This natural bloom serves a vital biological purpose: it prevents moisture loss, slows down the respiration of the fruit, and acts as a physical barrier against microorganisms and minor abrasions. However, once the apples are harvested, they are sent to commercial packing houses where they undergo a rigorous washing process to remove orchard dirt, chemical residues, and bacteria. This aggressive washing strips away the apple’s natural protective wax.
Because an unwaxed apple will rapidly lose moisture, shrivel, and rot, the agricultural industry replaces the natural bloom with a food-grade wax coating. This is why grocery store apples have that unnatural, mirror-like shine. The two most common waxes used in the commercial fruit industry are carnauba wax and shellac. Carnauba wax is a plant-based product harvested from the leaves of the Copernicia cerifera palm tree native to Brazil. Shellac, on the other hand, is a resin secreted by the female lac bug (Kerria lacca), a scale insect found in the forests of Asia.
Both of these coatings are entirely approved by the FDA as safe for human consumption. They extend the shelf life of the fruit and make it look incredibly appealing under the fluorescent lights of the grocery store. But while they are safe to eat, they are the mortal enemies of the home confectioner.
The Science of Hydrophobicity
Here is where the food science comes into play. Wax, by its very chemical nature, is hydrophobic. It actively repels water. Caramel, on the other hand, is a hydrophilic substance. It is a complex emulsion of sugar, water, dairy proteins, and fats. When you attempt to dip a water-based sugar syrup onto a wax-coated, water-repelling surface, the two materials fundamentally reject each other.
The caramel cannot grip the microscopic pores of the apple’s skin because the wax is acting as a slick, impenetrable barrier. Gravity takes over, and your caramel slides right off. Therefore, if you want your candy coating to adhere flawlessly, you must strip the apple completely bare. You have to remove that commercial wax, exposing the raw, porous skin of the fruit underneath.
The Master Protocol: Eradicating Wax Like a Pro
Do not even think about taking a vegetable peeler to your apples or aggressively scraping them with a paring knife. We want to remove the wax, not the skin. The skin provides the structural integrity necessary to hold the heavy candy coating. To properly degrease and prep your fruit, you need to execute a precise, multi-step cleaning protocol.
Step 1: The Thermal Shock Treatment
The absolute best way to break down commercial carnauba or shellac wax is through a brief application of intense heat. You need to melt the wax just enough to loosen its grip on the fruit, without actually cooking the flesh of the apple.
Bring a large, heavy-bottomed pot of water to a rolling boil. Using a stainless steel spider skimmer or a pair of long tongs, carefully submerge your apples into the boiling water for exactly 6 to 10 seconds. Do not leave them in for longer than 10 seconds, or the heat will penetrate the skin, causing the apple to turn mushy and leak juices. You just want a rapid thermal shock.
Step 2: The Chemical and Mechanical Scrub
As soon as you pull the apples from the boiling water, the wax will be soft and pliable. Now, you must immediately apply a mildly abrasive, acidic cleaning solution to scrub it away.
In a large bowl, create a paste or a heavy solution using baking soda and an acid—either fresh lemon juice or apple cider vinegar. The baking soda acts as a gentle mechanical abrasive that lifts the loosened wax from the pores of the skin, while the acid helps to dissolve the chemical bonds of the shellac. Use a clean, textured kitchen towel, a brand-new non-scratch scrubbing pad, or a stiff vegetable brush to rigorously scrub the entire surface of the apple. Pay special attention to the crown and the base of the apple, as wax tends to pool heavily in those crevices.
Step 3: The Critical Drying Phase
Once the apples are thoroughly scrubbed, rinse them under cold water to remove any lingering baking soda residue. Now comes a step that impatience usually ruins: drying.
Caramel hates wax, but it hates moisture even more. If there is a single drop of water left on the surface of your apple, the hot sugar will hit that water, create a pocket of steam, and form a massive air bubble under your caramel coating. Vigorously dry each apple with a lint-free paper towel.
Step 4: The Chilling Process
After the apples are completely dry, remove the stems. Plucking the stem creates a clean, deep anchor point for your wooden skewer. Drive a heavy-duty wooden skewer or a professional caramel apple stick deep into the core of the fruit. Do not push it all the way through the bottom, or your apples won’t be able to stand upright on the tray.
Finally, place your skewered, naked apples into the refrigerator for at least 45 minutes to an hour. Hot caramel adheres significantly better to a cold surface because the chill rapidly drops the temperature of the candy upon contact, forcing it to set and grip the skin instantly.
The Chemistry of Caramel: Temperature is Everything
Now that your canvas is prepped, we have to talk about the medium. Making caramel from scratch intimidates a lot of home cooks, but it shouldn’t. It is not magic; it is just thermal dynamics. If you can read a thermometer and stir a pot, you can make mind-blowing caramel.
The “No-Go” Rule on Toxic Cookware
Before we even discuss ingredients, we need to address your equipment. If you are planning to boil sugar in a flimsy, scratched, peeling non-stick pan you bought for ten dollars at a discount store, stop right now. I have zero patience for toxic kitchen gear, and boiling sugar is the ultimate stress test for cookware.
Cheap non-stick coatings (like traditional PTFE/Teflon) degrade rapidly at high temperatures, leaching forever chemicals into your food. Furthermore, thin aluminum pans have terrible thermal mass, meaning they heat unevenly and will scorch your sugar in seconds. Ruining your nonstick pans with a batch of molten sugar is a harsh lesson to learn. You must use a high-quality, heavy-bottomed tri-ply stainless steel saucepan, a solid copper sugar pot, or a premium enameled cast-iron Dutch oven. These materials provide the superior heat distribution and thermal retention required to cook sugar evenly without creating localized hot spots.
The Science of the Soft-Ball Stage
When you cook caramel, you are boiling off the water content of your ingredients to concentrate the sugars. The temperature of the boiling syrup corresponds directly to the ratio of sugar to water left in the pot.
For perfect caramel apples, you must cook your sugar to the “soft-ball stage,” which falls strictly between 235°F and 240°F (113°C – 116°C). At this exact temperature window, the sugar concentration is roughly 85%. When dropped into cold water, syrup at this stage forms a soft, pliable ball that flattens when you squish it between your fingers.
If you pull the caramel off the heat too early (say, 225°F), there is too much water left in the emulsion. The caramel will be a runny soup that slips right off the apple. If you let the temperature climb too high (say, 250°F, the firm-ball stage), too much water evaporates. The resulting candy will be incredibly tough, chewy, and capable of pulling a filling right out of your teeth.
Precision is non-negotiable here. You cannot eyeball this. You must use a high-quality, instant-read digital candy thermometer. Just like a simple oven thermometer is crucial for baking cakes, a fast-reading digital probe is mandatory for candy making. Do not rely on cheap analog glass thermometers that take thirty seconds to register a temperature change; by the time the red liquid climbs to the correct line, your caramel has already overcooked.
The Role of Invert Sugars
If you’ve ever wondered why your caramel crystallizes into a grainy, sandy mess instead of remaining smooth and glossy, the answer lies in the molecular structure of sucrose. Table sugar (sucrose) loves to crystallize. Once melted, the molecules actively seek each other out to reform their rigid, crystalline structures. All it takes is one rogue sugar crystal clinging to the side of your pot to trigger a chain reaction that ruins the entire batch.
To prevent this, we introduce an invert sugar—specifically, light corn syrup. Corn syrup is mostly glucose, and its molecular shape physically interferes with the sucrose molecules, preventing them from linking back together. This ensures your caramel remains impossibly smooth, sticky, and chewy. Do not attempt to substitute the corn syrup with maple syrup or honey; candy chemistry requires exact structural properties, and corn syrup provides the precise taffy-like elasticity needed to grip the apple.
The Foolproof Sassy Sous-Chef Caramel Recipe
It is time to put the science into practice. This recipe is designed to yield a rich, buttery, perfectly textured coating that clings to your fruit like a tailored suit.
The Ingredients
- 1 cup (2 sticks) high-quality unsalted butter
- 2 cups dark brown sugar (packed)
- 1 cup light corn syrup
- 1 can (14 ounces) sweetened condensed milk
- 2 teaspoons pure vanilla extract
- 1/2 teaspoon kosher salt (or flaky sea salt)
- 8 to 10 medium-sized, wax-free, chilled apples (Granny Smith, Honeycrisp, or Fuji)
The Execution
- The Melt: In your heavy-bottomed stainless steel saucepan, melt the butter over medium heat.
- The Mix: Once the butter is fully melted, pour in the packed brown sugar, the light corn syrup, and the sweetened condensed milk.
- The Stir: Switch to a high-quality, heat-resistant silicone spatula. Nobody wants a dessert that tastes like yesterday’s stir-fry, so ensuring you have dedicated, odor-free silicone spatulas for your baking projects is mandatory. Stir the mixture constantly, making sure to firmly scrape the bottom and the corners of the pot to prevent the milk solids from scorching.
- The Boil: Allow the mixture to come to a steady, rolling simmer. Clip your digital thermometer to the side of the pot, ensuring the probe is fully submerged in the boiling sugar but not touching the metal bottom of the pan.
- The Climb: Continue to stir at a constant, rhythmic pace. Watch the temperature climb. It will hover around 212°F for a while as the water boils off, and then it will begin to rise rapidly.
- The Pull: The absolute second your thermometer registers 235°F to 240°F (depending on your elevation—aim for 238°F at sea level for a perfect chew), immediately remove the pot from the heat.
- The Finish: Quickly and vigorously stir in the vanilla extract and the kosher salt. The mixture will bubble up violently when the alcohol in the vanilla hits the hot sugar; this is normal. Keep stirring until the caramel is smooth and glossy.
Allow the caramel to sit in the pot off the heat for about 5 to 10 minutes. You want the violent boiling action to completely subside, and you want the caramel to cool just slightly so it thickens. If you dip while it is screaming hot, the coating will be too thin and will run right off the apple.
The Dip and The Drip: Flawless Execution
Take your chilled, perfectly dry, wax-free apples out of the refrigerator. It is time for the main event.
Tilt your heavy saucepan to a 45-degree angle so the caramel pools deeply on one side. Grab an apple by its sturdy wooden skewer and plunge it directly into the deep pool of caramel. Submerge it all the way up to the shoulder of the fruit, leaving just a small ring of green skin visible around the stick.
Now, give the apple a slow, deliberate twirl. You want to coat the entire surface evenly. Lift the apple straight up out of the caramel and hold it over the pot. Continue to slowly twirl the stick between your fingers, allowing the excess caramel to drip back down into the saucepan.
Here is the pro-trick to avoid the dreaded “caramel foot”—that giant, unappealing puddle of hard candy that forms at the base of the apple when it sets. Once the dripping slows down, take the bottom of the apple and lightly scrape it against the inner rim of the saucepan to shear off the excess caramel.
Immediately place the dipped apple onto a baking sheet heavily lined with high-quality parchment paper or a silicone baking mat. A quick note on your hardware: if your frying pans keep warping under heat, your cheap baking trays will likely pop and twist on the counter too, causing your apples to slide into each other. Invest in thick, commercial-grade aluminum half-sheet pans that remain perfectly flat.
Allow the apples to sit undisturbed for a few minutes so the caramel can begin to set before you move on to the next phase.
Engineering the Mindful Apple Bar
Now that you have mastered the foundational technique, let’s talk about hosting. The beauty of the caramel apple is that it is inherently interactive. Instead of hiding in the kitchen stressing over plating, you can outsource the final steps to your guests. A great host knows that effortless hosting comes down to smart prep work and strategic staging, not frantic last-minute cooking.
Setting up a DIY “Mindful Apple Bar” is the ultimate flex for a casual autumn gathering. It allows your guests to customize their treats while you get to mingle with a glass of wine. But to pull this off without your kitchen devolving into a sticky, chaotic nightmare, you need a system.
Thermodynamic Holding Strategies
The biggest logistical hurdle of an interactive dipping station is keeping the caramel at the perfect working temperature. If you leave the pot on the counter, the caramel will cool, harden, and become impossible to dip within twenty minutes. If you leave it on the stove over a low flame, the bottom will eventually scorch, and the sugar will continue to cook past the soft-ball stage, turning into hard candy.
The solution is a thermodynamic water bath or a slow cooker. Transfer your finished, slightly cooled caramel into a small, ceramic slow cooker set to the “Warm” setting. The thick ceramic insert provides excellent thermal mass, radiating gentle, indirect heat that keeps the caramel in a perfectly fluid, viscous state without cooking it further. Alternatively, you can set up a traditional bain-marie (water bath) by placing your saucepan over a larger pot of gently steaming (not boiling) water.
The 5-Zone Setup
To prevent traffic jams and sticky elbows, you must organize your counter space logically. Creating a permanently organized kitchen workflow for your guests is essential. Set up your station in a linear progression:
- Zone 1: The Orchard. Display your pre-cleaned, skewered, and chilled apples on a beautiful wooden board or a bed of food-safe hay.
- Zone 2: The Hot Springs. This is where your slow cooker of warm caramel lives. Provide a ladle to help guests spoon the caramel over the tops of their apples if they don’t want to do the full plunge.
- Zone 3: The Crunch Sector. While the caramel is still warm and tacky, the toppings must be applied. Use heavy ceramic ramekins to hold a variety of textures. Think toasted crushed pecans, salted peanuts, crushed graham crackers, mini M&Ms, toffee bits, and flaky Maldon sea salt.
- Zone 4: The Chocolate Spa. For the decadent double-dip, provide a fondue pot or a secondary warm water bath holding melted dark and white chocolate. Crucial warning: Chocolate seizes when exposed to water. Ensure your guests’ apples are fully set and dry before they dip, or you’ll quickly find out why melted chocolate turns clumpy and grainy the second moisture hits the bowl.
- Zone 5: The Cooling Deck. Provide a large, parchment-lined commercial baking sheet where guests can park their customized creations to set. Label the parchment with a marker so everyone knows whose apple is whose.
Troubleshooting the Stickiest Situations
Even with the best preparation, sugar can be temperamental. Here are the smart fixes to the most common caramel apple disasters.
The Caramel is Too Thin and Runny
If your caramel is practically transparent and sliding off the apple entirely, you either didn’t dry the apple properly, or you pulled the sugar off the stove before it reached 235°F. If the batch is undercooked, pour it back into your heavy-bottomed pot, turn the heat back on, and use your thermometer to bring it up to the proper soft-ball stage.
The Caramel is Rock Hard
If your guests are risking dental damage to take a bite, you overcooked the sugar, pushing it into the firm-ball or hard-ball stage. Unfortunately, you cannot easily un-cook sugar once the water has evaporated. You can try to salvage it by returning it to the pot, adding a few tablespoons of heavy cream, and gently melting it down to re-hydrate the emulsion, but your best bet is to start a fresh batch and watch your thermometer like a hawk.
Bubbles on the Surface
If your finished apples look like they have a bad case of the measles, you are dealing with trapped air or steam. This happens for three reasons:
- You stirred the caramel too aggressively right before dipping, whipping air into the syrup.
- The apples were still wet, and the water flashed into steam upon contact.
- The apples were too cold, and the extreme temperature differential caused the caramel to seize and trap air instantly. (Chill the apples, but don’t freeze them).
To fix bubbles, let the caramel rest in the pot for five minutes after cooking to allow trapped air to rise and pop. Dip slowly, and twirl gently.
The Sweet Taste of Victory
Mastering the homemade caramel apple is a rite of passage for the weekend home cook. It requires you to respect the ingredients, understand the basic laws of food science, and invest in the right tools for the job.
By taking the time to properly strip the commercial wax from your fruit, controlling your temperatures with clinical precision, and utilizing smart hosting strategies, you elevate a simple autumn snack into a stunning culinary event. You don’t need a pastry degree to pull this off. You just need patience, a good thermometer, and the confidence to show that boiling sugar exactly who is boss in your kitchen.
Now get in there, scrub those apples, and go make something spectacular.






