
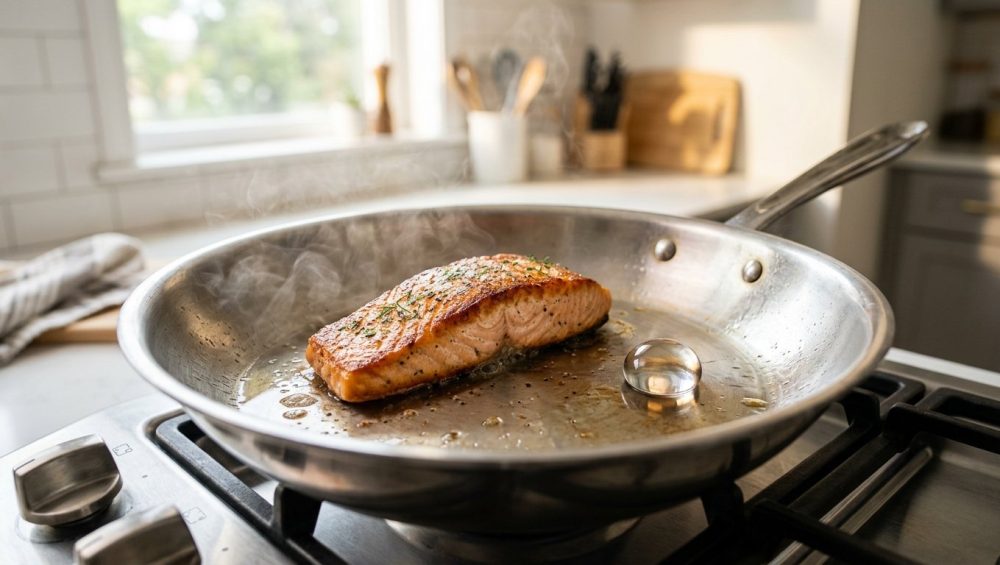
Listen, we need to have a serious talk about the absolute massacre happening on your stovetop every Tuesday night. I know exactly what you are doing. You buy a beautiful, expensive piece of salmon or a perfectly marbled ribeye steak. You drop it into a stainless steel skillet, hear a vaguely satisfying sizzle, and then, three minutes later, tragedy strikes. You try to flip it, but the protein has chemically welded itself to the metal. Panic sets in. You scrape, you pry, you curse, and eventually, you are left serving a mangled, shredded pile of meat while spending the next twenty minutes aggressively scrubbing the pan in the sink.
I have been there. We have all been there. It is one of the most frustrating culinary hurdles that drives perfectly capable home cooks back into the welcoming, yet highly toxic, arms of cheap non-stick cookware. But as your resident culinary realist, I am here to tell you that you do not need a culinary degree to cook like a professional, and you certainly do not need to rely on chemical coatings that peel off into your scrambled eggs. What you need is a basic, working understanding of thermodynamics and kitchen physics.
By understanding the precise temperature thresholds required to manipulate moisture and heat, you can transform an uncoated, lifetime-lasting stainless steel skillet into a naturally slick workhorse. This is the definitive, exhaustive masterclass on exactly how to prevent lean proteins from bonding to your cookware, saving your dinners, your wallet, and your sanity.
The Toxic Elephant in the Room: Why We Are Ditching Non-Stick
Before we get into the mechanics of heat control, we have to address why learning to use stainless steel is no longer just a fun culinary flex—it is an absolute necessity for a safe home kitchen. I have zero patience for pretentious chef-speak, but I have even less patience for the chemical soup leaching into our weeknight dinners.
For decades, the cookware industry sold us a lie: that we needed per- and polyfluoroalkyl substances (PFAS), commonly known as “forever chemicals,” to fry an egg without it sticking. These are the chemicals used to make traditional Teflon and various other non-stick coatings. The problem? They are linked to a terrifying laundry list of health issues, from immune system suppression to thyroid dysfunction and certain cancers.
If you haven’t been paying attention to the regulatory landscape lately, let me catch you up. As of this year, 2026, the European Union has aggressively cracked down on these substances. The Packaging and Packaging Waste Regulation (PPWR), which came into force in February 2025, mandates a strict ban on PFAS in food contact packaging that takes full effect in August 2026. Meanwhile, France’s Law 2025-188 banned PFAS in cosmetics and textiles starting January 1, 2026. Do you know why cookware wasn’t fully banned in that specific French law? Because massive cookware conglomerates lobbied relentlessly for a temporary carve-out. They know their chemical coatings are on the chopping block, and they are buying time.
When you buy cheap non-stick pans, you are buying a product with an intentional expiration date. The moment that coating gets a single scratch, or the moment you accidentally overheat it past 260 °C (500 °F), it begins to degrade, releasing toxic fumes and flaking into your food. This is exactly why I am so passionate about banishing toxic kitchen gear from your home. You deserve cookware that works for you, not against your long-term health.
Stainless steel, on the other hand, is virtually indestructible. It contains no synthetic chemical coatings, it does not degrade over time, and it can handle blistering heat without off-gassing. It is the ultimate tool for the home cook—provided you know how to talk to it.
The Scene of the Crime: Why Food Actually Sticks to Metal
To stop your food from sticking, you first have to understand why it sticks in the first place. It is not because the universe hates you, and it is not because you bought the wrong brand of pan. It is pure, unadulterated chemistry.
When you look at a high-quality 18/10 stainless steel skillet, it looks perfectly smooth. It feels smooth to the touch. But if you were to look at that same surface under a powerful microscope, you would see a jagged, porous landscape full of microscopic hills, valleys, crevices, and pores. Metal is not a static, solid block; it expands and contracts based on temperature.
When you place a cold or room-temperature piece of protein—like a chicken breast, a steak, or a delicate filet of fish—into a pan that is improperly heated, a complex series of chemical reactions occurs. Proteins are essentially tightly wound coils of amino acids. As they are exposed to heat, they begin to denature, meaning they unwind and open up, exposing their reactive side chains.
Simultaneously, the surface of your stainless steel pan contains iron atoms. When the denaturing proteins from your food come into direct, intimate contact with the metal, those exposed amino acids form literal covalent bonds and van der Waals forces with the iron atoms. Your chicken breast is not just resting on the pan; it is chemically welding itself to the metal at a molecular level. This is the fundamental science behind why everything sticks when you rush the cooking process.
Furthermore, as the food heats up, it releases cellular moisture (water) mixed with dissolved starches and sugars. If the pan is not hot enough, this liquid seeps into those microscopic valleys in the steel. As the pan eventually heats up, the metal expands, effectively pinching and trapping those food particles in the crevices. By the time you grab your spatula to flip your dinner, the structural integrity of the meat is weaker than the chemical bond it has formed with the pan. The meat tears, the crust is ruined, and you are left scraping a burnt, sticky mess.
The Hero of Our Story: The Leidenfrost Effect Explained
So, how do we defeat molecular bonding without resorting to toxic chemical coatings? We use physics to create an invisible, floating shield between the food and the metal. Enter the Leidenfrost effect.
Named after Johann Gottlob Leidenfrost, a German doctor who first documented the phenomenon in 1751, the Leidenfrost effect is a physical reaction that occurs when a liquid comes into contact with a surface that is significantly hotter than the liquid’s boiling point.
We all know that water boils at 100 °C (212 °F). If you drop water onto a pan heated to 120 °C (250 °F), the water simply boils, sizzles aggressively, and evaporates into steam. But if you heat that pan to the Leidenfrost point—which for water on stainless steel is approximately 193 °C (379 °F)—something magical happens.
At this critical temperature threshold, the very bottom layer of the water droplet vaporizes the absolute microsecond it touches the hot metal. This instant vaporization creates a microscopic, insulating cushion of steam underneath the rest of the water droplet. Because steam is a gas and a poor conductor of heat compared to direct metal contact, this vapor barrier protects the rest of the liquid from boiling immediately. Instead of sizzling and vanishing, the water droplet beads up into a perfect little sphere and effortlessly levitates, skittering and gliding across the surface of the pan like a mercury ball.
This exact same physics principle applies to the moisture inside your food. When you place a piece of meat into a pan that has achieved the Leidenfrost threshold, the moisture on the immediate surface of the meat instantly vaporizes, creating a microscopic steam cushion that physically lifts the protein away from the jagged, porous metal. Because the meat is hovering on a fraction of a millimeter of vapor, those unwinding amino acids never get the chance to make direct contact with the iron atoms. You are effectively preventing protein adhesion by using the food’s own moisture against it.
The Master Technique: The Water Drop Test
Understanding the theory is great, but executing it on a busy Wednesday night when you have twenty minutes to get dinner on the table is what actually matters. To harness the Leidenfrost effect, you do not need an infrared thermometer (though they are fun to play with). You only need a few drops of tap water and a little bit of patience.
This technique, universally known as the Water Drop Test, is the single most important skill you will ever learn for stainless steel cooking. It is the infallible secret to make it actually non-stick, and it requires strict visual feedback. Here is exactly how to execute it, phase by phase.
Phase 1: The Cold Start
Place your clean, completely dry, empty stainless steel skillet on the stove. Turn the burner to medium heat. Do not blast it on high; stainless steel is fantastic at retaining heat, but it is not the fastest conductor, meaning high heat will just cause hot spots and warp your pan over time. Let the dry pan heat up for about two to three minutes.
Phase 2: The Danger Zone (Too Cold)
After a couple of minutes, flick a few drops of water from your fingers into the center of the pan. If the water drops hit the pan, flatten out, bubble, sizzle loudly, and quickly evaporate away, the pan is too cold.
What it means: The metal is above water’s boiling point (100 °C / 212 °F) but below the Leidenfrost point (193 °C / 379 °F). If you add oil and food right now, the moisture in the food will seep into the pores of the metal, the proteins will bond, and your dinner will violently stick. Wipe the pan dry if necessary, and keep waiting.
Phase 3: The Goldilocks Zone (The Leidenfrost Point)
Wait another 30 to 60 seconds and flick another drop of water into the pan. If the drop immediately pulls itself together into a tight, perfect sphere and begins to effortlessly glide, dance, and bounce around the surface of the pan without evaporating, congratulations. You have reached the Leidenfrost point.
What it means: The pan is perfectly preheated. The microscopic pores in the metal have expanded and tightened, and the surface is ready to create that crucial vapor barrier.
Phase 4: The Inferno (Too Hot)
What happens if you get distracted by a text message and leave the pan on the heat too long? Flick a drop of water in. If the water hits the pan and instantly shatters into dozens of tiny, frantic micro-beads that aggressively dart in every direction before vanishing, your pan is too hot.
What it means: You have overshot the ideal temperature. If you add oil now, it will instantly smoke, polymerize into a sticky yellow glue, and taste incredibly bitter. If your pan is too hot, simply take it off the heat for a minute, let it cool down slightly, and test it again.
The Role of Fat: Why You Still Need Oil
A common misconception among home cooks is that once you achieve the Leidenfrost effect, you can just throw a dry piece of chicken into a dry pan. Please do not do this. While the vapor barrier does the heavy lifting to prevent chemical bonding, you still absolutely need a cooking lipid (oil, clarified butter, or tallow).
The rule of thumb in professional kitchens is: Hot pan, cold oil.
You must preheat the dry pan first, achieve the Leidenfrost state, and then add your fat. Why? Because if you add the oil while the pan is cold and let them heat up together, the oil will slowly degrade, break down, and begin to polymerize (get sticky) before you even start cooking.
When you add room-temperature oil to a properly preheated pan, the heat immediately drops the oil’s viscosity. It becomes incredibly thin and fluid, shimmering instantly. This hyper-fluid hot oil acts as the final sealant. It rushes into any remaining microscopic valleys in the steel, creating a perfectly smooth, lubricated surface.
Furthermore, the hot oil acts as a conductive medium. Air and steam are terrible conductors of heat. The oil bridges the microscopic gap between the pan and the food, ensuring that heat is transferred rapidly and evenly to the surface of the meat, which is essential for developing a crust.
A crucial warning: Never use aerosol cooking sprays (like PAM) on your high-quality stainless steel. These sprays contain emulsifiers, anti-foaming agents, and propellants (like soy lecithin) that burn at much lower temperatures than the oil itself. They will bake onto the sides of your pan, creating a sticky, polymerized brown residue that is nearly impossible to scrub off, effectively ruining your nonstick pans or severely staining your stainless steel. Always use pure, liquid fats with a high smoke point, such as avocado oil, ghee, or refined olive oil.
Temperature Control and The Maillard Reaction
Now that your pan is perfectly heated and your oil is shimmering, you drop your protein into the skillet. You will hear a loud, aggressive sizzle. That sound is the rapid evaporation of surface moisture.
For generations, culinary myth dictated that searing meat at high temperatures “seals in the juices.” This was debunked decades ago (the theory actually dates back to a German chemist in 1847). Searing does absolutely nothing to trap moisture inside a steak. In fact, a seared piece of meat loses slightly more moisture than a gently poached one.
So why do we do it? We sear for flavor. Specifically, we sear to trigger the Maillard reaction.
The Maillard reaction is a complex, non-enzymatic chemical reaction between amino acids (proteins) and reducing sugars that occurs when food is subjected to high heat. It is the exact same process that turns pale dough into golden bread crust, turns raw beans into roasted coffee, and turns a red steak into a deeply savory, brown, flavor-packed masterpiece.
This reaction kicks into high gear between 140 °C and 165 °C (280 °F to 330 °F). Notice that this temperature range is slightly lower than the Leidenfrost point of the pan (193 °C). This is intentional and necessary. When you drop a cold, dense piece of meat into the skillet, the temperature of the metal immediately drops due to the thermal shock. By starting at the Leidenfrost point, the pan has enough stored thermal mass to absorb that temperature drop while still remaining squarely within the optimal zone for mastering the Maillard reaction.
If your pan was too cold to begin with, dropping the meat in would plummet the temperature down to 100 °C (212 °F)—the boiling point of water. At this temperature, the Maillard reaction cannot occur. Your meat will simply boil and steam in its own juices, turning gray, rubbery, and incredibly sad.
The “Patience” Principle: Let the Meat Tell You When It’s Ready
This is the moment where 90% of home cooks sabotage themselves. You have preheated the pan perfectly. You added the oil. You dropped the meat in. And then, 45 seconds later, your anxiety takes over. You grab your tongs and try to lift the edge of the chicken breast to “check” the color. You feel resistance, so you force it. The meat tears.
Stop touching your food.
When you first place the protein into the hot oil, there will inevitably be a brief period where minor sticking occurs as the surface moisture evaporates and the proteins begin to interact with the heat. You must have the patience to let the chemistry run its course.
As the Maillard reaction progresses, the outer layer of the meat undergoes a physical transformation. The proteins dehydrate, coagulate, and form a dense, hardened crust. As this crust forms, the physical structure of the meat changes, and those initial, temporary bonds with the pan are naturally broken. The meat literally pushes itself away from the metal.
Your food will tell you when it is ready to be flipped. If you gently nudge the side of a steak or a piece of fish with your tongs and it resists, it is not ready. Leave it alone. When the crust is fully developed, the meat will release voluntarily and glide across the pan with zero resistance.
If you are constantly hovering over the pan because you are terrified of overcooking the center while waiting for the crust to release, you are likely suffering from a lack of accurate data. Stop guessing. The easiest way to eliminate this anxiety is to acknowledge that your cheap, analog dial meat thermometer is lying to you, and invest in a highly responsive digital instant-read probe. When you know exactly what is happening inside the meat, you can confidently leave the outside alone to do its job.
Troubleshooting Your Sear: Where Things Go Wrong
Even armed with the knowledge of the Leidenfrost effect and the Maillard reaction, weeknight variables can throw a wrench into your plans. If your food is still sticking, one of these three rookie kitchen mistakes is likely the culprit.
1. The Meat is Too Wet
Moisture is the mortal enemy of a good sear. The Maillard reaction cannot begin until all surface moisture has evaporated, because water cannot exceed 100 °C (212 °F). If you take a chicken breast straight out of a vacuum-sealed package, dripping with liquid, and throw it into the pan, the pan’s thermal energy is entirely wasted on boiling off that excess water. The temperature plummets, the Leidenfrost vapor barrier fails, the proteins bond to the metal, and you end up steaming your dinner.
The Fix: Always, always pat your proteins bone-dry with heavy-duty paper towels before cooking. If you have the time, salt the meat and leave it uncovered on a wire rack in the fridge for a few hours. The circulating air will dry out the pellicle (the surface layer), guaranteeing a flawless, stick-free crust.
2. The Meat is Too Cold
Dropping a massive, fridge-cold, 4 °C (39 °F) steak into a skillet causes a massive thermal shock. Unless you are using a 12-inch, heavy-gauge cast iron skillet that holds heat like a bank vault, a standard stainless steel pan will rapidly lose its temperature, dropping out of the Leidenfrost zone and into the sticking zone. This is a primary reason why people struggle to prevent dry chicken breast; they overcook the inside trying to compensate for a crust that won’t form because the pan got too cold.
The Fix: Pull your proteins out of the refrigerator 20 to 30 minutes before you plan to cook. Taking the chill off the meat ensures that your pan maintains its critical temperature threshold when the food hits the oil.
3. Overcrowding the Pan
You are cooking dinner for four, and you try to squeeze four large pork chops into a single 10-inch skillet. They are practically overlapping.
The Fix: Don’t do this. By covering every square inch of the pan’s surface, you are introducing too much cold mass all at once. Furthermore, the steam escaping from the sides of the chops has nowhere to go, so it gets trapped under the neighboring pieces of meat, completely shutting down the browning process. Cook in batches, or use two pans. You need at least an inch of breathing room between each piece of food.
The Cleanup: Deglazing Like a Pro
Let’s say you executed everything flawlessly. You did the water drop test, you used a high-smoke-point oil, you dried your meat, and you waited patiently for the natural release. You serve a gorgeous, golden-brown meal. But when you look back at the stove, the bottom of your stainless steel pan is covered in a dark, crusty, brown residue.
Do not panic, and definitely do not take a scouring pad to it. You did not ruin the pan. That brown residue is called fond.
Fond is the caramelized accumulation of rendered fats, sugars, and protein fragments that naturally adhere to the pan during the Maillard reaction. It is not burnt food; it is concentrated culinary gold. In professional kitchens, leaving that fond in the pan and washing it down the drain is a fireable offense.
Instead of scrubbing, you are going to use a technique called deglazing. While the pan is still hot (or over medium heat if it has cooled), pour in a splash of liquid—chicken stock, white wine, or even just a quarter cup of tap water. The liquid will immediately boil and bubble violently. Take a flat-edged wooden spoon or a silicone spatula and gently scrape the bottom of the pan.
The rapid evaporation of the liquid acts as a steam-cleaner, lifting all of that stuck-on fond effortlessly away from the metal and dissolving it into the liquid. Let that liquid reduce for two minutes, swirl in a tablespoon of cold butter, and you have just mastered the art of turning burnt bits into sauce. Pour that rich, savory pan sauce over your meat, and marvel at the fact that your pan is now 90% clean before it even hits the sink.
For the remaining 10%—usually a slight yellowing or rainbow-colored heat tint on the steel caused by polymerized oil—a quick sprinkle of Bar Keepers Friend (a mild oxalic acid abrasive) and a soft sponge will restore the pan to a mirror finish in thirty seconds.
Conclusion
Transitioning away from the chemical crutch of non-stick cookware can feel intimidating. The first time you stare down a bare metal pan, it feels like you are setting yourself up for a dishwashing nightmare. But cooking is not magic; it is just applied physics and chemistry.
By taking an extra two minutes to properly preheat your skillet, utilizing the water drop test to guarantee you have reached the Leidenfrost point, and practicing the restraint to let the Maillard reaction do its job, you take complete control of your kitchen. You stop fighting your equipment and start working in harmony with it.
You do not need toxic, disposable pans to make a flawless dinner. You just need a little bit of heat, a little bit of fat, and the confidence to let the science do the heavy lifting. Now go dry off a steak, heat up your skillet, and show that stainless steel who is boss.






