The Great Sweet Potato Crime: Why We Need to Talk About Temperature
Listen to me very carefully: put down the bag of miniature marshmallows and step away from the brown sugar. I am begging you to stop treating your sweet potatoes like bland, starchy afterthoughts that desperately require a sugary life support system to be palatable. Every single Thanksgiving, I am forced to witness the absolute culinary tragedy of home cooks drowning perfectly good tubers in maple syrup, candied pecans, and artificial marshmallow fluff, all because they do not understand the fundamental science of what is happening inside their ovens.
You do not need extra sugar to make a sweet potato taste like dessert. In fact, if you are adding sugar to a sweet potato, you have already failed at roasting it. You are compensating for bad technique. The sweetness is already locked inside the vegetable, just waiting for you to coax it out. The problem is that most weekend culinary hobbyists and frantic weekday cooks are incredibly impatient. You come home from work, crank your oven to 450°F because you want dinner on the table in forty-five minutes, and you aggressively blast the potato with high heat.
This is a crime against vegetables. When you rush a sweet potato, you completely bypass the delicate chemical reactions required to unlock its natural syrups. You end up with a dry, fibrous, chalky brick that tastes like sweet cardboard. But I firmly believe that anyone—without a culinary degree and without fancy restaurant equipment—can produce a mind-blowing, genuinely gooey, naturally caramelized sweet potato in a standard home kitchen. All it takes is a little bit of patience and a basic understanding of thermal dynamics. If you have ever tried to cut through a raw, dense sweet potato and felt like you were risking a trip to the emergency room, it’s highly likely that your dull knife is to blame, not the vegetable itself. The same logic applies to the cooking process: if your potato tastes bland, your temperature control is to blame, not the potato.
Today, we are going to dive deep into the culinary science of temperature manipulation. We are going to transform your roasting technique from a rushed, chaotic chore into a deliberate, scientific process that yields professional-level results every single time.
Meet Your New Best Friend: The Beta-Amylase Enzyme
To understand why low and slow roasting is the only acceptable way to treat a sweet potato, we need to get a little nerdy and talk about what a sweet potato actually is before it hits the heat. When you pull a sweet potato out of the ground, it is essentially a dense, solid block of raw starch.
Starch, in its natural state, is completely flavorless to the human palate. Molecularly speaking, starch is composed of two types of complex carbohydrates: amylose and amylopectin. You can visualize these starches as incredibly long, complicated chains of sugar molecules holding hands. Because the chains are so massively long, our taste buds cannot register them as sweet. In order to taste the sweetness, we need a pair of molecular scissors to come in and chop those long, bland chains into small, individual sugar molecules.
Enter your new best friend: the beta-amylase enzyme.
Beta-amylase is a naturally occurring enzyme present inside the flesh of the sweet potato. Its entire purpose in life is to act as those molecular scissors, snipping the complex starches into a specific type of simple sugar called maltose. Maltose is the exact same complex sugar that gives malted milkshakes and dark beers their deeply rich, syrupy, caramel-like flavor profiles. It is about one-third as sweet as standard white table sugar (sucrose), which means it provides a wonderfully complex, earthy sweetness that never feels cloying or artificial.
But here is the catch: beta-amylase is an absolute diva. It is a highly temperature-sensitive protein that refuses to work unless the conditions are absolutely perfect.
According to legendary food scientist Harold McGee, the beta-amylase enzyme remains completely dormant when the potato is cold or at room temperature. It only wakes up and begins rapidly snipping starches into maltose when the internal temperature of the sweet potato reaches 135°F (57°C). However, because it is a delicate protein, the enzyme will literally cook, denature, and die if the temperature gets too hot. The absolute ceiling for beta-amylase survival is 170°F (77°C).
Therefore, the magical, active window for starch-to-sugar conversion is strictly between 135°F and 170°F. Your sole objective as a cook is to keep the internal temperature of that potato trapped inside this specific thermal window for as long as humanly possible.
The 400-Degree Mistake: Why the Weekday Rush Ruins Your Spuds
Now that you understand the 135°F to 170°F enzyme activation window, let’s examine the absolute disaster that is the standard American weeknight roasting method.
You are in a rush. You preheat your oven to 400°F or 425°F. You toss your sweet potatoes onto a pan and shove them into the blazing inferno. Because the ambient heat of the oven is so aggressively high, the thermal energy penetrates the flesh of the potato at a rapid, violent pace. The internal temperature of the potato hits 135°F, and the beta-amylase enzyme wakes up and frantically begins trying to convert the starch into maltose.
But it doesn’t have time. Within fifteen to twenty minutes, the aggressive heat of the 400-degree oven forces the potato’s internal temperature to rocket right past the 170°F death zone. The beta-amylase enzyme is instantly denatured and destroyed before it has even made a dent in the starch reserves. When you subject delicate proteins or enzymes to aggressive, violent heat, they seize up and release moisture unpleasantly—this is the exact same scientific reason why your scrambled eggs leak water when you cook them over a blazing hot flame.
The end result of this rushed, high-heat roasting method is a potato that has successfully cooked through—it will be soft enough to pierce with a fork—but it will retain almost all of its original, flavorless starch. It will be incredibly dry, it will have a chalky mouthfeel, and it will possess virtually zero natural sweetness. This is exactly why people feel the need to aggressively mash butter, brown sugar, and maple syrup into their weekday potatoes. They have fundamentally failed to activate the potato’s internal sugar factory.
Farm to Oven: The Science of the Curing Process
Before we move on to the proper roasting technique, it is crucial to understand that the journey of sweetening a potato actually begins long before you ever place it in your grocery cart. I want to advocate for the incredible agricultural science that goes into these tubers, because respecting the ingredient is the first step to becoming a better home cook.
When sweet potatoes are first pulled from the dirt, they are not sweet at all. They are hard, easily bruised, and incredibly starchy. To prepare them for consumption and long-term storage, farmers must put the freshly harvested tubers through a rigorous “curing” process.
Immediately after harvest, the sweet potatoes are placed into specialized, climate-controlled storage facilities. The temperature in these rooms is raised to a balmy 85°F (29°C), and the relative humidity is cranked up to a staggering 90 to 95 percent. The potatoes are left to sit in this tropical environment for anywhere from four to fourteen days.
This curing process serves two vital functions. First, the high heat and extreme humidity cause the potato to form a protective, corky layer of cells over any cuts or abrasions it sustained during the harvest, essentially healing its own wounds and preventing storage rot. Second, and more importantly for our culinary purposes, this warm environment gently triggers the very beginning of the starch-to-sugar enzymatic conversion.
By establishing a predictable, slow-cooking routine on your days off, you can effortlessly transform your chaotic cooking routine into a peaceful daily habit that pays dividends all week. Think of the farmer’s curing process as the ultimate slow-prep. The farmers have done the initial heavy lifting to wake up the sweet potato’s potential. It is your responsibility, as the home cook, to carry the baton across the finish line by roasting it properly.
Choosing Your Champion: Not All Sweet Potatoes Are Created Equal
If you want to achieve professional-level results, you need to know exactly what kind of ingredient you are working with. The term “sweet potato” is a massive umbrella that covers dozens of radically different botanical cultivars, each with its own unique moisture content and starch-to-sugar ratio.
The Classic Orange Powerhouses (Beauregard, Jewel, Covington)
These are the ubiquitous supermarket staples. They have copper or rose-colored skin and vibrant, bright orange flesh. Botanically, these varieties have a naturally high moisture content. When you apply the low-and-slow roasting method to a Beauregard or a Covington, the abundant moisture mixes with the newly created maltose to create a phenomenally gooey, almost pumpkin-pie-like texture. These are the most forgiving varieties for absolute beginners.
The Red-Skinned Wonders (Garnet)
Garnet sweet potatoes are easily identifiable by their dark, purplish-red skin and deep orange flesh. They are even higher in moisture than the Beauregards. If you are looking to make a silky, luxurious sweet potato puree or a velvety pie filling without adding a drop of heavy cream, the Garnet is your undisputed champion.
The Starchy Aristocrats (Japanese, Murasaki, Okinawan)
This is where the low-and-slow method becomes absolutely mandatory. Japanese sweet potatoes (Murasaki) feature striking purple skin with pale, creamy white or yellow flesh. Okinawan sweet potatoes have beige skin with shocking, vibrant purple flesh.
These tubers are incredibly dense, and if you try to hack through them with the wrong tools, you’ll end up ruining your knives before you even get them into the oven. More importantly, they have a significantly lower moisture content and a much higher baseline starch content than their orange cousins. If you rush-roast a Japanese sweet potato at 400°F, it will literally turn to dust in your mouth. It will be so dry you will choke on it. However, if you subject these starchy aristocrats to a prolonged, two-hour slow roast, something miraculous happens. The massive reserves of starch slowly convert into a concentrated maltose syrup, resulting in a texture that resembles a roasted chestnut and a flavor profile that mimics rich caramel and vanilla.
The Ultimate “Low and Slow” Masterclass: Step-by-Step Perfection
We have covered the biology, the chemistry, and the agriculture. Now, it is time to execute. This is my definitive, no-nonsense, highly researched masterclass on roasting the perfect sweet potato. Reserve this project for a lazy weekend afternoon when you have time to let the oven do the heavy lifting.
Step 1: The Prep (To Prick or Not to Prick?)
Start by thoroughly scrubbing your sweet potatoes under cold running water to remove any residual dirt. Do not peel them. The skin acts as a natural, biological roasting vessel that traps the moisture and syrups inside the flesh as they develop.
Once they are clean, you must prick them. Take a standard dinner fork and aggressively stab each potato six to eight times, ensuring you pierce completely through the skin and into the flesh. This is not an optional aesthetic step; it is a vital safety measure. As the beta-amylase enzyme converts the solid starches into liquid maltose and water, a massive amount of internal steam is generated. If you do not provide escape vents for this steam, the pressure will build until the sweet potato literally explodes, leaving you with a sticky, caramelized nightmare to scrub off your oven walls.
Next, we must address the great foil debate. Countless recipes instruct you to wrap your sweet potatoes tightly in aluminum foil before roasting. I despise this method. When you wrap a potato in foil, you are not roasting it; you are steaming it in its own juices. The foil traps all the escaping moisture against the skin, resulting in a soggy, wet, flabby exterior. We want the ambient dry heat of the oven to slowly dehydrate the skin, turning it into a chewy, caramelized, incredibly flavorful shell. Leave the potatoes naked.
Step 2: The Two-Stage Roasting Strategy
Place your naked, pricked sweet potatoes directly onto a high-quality roasting pan. We are going to utilize a two-stage temperature strategy to maximize enzyme activity first, and then achieve caramelization second.
Stage 1: The Enzyme Activation Phase
Preheat your oven to a shockingly low 275°F (135°C). Place the pan of potatoes into the center of the oven and walk away for at least two full hours.
Yes, two hours. By keeping the ambient oven temperature at 275°F, the internal temperature of the sweet potato will crawl upward at an agonizingly slow pace. It will enter the magic 135°F zone and stay trapped there for over an hour before it ever gets close to the 170°F death zone. During this prolonged window, the beta-amylase enzyme is working in absolute overdrive, completely dismantling the starch reserves and flooding the potato with sweet, syrupy maltose.
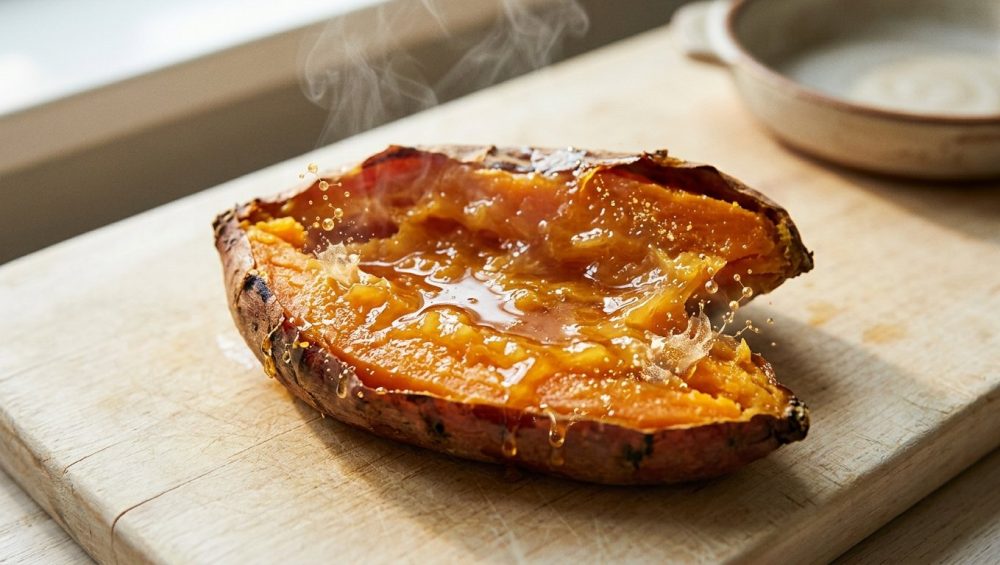
You will know this phase is working when the potatoes literally begin to weep. A thick, dark, sticky syrup will begin to ooze out of the fork holes and bubble onto your roasting pan. That is pure, unadulterated maltose.
Stage 2: The Caramelization Phase
After two hours, the potatoes will be incredibly soft, but we are not done. The flesh is currently very wet, and the skin is pale. Without removing the potatoes from the oven, crank the heat up to 400°F (200°C).
Roast them at this high temperature for an additional 30 to 45 minutes. This intense blast of finishing heat serves two purposes. First, it drives off the excess internal water, concentrating the maltose syrups so the flesh becomes dense and fudge-like rather than watery. Second, it triggers the Maillard reaction on the exterior, caramelizing the sticky syrups that have pooled on the skin and turning the jacket into a chewy, roasted delicacy.
Do not guess when it comes to internal temperature; if you suspect your meat thermometer is lying to you, calibrate it in ice water before using it to probe your potatoes. For the ultimate, dessert-like texture, you want the deepest center of the sweet potato to register between 205°F and 210°F. At this temperature, the internal structure has completely broken down into a silky puree.
Step 3: The Crucial Carryover Rest
When you pull the pan out of the oven, do not immediately cut into the potatoes. They are filled with boiling hot, liquid sugar. If you slice them open now, the steam will rapidly escape, and the flesh will seize up.
You must let them rest at room temperature for at least 20 to 30 minutes. During this resting phase, carryover cooking gently finishes the center, and more importantly, as the temperature drops, the liquid maltose syrups begin to thicken and retrograde. The flesh will settle into a dense, custardy, wildly sweet texture that requires absolutely zero added butter or sugar to enjoy.
Gear Talk: Ditch the Toxic Trash for Better Roasting
As a sassy, highly opinionated culinary blogger who advocates for the everyday home cook, I have a strict “no-go” rule when it comes to toxic, cheap, garbage kitchenware. The low-and-slow roasting method is going to produce a massive amount of sticky, burnt sugar runoff on your pan. If you use the wrong gear, you are going to ruin your equipment and potentially contaminate your food.
First of all, throw away your flimsy, paper-thin aluminum baking sheets. When you transition from a low oven to a high oven, flimsy cookware will violently pop and twist. If you are constantly wondering why your baking sheets keep warping during high-heat roasting, it is because they lack the necessary thermal mass to handle temperature fluctuations. Worse, the acidic, sugary syrup from the sweet potatoes can pit and react with cheap aluminum, imparting a metallic taste to your beautifully roasted skins.
Secondly, do not even think about roasting these on a cheap, peeling Teflon non-stick pan. The maltose syrup will bake onto the surface like industrial glue. When you inevitably have to scrub the pan with a coarse sponge to remove the burnt sugar, you are going to flake toxic, carcinogenic PFAS chemicals (forever chemicals) right off the pan and into your sink. And please, do not coat your roasting pan with cheap aerosol oils to prevent sticking. I have preached this endlessly: cooking spray is the enemy of high-quality cookware and will leave a sticky, polymerized residue that is impossible to clean.
Some home cooks try to avoid the mess by using silicone baking mats, but those mats absorb rancid oils and odors over time. This is the exact reason why your silicone spatulas taste like soap, and you certainly don’t want that flavor transferring to your food.
Instead of relying on toxic crutches, you need to invest in the essential tools every beginner needs, such as a heavy-gauge, uncoated stainless steel roasting pan or a seasoned cast iron skillet. These materials offer incredible thermal mass, ensuring even heat distribution during that critical two-hour low-temp window. If you are worried about the sticky maltose cleanup on bare stainless steel, simply line the pan with a sheet of high-quality, unbleached parchment paper. It is non-toxic, heat-safe up to 425°F, and makes cleanup an absolute breeze.
Weekday Hacks vs. Weekend Projects: Managing Your Time
I am a realist. I know perfectly well that you do not have two and a half hours to roast a sweet potato on a chaotic Wednesday evening. Time is money, and when you are trying to get a weeknight dinner on the table, efficiency is your ultimate priority.
This is why the low-and-slow method is strictly a weekend project. But you can absolutely leverage this weekend perfection for your weekday survival.
The smartest thing you can do is buy a massive, ten-pound bag of sweet potatoes and batch-roast all of them on a lazy Sunday afternoon. Let them go through the entire two-and-a-half-hour process. Let them cool completely, then store them whole, in an airtight container, in the refrigerator. They will keep perfectly for up to five days.
When Wednesday rolls around and you need a lightning-fast, incredibly flavorful side dish, your prep work is already done. Simply take a cold, pre-roasted sweet potato out of the fridge and slice it in half lengthwise. Heat a bare cast iron skillet over medium-high heat with a small knob of grass-fed butter or a drizzle of olive oil. Place the sweet potato halves cut-side down into the hot skillet.
Because the starches have already been converted to sugars, the surface of the potato will instantly begin to caramelize and form a crispy, deeply browned crust in a matter of minutes. When you pan-sear these leftover halves in a hot skillet, they develop a beautiful caramelized crust, and you can easily deglaze the pan, turning burnt bits into sauce to drizzle right back over the top. You get the phenomenal, complex sweetness of a three-hour roast with only five minutes of active weeknight cooking. This is how you cook like an expert without losing your mind.
Beyond the Baked Potato: What to Do With Your Liquid Gold
Once you have mastered the low-and-slow roasting technique, you will find that these hyper-sweetened, maltose-rich potatoes are the ultimate culinary cheat code. Because you have fundamentally altered their chemical structure, they can be utilized in ways that a rush-roasted potato simply cannot.
The Ultimate One-Ingredient Puree
If you scoop the flesh out of a properly slow-roasted Garnet or Beauregard sweet potato and run it through a food processor, it will whip into a velvety, silky puree that looks and tastes like it is loaded with heavy cream and brown sugar. It requires absolutely nothing else. You can serve this under a pan-seared pork chop or a roasted chicken thigh for a restaurant-quality plating presentation that took zero extra effort.
Upgraded Baking Applications
If you are making a sweet potato pie, sweet potato muffins, or sweet potato pancakes, always use the flesh from a low-and-slow roasted tuber. Because the moisture has been reduced and the complex sugars have been maximized, your baked goods will have a much deeper, more robust flavor. Furthermore, because the potato is naturally sweeter, you can significantly reduce the amount of refined white sugar called for in the recipe.
Natural Soup Thickeners
Drop a peeled, slow-roasted sweet potato into a blender with some chicken stock, roasted garlic, and a touch of smoked paprika. The dense, broken-down starches will act as a natural hydrocolloid, thickening the soup into a rich, creamy bisque without the need for a traditional flour roux or heavy dairy.
The Final Word: Trust the Process, Not the Sugar Bowl
At the end of the day, cooking is just edible chemistry. You do not need a Michelin star or a pretentious culinary vocabulary to make incredible food; you just need to understand the basic rules of the game.
The sweet potato is a perfect example of how patience and temperature control can completely transform a humble, inexpensive ingredient into a luxurious masterpiece. By respecting the beta-amylase enzyme and giving it the time it needs to perform its molecular magic in that crucial 135°F to 170°F window, you eliminate the need for toxic kitchen hacks, artificial sweeteners, and marshmallow fluff.
So the next time you bring a bag of these tubers home from the market, do them a favor. Don’t rush them. Drop your oven temperature, walk away, and let the science do the heavy lifting. Your taste buds—and your weeknight dinner routine—will thank you.