
We have all been there, staring down a hot skillet with a mixture of anticipation and mounting dread. You carefully pour a generous, shimmering glug of expensive extra-virgin olive oil into the pan. You gently lay down a beautiful, firm slice of raw eggplant, expecting the satisfying, continuous sizzle of a perfect sear. Instead, you witness a culinary magic trick that belongs in a horror movie: within three seconds flat, the oil completely vanishes. The pan is bone dry. The vegetable has inhaled every single drop of fat, and now, instead of developing a crispy, caramelized crust, it is aggressively sticking to the metal and beginning to burn. You panic, add more oil, and the vicious cycle repeats itself until you are left with a heavy, oil-logged, unappetizing disk of regret.
If this scenario sounds painfully familiar, take a deep breath. You are not a bad cook. You are simply fighting a losing battle against cellular biology and thermodynamics. Eggplant is a notoriously tricky ingredient for the weekend culinary hobbyist, but it absolutely does not require a culinary degree to master. You just need to understand the science of what is happening on your cutting board, and more importantly, how to manipulate it. The secret to transforming this vegetable from a heavy grease-trap into a silky, tender, melt-in-your-mouth masterpiece lies in a simple, science-backed prep step: the salt sweat.
The Botanical Sabotage: Why Your Eggplant Hates You
To understand why this vegetable acts the way it does, we have to put on our lab coats and look at the microscopic anatomy of Solanum melongena. While it feels solid and heavy when you pick it up in the produce aisle, the internal structure of a raw eggplant is highly deceptive. It is composed of roughly ninety percent water, but that water is suspended within a vast, intricate network of tiny, microscopic air pockets.
Think of the flesh as a biological kitchen sponge. When you drop a dry sponge into a sink full of soapy water, capillary action draws the liquid into the empty pockets, filling the voids instantly. The exact same physical process occurs in your skillet. When raw, untreated eggplant hits hot oil, the intense heat immediately vaporizes the water trapped inside the vegetable’s cells. That water turns into steam and forcefully escapes. The sudden departure of the water leaves behind empty, expanding air pockets. These empty pockets create a literal vacuum effect. As the structure expands and contracts in the heat, it violently sucks up whatever liquid is surrounding it. If that liquid happens to be a quarter-cup of your best olive oil, the vegetable will drink it all in a heartbeat.
This is why, without proper preparation, your beautiful produce rapidly becomes a greasy sponge that ruins the entire texture of your dinner. It is not a matter of cooking skill; it is a matter of structural mechanics. Unsalted, unprepared eggplant can absorb up to fifty percent of its own weight in oil during the frying process. That is enough to make even the most robust stomach feel heavy and sluggish. To stop this from happening, we have to physically alter the cellular structure before the food ever comes into contact with the heat. We have to collapse the sponge.
The Osmosis Protocol: Hacking Cellular Biology
Enter salt. The age-old technique of salting your vegetables before cooking is not just some fussy, outdated step invented by pretentious chefs with too much time on their hands. It is a highly effective, scientifically proven method of manipulating moisture through a process called osmosis.
Osmosis is the movement of water across a semi-permeable membrane from an area of low solute concentration to an area of high solute concentration. When you aggressively coat the exposed flesh of a sliced eggplant with salt, you are creating a hypertonic environment on the surface of the vegetable. The cells inside the flesh recognize this extreme imbalance and immediately begin to expel their internal water in a desperate attempt to dilute the salt on the surface.
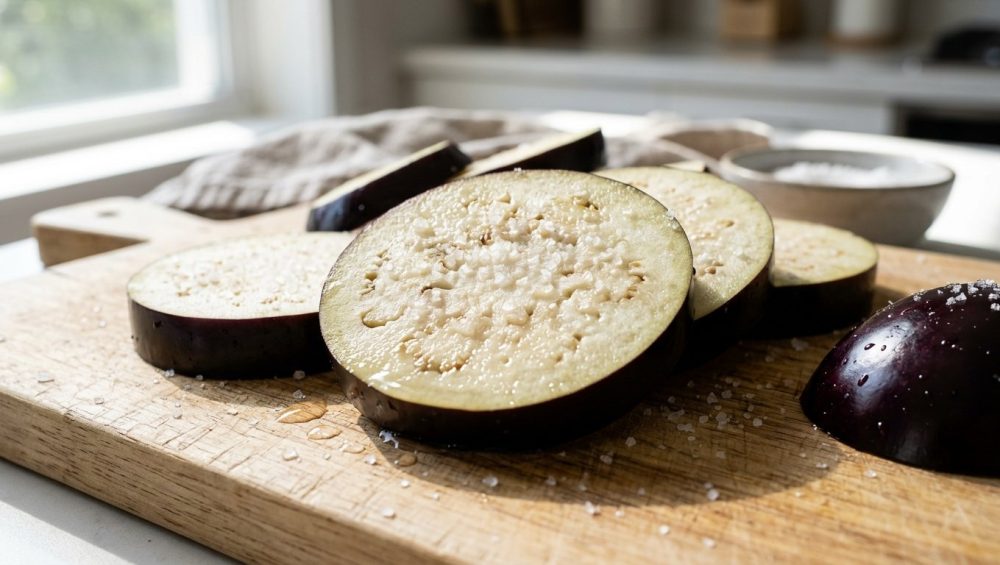
As the water rushes out of the cells, you will see beads of moisture form on the surface—this is the “sweat.” But the real magic is happening beneath the surface. As the cells lose their water, they deflate. Without the internal water pressure keeping them inflated, those millions of microscopic air pockets collapse in on themselves. The spongy, airy texture condenses into a tight, dense, meaty structure.
Why does this matter for your dinner? Because a dense, collapsed structure has absolutely no room left to absorb oil. When you introduce this pre-treated, condensed vegetable to a hot skillet, the oil stays in the pan where it belongs, conducting heat and creating a crispy, golden-brown crust. The interior, safely protected from the grease, gently steams in its own residual moisture, transforming into a rich, creamy, custard-like texture. It is proof that a little salt fixes everything when applied with proper technique and patience.
Dispelling the Great Bitterness Myth
If you have ever read a vintage cookbook or watched an old-school cooking show, you have likely heard a slightly different explanation for this technique. For decades, the prevailing culinary wisdom dictated that you must salt your eggplants strictly to draw out bitter, unpalatable juices.
Historically, this was entirely accurate. Early cultivars of this nightshade family member were notoriously loaded with bitter alkaloid compounds, specifically solanine, which served as a natural defense mechanism against pests. Salting the flesh and washing away the dark, murky liquid that pooled on the surface was an absolute necessity to make the food edible.
However, we are no longer cooking in the 1950s. Modern agricultural science and decades of selective breeding have largely eliminated these bitter compounds from commercial varieties. Today, the standard globe eggplants, slender Japanese varieties, and striped graffiti eggplants you find at your local grocery store are inherently mild, sweet, and tender.
So, if the bitterness is gone, why do we still bother with the prep work? Because the structural problem remains. We are no longer salting for flavor correction; we are salting for structural integrity, moisture control, and oil defense. Do not let anyone tell you that this step is obsolete just because modern produce is sweeter. If you skip it, you will still end up with a pan full of grease.
Method One: The Classic Dry Sweat (For the Weekend Perfectionist)
When you have the luxury of time on a lazy Saturday afternoon and you want to execute a flawless Eggplant Parmesan or a stunning Ratatouille, the classic dry sweat is the undisputed gold standard. It requires zero special equipment, just a bit of patience and some high-quality kosher salt.
Step 1: The Precision Cut
Begin by slicing your vegetable uniformly. Whether you are cutting rounds for a layered bake or thick planks for the grill, aim for a thickness of about half an inch to three-quarters of an inch. Uniformity is critical here; if your slices are wildly uneven, the salt will penetrate at different rates, leaving you with some pieces that are perfectly condensed and others that are still spongy in the center.
Step 2: The Generous Coating
Once you chop your nightshades, you will absolutely need a bench scraper to easily transfer the mountain of slices into a large colander. Place the colander in your sink or over a large mixing bowl to catch the liquid. Now, you must salt generously. I am not talking about a polite, delicate sprinkle. You need to coat both sides of every single slice with a visible layer of salt.
Crucially, you must use Kosher salt (like Diamond Crystal or Morton) for this step. Do not use fine iodized table salt. Table salt is too dense, dissolves too quickly, and will aggressively penetrate the flesh, rendering your dinner inedible. Kosher salt has large, flaky crystals that sit on the surface, drawing out the moisture without over-seasoning the interior.
Step 3: The Waiting Game
Walk away. Let the colander sit undisturbed for a minimum of 45 minutes, though 60 minutes is ideal. During this time, you will witness the osmosis in action. The flesh will transform from opaque and spongy to slightly translucent and dense. A significant amount of brownish liquid will pool at the bottom of the bowl.
Step 4: The Aggressive Purge
This is the step where most rookies ruin their dinner. You cannot just throw these salted slices directly into a pan, or your meal will taste like seawater. You must thoroughly rinse the slices under cold running water to wash away the excess surface salt.
After rinsing, you must dry them aggressively. Place the slices between layers of clean, lint-free kitchen towels or heavy-duty paper towels, and press down firmly. You want to extract as much surface moisture as humanly possible. If you introduce wet vegetables to hot oil, the water will instantly vaporize, dropping the temperature of your pan and causing the food to steam rather than sear. A bone-dry surface is the absolute prerequisite for the Maillard reaction—the chemical process responsible for that beautiful, savory, brown crust.
Method Two: The Submersion Brine (For the Diced Dilemmas)
The dry sweat is perfect for large slices and planks, but it becomes incredibly tedious and inefficient when you are working with small cubes for a pasta sauce, a stir-fry, or a caponata. Trying to evenly coat hundreds of tiny cubes in a colander usually results in wildly uneven seasoning and patchy texture. For diced applications, we pivot to the wet brine.
The Science of the Brine
A wet brine utilizes the exact same principle of osmosis, but it uses a liquid medium to ensure that every single surface of every single cube is exposed to the exact same salinity. The saltwater solution pulls the internal moisture out of the cubes while simultaneously seasoning the flesh perfectly from the outside in.
The Execution
In a large mixing bowl, dissolve two tablespoons of Kosher salt into one liter (about four cups) of cold water. Whisk vigorously until the water is completely clear and the salt is fully dissolved.
Drop your diced cubes into the brine. Because of their spongy, airy nature, the cubes will stubbornly float to the top. To ensure they are fully submerged and treating evenly, place a heavy dinner plate directly on top of the water to weigh the vegetables down.
Let the bowl sit for 30 to 45 minutes. When the time is up, drain the cubes in a colander. Because they have been soaking in liquid, they will be quite wet. You must lay them out on a clean kitchen towel, roll the towel up into a cylinder, and gently squeeze to wring out the excess moisture. The cubes will emerge condensed, perfectly seasoned, and completely immune to soaking up excess oil in your wok or skillet.
Method Three: The Thermal Shortcut (The Weekday Cheat Code)
I am a realist. I know that when it is 6:30 PM on a Tuesday and you are desperately trying to master simple weeknight dinners before you collapse from exhaustion, you do not have an hour to stand around waiting for a vegetable to slowly sweat in a colander. You need efficiency, and you need it now.
When time is of the essence, we abandon osmosis and rely on brute thermal force. We can achieve the exact same structural collapse by utilizing the intense, targeted heat of a microwave.
The Microwave Hack
Microwaves work by emitting electromagnetic waves that specifically target and excite water molecules inside your food. By placing our spongy, water-logged slices into the microwave, we can rapidly heat the internal moisture, turning it into steam. As the steam forces its way out of the flesh, the air pockets collapse instantly. It is the exact same physical result as the salt sweat, achieved in a fraction of the time.
Line a large, microwave-safe plate with two layers of heavy-duty paper towels. Arrange your slices in a single, even layer on the paper towels. Do not overlap them, or they will steam unevenly. Place another layer of paper towels directly on top of the slices.
Microwave on high power for three to five minutes, depending on the wattage of your appliance and the thickness of your cuts. Keep a close eye on them; you want the slices to look shriveled, dense, and slightly pliable, but you do not want to fully cook them to mush.
Carefully remove the plate (it will be blazing hot) and discard the paper towels, which will be completely saturated with the expelled moisture. Your slices are now pre-collapsed, dense, and ready to hit the frying pan immediately. The magic of a quick microwave prep step cannot be overstated for the busy home cook; it saves you an hour of prep time and still guarantees that you can stop eating greasy eggplant forever.
The Sassy Sous-Chef’s Cookware Manifesto
We need to pause for a moment and have a brutally honest conversation about the equipment you are using. I can teach you the intricate cellular biology of vegetables and give you foolproof prep techniques all day long, but if you are executing these techniques on cheap, toxic, degraded cookware, you are sabotaging yourself before you even turn on the stove.
I have zero patience for the flimsy, scratched aluminum pans you bought for ten dollars five years ago. You know the ones I am talking about—the pans where the dark non-stick coating is actively flaking off into your food. Cooking on compromised synthetic coatings is not only a fantastic way to ruin a meal with uneven heating, but it is also a legitimate health hazard. It is time to step up and start banishing toxic kitchen gear from your cabinets once and for all.
Furthermore, if you are relying on those aerosol cooking sprays to keep your food from sticking, you are making a massive mistake. Those pressurized cans contain soy lecithin and chemical propellants that bake into the surface of your cookware at high temperatures, creating a sticky, invisible, impossible-to-remove polymer residue. This buildup completely destroys the non-stick properties of your equipment, actively ruining your nonstick pans with every single spray. Throw the cans in the garbage and buy a bottle of real, high-quality cooking oil.
The Right Tools for the Job
If you want to cook like an expert and achieve professional-level sears, you need cookware that can retain heat and distribute it evenly. When you place a room-temperature ingredient into a hot pan, the temperature of the metal plummets. Cheap, thin pans cannot recover quickly enough, meaning your food ends up simmering in its own juices rather than searing.
For pan-frying, I demand that you use either a heavy-bottomed stainless steel skillet, a carbon steel pan, or a well-seasoned cast iron skillet.
If you are using uncoated metal and your food constantly sticks to your stainless steel, it means your heat control is completely out of whack. You are likely putting the food in before the pan is hot enough, or you are impatiently trying to flip the food before the Maillard reaction has naturally released it from the metal. Let the pan preheat properly, add your oil, wait for it to shimmer, and then trust the process.
If you prefer the natural, slick surface of traditional heavy metal, that is fantastic. But you must maintain it. Please, stop ruining your cast iron by letting it soak in a sink full of soapy dishwater overnight. Clean it properly while it is still warm, dry it thoroughly on the stovetop, and apply a micro-thin layer of oil to protect that beautiful, hard-earned seasoning. Treat your gear with respect, and it will reward you with flawless meals for the rest of your life.
The Final Sear: Achieving the Creamy Custard Interior
Now that you have successfully collapsed the cellular sponge—whether through the patient art of the dry sweat, the even distribution of the wet brine, or the rapid thermal force of the microwave—and you have a high-quality, heavy-bottomed skillet ready to go, it is time to bring it all together.
Place your skillet over medium-high heat and allow the dry metal to come up to temperature. Once the pan is hot, add a reasonable amount of high-quality cooking oil. Because we have fundamentally altered the structure of the vegetable, you do not need to pour in half a bottle of oil. Two to three tablespoons will be more than enough to achieve a beautiful fry.
Wait for the oil to shimmer and glide across the surface of the pan like water. Carefully lay your prepped, bone-dry slices into the oil, making sure to lay them away from you so that any rogue splatters do not hit your hands. Do not overcrowd the pan. If you pack the slices in shoulder-to-shoulder, the ambient temperature will drop, the moisture will become trapped, and you will accidentally steam your food. Work in batches if necessary.
Because the flesh is now dense and compressed, it will not absorb the fat. Instead, the oil will remain on the exterior, conducting the intense heat directly into the surface of the food. Leave the slices completely alone for three to four minutes. Do not poke them, do not prod them, and do not nervously lift the edges. Allow the Maillard reaction to work its chemical magic, transforming the exterior into a deeply browned, crispy, savory crust.
When you flip the slices, you will see a gorgeous, caramelized surface that looks like it came out of a professional restaurant kitchen. Cook the second side until equally browned.
While the exterior is crisping up, the magic is continuing on the inside. Protected by the dense outer layer, the interior flesh gently steams in its own residual moisture. It breaks down, softening into a rich, silky, luxurious texture that practically melts on the tongue. It is the exact opposite of the chewy, rubbery, oil-slicked disasters of the past.
The Weekend Culinary Hobbyist’s Triumph
Mastering the art of cooking at home does not require a fancy degree, a towering chef’s hat, or a vocabulary full of pretentious French culinary jargon. It simply requires a basic understanding of how ingredients behave, a willingness to respect the science of the kitchen, and the refusal to accept mediocre results.
Eggplant is a beautiful, versatile, and incredibly delicious ingredient, provided you understand its biological quirks. It wants to act like a sponge, but you are the boss of your cutting board. By utilizing the power of osmosis through a proper salt sweat, or by harnessing the targeted heat of your microwave, you can forcefully change the rules of engagement. You can collapse those air pockets, lock out the grease, and guarantee a perfect texture every single time.
So the next time you are planning a weekend cooking project or throwing together a quick weeknight meal, do not be intimidated by this quirky purple nightshade. Grab your kosher salt, prep your slices with confidence, and get ready to experience the absolute best, most creamy, and non-greasy vegetable dish you have ever made in your own kitchen. You’ve got this.






