
We have all been there. It is a lazy Sunday morning, the coffee is brewing, the sourdough is toasted, and you have decided to treat yourself to a luxurious, café-style brunch in the comfort of your own home. You bring a pot of water to a boil, crack an expensive, pasture-raised egg into the depths, and watch in absolute horror as it instantly explodes into a chaotic, stringy, ghostly mess. Instead of a tight, delicate, perfectly oval poached egg, you are left staring at a pot of cloudy breakfast soup that looks like a jellyfish caught in a propeller.
If you are nodding your head in painful agreement, take a deep breath and pour yourself a mimosa. I am here to tell you that the problem is not your culinary skill level, and it is certainly not a lack of effort. The problem is a fundamental misunderstanding of the ingredient itself, compounded by decades of terrible advice from pretentious restaurant chefs who love to overcomplicate simple food. Once you learn how to [transform your chaotic cooking routine](https://citchenware.com/blog/the-art-of-the-kitchen/how-to-transform-your-chaotic-cooking-routine-into-a-peaceful-daily-habit/) by applying a little bit of basic kitchen science, you will never fear the poaching pot again.
Today, we are going to completely demystify the poached egg. We are going to throw out the chaotic water vortexes, banish the flavor-ruining vinegar, and introduce you to the absolute genius of the stainless steel fine mesh strainer. By the end of this incredibly comprehensive masterclass, you will be churning out flawlessly tight, restaurant-quality poached eggs with zero stress and zero culinary degree required.
The Biological Masterpiece: Understanding the Anatomy of an Egg
To perfectly cook an ingredient, you must first understand how it is built. An egg is not just a yellow circle floating in a clear puddle; it is a highly complex, biological marvel engineered to protect and nourish. When we fail at poaching, it is because we are fighting against the egg’s natural anatomy rather than working with it.
The Shell and the Membranes
Let us start from the outside. The shell of an egg is composed primarily of calcium carbonate. While it looks completely solid to the naked eye, it is actually a semi-permeable membrane covered in up to 10,000 microscopic pores. These pores allow moisture and gases to exchange between the inside of the egg and the outside environment. Just inside the shell lie two protective membranes—the outer and inner shell membranes—which act as a defensive barrier against bacterial invasion.
The Chalazae
If you have ever cracked an egg and noticed those weird, twisted, white stringy things clinging to the yolk, congratulations, you have found the chalazae (pronounced kuh-LEY-zee). These are tightly wound spirals of protein that act like tiny bungee cords, anchoring the yolk securely in the absolute center of the egg so it does not smash against the shell. The more prominent and visible the chalazae, the fresher the egg.
The Tale of Two Whites: Thick vs. Thin Albumen
This is where the absolute secret to poached egg success lies. The egg white, scientifically known as the albumen, makes up about two-thirds of the egg’s total weight. It consists of roughly 90 percent water and 10 percent protein (specifically ovalbumin, conalbumin, and ovomucoid). However, the albumen is not a single, uniform liquid. It is actually divided into distinct layers, and the two most important for our culinary purposes are the inner thick albumen and the outer thin albumen.
The inner thick albumen (also called the chalaziferous white) is a dense, gel-like capsule that tightly hugs the yolk. It is structurally sound and holds its shape beautifully. The outer thin albumen, on the other hand, is a much more watery, fluid layer that surrounds the thick white.
The Aging Process and the pH Shift
Here is the crucial piece of the puzzle: as an egg ages in your refrigerator, carbon dioxide slowly escapes through those 10,000 microscopic pores in the shell. As the CO2 leaves, the internal environment of the egg changes. The pH level of the egg white rises, becoming more alkaline. This chemical shift causes the tight protein bonds in the inner thick albumen to gradually break down and degrade.
Simply put, as an egg gets older, the thick white shrinks, and the watery, thin white multiplies. When you crack an older egg into a hot pan, it spreads out wildly across the skillet. (Side note: this aging process is also exactly [hard-boiled eggs refuse to peel](https://citchenware.com/blog/kitchen-stories-solutions/why-your-hard-boiled-eggs-refuse-to-peel-and-how-to-fix-it/) when they are too fresh, as the lower pH causes the albumen to aggressively fuse to the inner membrane when heated).
When you drop an egg with a large amount of watery, thin albumen into a pot of simmering water, those loose proteins instantly detach from the yolk and drift away into the current. Those ugly, wispy tentacles ruining your brunch? That is the outer thin albumen. If we want a perfect poached egg, we must deal with the thin white.
The Pretentious Chef Myths: Why Traditional Methods Fail
For decades, professional chefs and glossy food magazines have peddled two primary “tricks” for achieving the perfect poached egg. As a home cook who despises unnecessary fluff, I am here to [decode pretentious recipe jargon](https://citchenware.com/blog/the-modern-recipe/how-to-decode-pretentious-recipe-jargon-and-conquer-the-modern-kitchen/) and explain exactly why these traditional methods are flawed, stressful, and entirely unnecessary for your weekend brunch.
Myth 1: The Chaotic Water Vortex
The most common piece of poaching advice is to use a spoon to vigorously stir your simmering water, creating a deep, swirling whirlpool (or vortex) in the center of the pot. The theory is that when you drop the egg into the eye of the whirlpool, the centripetal force will wrap the wispy whites tightly around the yolk, creating a neat little spherical package.
In practice, the vortex method is a logistical nightmare for the everyday home cook. First, it requires perfect timing and a deft hand. If the water is spinning too fast, the violent turbulence will actually rip the delicate egg apart. If it is spinning too slowly, the egg will just sink to the bottom and flatten out.
More importantly, the vortex method only allows you to cook exactly one egg at a time. If you are trying to serve Eggs Benedict to a table of four hungry friends, poaching one egg every four minutes while frantically swirling a pot of water is a guaranteed way to ruin your morning. By the time the fourth egg is done, the first egg is ice cold. Time is money, and the vortex is a massive waste of both.
Myth 2: The Flavor-Ruining Vinegar Trick
The second most pervasive myth is that you must dump a heavy splash of white vinegar into your poaching water. This is a classic restaurant trick, and unlike the vortex, it actually is rooted in sound molecular chemistry.
Remember those ovalbumin proteins in the egg white? They need heat to denature (unwind) and coagulate (bind together into a solid). However, proteins are also highly reactive to acid. When you introduce acetic acid (vinegar) to the water, you drastically lower the pH of the cooking environment. This highly acidic water shocks the egg white proteins, causing them to coagulate and firm up almost instantly upon contact. The acid acts like a chemical net, forcing the watery thin albumen to seize up before it has a chance to drift away and form wisps.
So, why is this a bad thing? Because it ruins the eating experience.
Using vinegar is a chemical crutch to compensate for [common beginner cooking mistakes](https://citchenware.com/blog/kitchen-stories-solutions/exactly-how-to-fix-the-seven-most-common-beginner-cooking-mistakes-without-ruining-dinner/) and older eggs. While the acid does hold the egg together, it severely alters the texture of the exterior white, turning it chalky, rubbery, and tough. Furthermore, the egg absorbs the flavor of the cooking liquid. Unless you specifically want your delicate, buttery poached egg to taste like a harsh salad vinaigrette, keep the acid out of your poaching pot. We want our eggs to taste like eggs, not pickled science experiments.
The Stainless Steel Savior: The Genius of the Fine Mesh Strainer
If the vortex is inefficient and the vinegar ruins the flavor, how do we solve the problem of the wispy thin albumen? The answer is brilliantly simple. Instead of using chaotic motion or harsh chemistry to force the watery whites to behave, we use basic physics to eliminate them entirely.
Enter the fine mesh strainer.
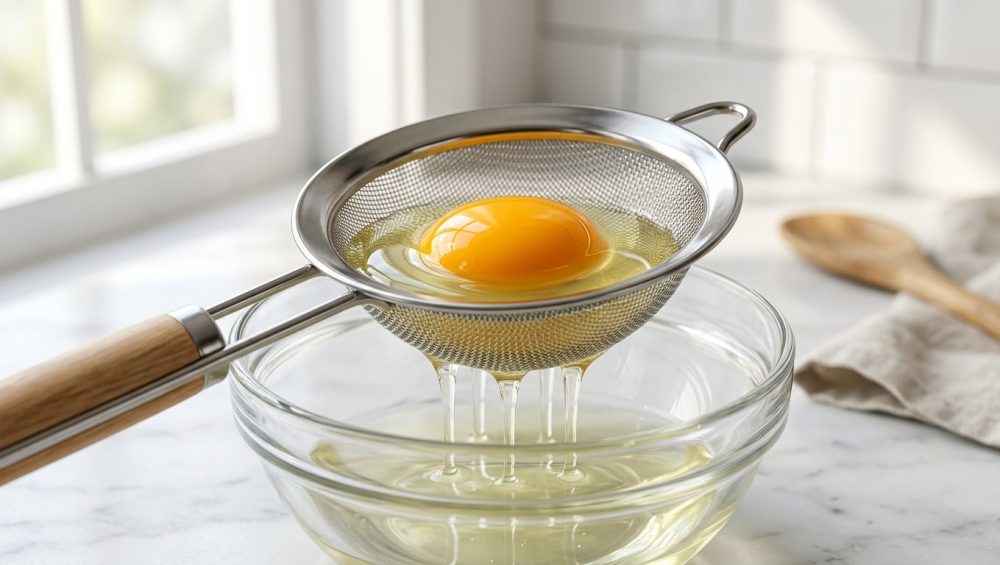
This simple, inexpensive kitchen tool is the absolute holy grail of egg poaching. The concept is foolproof: when you crack an egg into a fine mesh strainer, the tight, structural inner thick albumen stays cradled in the basket, safely holding the yolk. Meanwhile, the degraded, watery outer thin albumen—the exact culprit behind the ugly, ghost-like tentacles—simply drips right through the mesh and down the drain.
What you are left with in the basket of the strainer is the purest, tightest, most pristine version of the egg. When you gently slip this filtered egg into a pot of plain, gently simmering water, there is absolutely nothing left to drift away. The thick albumen instantly sets around the yolk in a flawless, tight, beautiful oval. No swirling required. No vinegar required. You can easily drop four, six, or eight strained eggs into a wide pan simultaneously, allowing you to feed a crowd without breaking a sweat.
The “No-Go” Rule on Toxic and Gimmicky Gear
Before we get to the step-by-step masterclass, we need to have a brutally honest conversation about your kitchen equipment. I have a strict “no-go” rule when it comes to cheap, toxic, and gimmicky kitchenware, and the egg-poaching industry is absolutely rife with garbage products designed to separate you from your money. I am fiercely dedicated to [banishing toxic kitchen gear](https://citchenware.com/blog/the-curators-corner/a-brutally-honest-masterclass-on-upgrading-your-cooking-skills-and-banishing-toxic-kitchen-gear/) from your home.
The Silicone Poaching Pods
First on the chopping block are those brightly colored, floppy silicone poaching cups that you float in boiling water. These are an absolute abomination. First, they do not actually poach the egg; they steam it inside a rubber cup, resulting in a weird, flat-topped, rubbery puck that looks like it came out of a fast-food breakfast sandwich. Second, cheap silicone is notorious for absorbing the chemical odors of dishwasher detergents. If you have ever wondered why your [silicone spatulas taste like soap](https://citchenware.com/blog/kitchen-stories-solutions/why-your-silicone-spatulas-taste-like-soap-and-how-to-fix-it/), it is because the material is porous. Serving your guests an egg that tastes like artificial lemon dish soap is a culinary tragedy.
The Peeling Non-Stick Inserts
Next are those dedicated non-stick poaching pans that feature tiny metal cups coated in cheap polytetrafluoroethylene (PTFE). Subjecting cheap non-stick coatings to high heat and boiling water inevitably leads to the coating blistering, flaking, and peeling directly into your food. It is time to [stop ruining your nonstick pans](https://citchenware.com/blog/the-art-of-the-kitchen/stop-ruining-your-nonstick-pans-why-cooking-spray-is-the-enemy/) and stop ingesting mystery chemical flakes with your breakfast.
The Only Tool You Need
You do not need a unitasker gadget to poach an egg. You simply need one of the [essential tools every beginner needs](https://citchenware.com/blog/the-curators-corner/essential-tools-every-beginner-needs-to-build-a-beautifully-organized-dream-kitchen/): a high-quality, stainless steel fine mesh strainer. Stainless steel is non-toxic, non-reactive, heat-safe, incredibly durable, and completely dishwasher safe. It will not melt, it will not peel, and it will not absorb soap flavors. A strainer with a comfortable handle and a resting hook on the rim will serve you for decades, not just for eggs, but for sifting flour, dusting powdered sugar, and making silky smooth pan sauces.
The Definitive Masterclass: Step-by-Step Strainer Poaching
Now that we understand the anatomy of the egg, the flaws of traditional methods, and the absolute necessity of safe, high-quality gear, it is time to put it all together. This is the definitive, foolproof method for achieving restaurant-quality poached eggs in your own kitchen.
Step 1: The Setup and Temperature Control
The vessel you choose for poaching matters just as much as the strainer. Do not use a deep, narrow stockpot. You want a wide, relatively shallow cooking surface so you have plenty of room to maneuver. A stainless steel sauté pan or a wide Dutch oven is perfect. Fill the pan with about three to four inches of water.
Temperature control is paramount. We do not want a violent, rolling boil. Large, aggressive bubbles will physically batter the delicate egg whites, tearing them apart before they have a chance to set. You want a very gentle simmer—often referred to as a “sub-simmer” or a “shiver.” Look for tiny, champagne-like bubbles gently rising from the bottom of the pan, with a water temperature hovering right around 180°F to 190°F.
Step 2: The Crack and Strain
While your water is coming up to temperature, it is time to prep the eggs. Do not crack the egg directly into the strainer, as a rogue shell fragment can easily get wedged in the mesh. Instead, crack your remarkably fresh egg into a small ramekin or a liquid measuring cup.
Hold your fine mesh strainer over a sink or a small bowl, and gently pour the egg from the ramekin into the strainer basket. Let it sit there for about 30 to 60 seconds. You can gently swirl the strainer in a circular motion to encourage the process. Watch as the watery, thin albumen drips away, leaving only the tight, plump thick albumen safely enveloping the yolk.
Step 3: The Gentle Drop
Once the egg is strained, bring the strainer over to your pan of gently simmering water. Do not hold the strainer high above the pot and drop the egg in like a cannonball. You want to minimize impact.
Lower the bottom of the strainer directly to the surface of the water so it is just barely touching the liquid. Gently tilt the strainer and allow the egg to softly slide out and slip into the water. Because you have eliminated the thin whites, the egg will immediately hold a beautiful, tight, teardrop or oval shape.
If you notice the egg sinking and staying on the bottom of the pan, do not panic. While we often talk about how to [prevent protein sticking](https://citchenware.com/blog/kitchen-stories-solutions/utilizing-the-leidenfrost-effect-to-prevent-protein-sticking-in-stainless-steel-pans/) when searing meats, in a poaching liquid, a gentle nudge with a silicone spatula or a slotted spoon after about 10 seconds of cooking is all it takes to free the egg from the bottom of the pan.
Step 4: The Precision Cook
Once the egg is in the water, step back and let the thermodynamics do the work. Do not poke, prod, or stir.
For a perfectly poached egg with fully opaque, tender whites and a warm, liquid, jammy yolk, you want to cook it for exactly 3 minutes. If you prefer a medium poach with a slightly firmer, fudge-like yolk, aim for 4 minutes. If you want a hard-poached egg with a fully set yolk, leave it in for 5 minutes (though at that point, you might as well just make a hard-boiled egg).
Setting a digital timer is non-negotiable here. When dealing with delicate proteins, 30 seconds is the difference between culinary perfection and a rubbery disappointment.
Step 5: The Extraction and Draining
When your timer goes off, it is time to extract your masterpiece. Use a wide, stainless steel slotted spoon or a slotted fish turner to gently lift the egg out of the water.
This next step is critical and often overlooked by home cooks: you must drain the egg. A perfectly poached egg is ruined if it transfers a puddle of hot cooking water onto your plate, turning your beautifully toasted English muffin or sourdough bread into a soggy, unappetizing sponge.
Hold the slotted spoon with the egg on it, and gently touch the bottom of the spoon to a folded paper towel or a clean kitchen towel for just a second. The towel will wick away the excess moisture through the slots in the spoon.
Finally, gently slide the egg onto your prepared dish. Hit it with a generous pinch of flaky sea salt and freshly cracked black pepper. Cut into it with your fork, and watch in immense satisfaction as the liquid gold yolk slowly runs over your plate.
Advanced Troubleshooting and Weekend Hosting
Once you master this strainer technique, you will realize that poaching eggs is actually one of the most efficient ways to cook for a crowd. If you are hosting a Sunday brunch, you do not want to be standing over a hot stove cooking eggs to order while your guests are drinking all the good champagne.
The Make-Ahead Ice Bath Technique
This is a brilliant restaurant trick that allows you to [master simple weeknight dinners](https://citchenware.com/blog/the-modern-recipe/how-to-master-simple-weeknight-dinners-when-you-have-zero-cooking-skills/) or weekend parties with zero stress. You can actually poach your eggs hours, or even a full day, in advance.
Set up a large bowl filled with cold water and ice cubes next to your stove. Using the strainer method, poach your eggs in batches of three or four at a time. However, instead of cooking them for the full 3 minutes, pull them out at the 2.5-minute mark.
Immediately drop the soft-poached eggs directly into the ice bath. The freezing water will instantly halt the cooking process, locking the yolks in their runny state. You can leave the eggs in this cold water in the refrigerator overnight.
When your guests arrive and the hollandaise sauce is ready, simply bring a pot of water to a gentle simmer. Drop the cold, pre-poached eggs into the hot water for exactly 60 seconds. This is just enough time to heat them all the way through without overcooking the yolks. Extract them, drain them on a paper towel, and serve immediately. You just served eight flawless poached eggs simultaneously, and you look like an absolute culinary wizard.
Dealing with Sub-Par Eggs
Let us be realistic: we do not always have access to farm-fresh eggs laid that very morning. Sometimes, all we have is a carton of grocery store eggs that have been sitting in the fridge for two weeks.
The older the egg, the more thin albumen you will have to strain away. When you crack an older egg into your mesh strainer, you might be shocked at how much liquid falls through, leaving you with a surprisingly small thick white and yolk in the basket. Do not be alarmed. It is much better to sacrifice that watery volume down the drain than to let it ruin your poaching liquid. A slightly smaller, perfectly tight poached egg is infinitely superior to a massive, stringy, waterlogged mess.
Final Thoughts: Empowering the Home Cook
Cooking should never be a source of anxiety. When a recipe or a technique fails you, it is almost always because the traditional instructions rely on outdated myths, unnecessary gadgets, or a misunderstanding of basic kitchen science.
The transition from a chaotic, stringy pot of vinegar-water to a pristine, perfectly oval poached egg does not require years of culinary school or a natural-born talent for the culinary arts. It requires nothing more than a basic understanding of thick versus thin albumen and the willingness to utilize a simple, non-toxic fine mesh strainer.
By filtering out the degraded whites, controlling your water temperature, and honoring the integrity of the ingredient, you elevate your home cooking to a professional standard. So this weekend, skip the crowded brunch lines, pour yourself a fantastic cup of coffee, grab your stainless steel strainer, and go poach some eggs with absolute confidence. You’ve got this.






