
Picture this: It is a Friday night. You have survived another grueling workweek, and to celebrate, you dropped an unjustifiable amount of your hard-earned paycheck on a gorgeous, thick-cut, beautifully marbled ribeye steak. You have romanticized this dinner all day. You pull your trusty skillet out of the cabinet, turn the burner to high, and wait for the pan to get screaming hot. You carefully lay the meat into the skillet, fully expecting that glorious, aggressive sizzle that signals the birth of a steakhouse-quality crust.
Instead, you get a weak, pathetic hiss.
Within seconds, the pan temperature plummets. A murky pool of grayish liquid begins to seep out from underneath the meat. The steak is not searing; it is boiling in its own juices. When you eventually flip it, there is no mahogany-brown, caramelized crust. There is only a pale, rubbery, unappetizing slab of gray protein that looks like it belongs in a Victorian workhouse rather than on your dining table. Congratulations. You have just made hot meat pudding.
If this scenario triggers a stress response, take a deep breath. You are not a bad cook, and you do not need an expensive culinary degree to fix this. You are simply losing a battle against the fundamental laws of thermodynamics. The culprit ruining your expensive weekend dinners is not a lack of talent; it is water.
Welcome to your definitive masterclass on the science of the sear. We are going to dive deep into the chemistry of browning, the physics of heat transfer, and why thoroughly patting your proteins dry with a paper towel is the absolute, non-negotiable first step to achieving a rich, caramelized crust.
The Chemistry of the Crust: Understanding the Maillard Reaction
To understand why your steak is turning gray, we first have to understand what makes it turn brown. We need to talk about the culinary holy grail: the Maillard reaction.
I have zero patience for pretentious chef-speak, but a little bit of food science is mandatory if you want to stop ruining your dinners. First described in 1912 by French chemist Louis Camille Maillard, this reaction is a form of non-enzymatic browning that occurs when the amino acids (the building blocks of proteins) and reducing sugars present in your food are subjected to high heat.
When these compounds get hot enough, they undergo a complex series of chemical rearrangements—forming glycosylamines and ketosamines—that eventually produce hundreds of brand-new, highly complex flavor and aroma compounds. This is not just about making the meat look pretty. The Maillard reaction is the literal engine of savory flavor. It is what makes roasted coffee taste like coffee, what gives baked bread its golden crust, and what transforms a raw, metallic-tasting piece of beef into a mouthwatering, savory, deeply complex steak.
But here is the catch, and it is the exact reason your weeknight dinners are failing: The Maillard reaction does not happen efficiently at low temperatures. While it can technically occur at a snail’s pace at lower heats, to get that rapid, aggressive browning required for a steakhouse crust, the surface temperature of the meat must reach between 280°F and 330°F (140°C to 165°C).
If your steak cannot reach that temperature, the Maillard reaction simply will not happen. And the single biggest roadblock preventing your steak from reaching 280°F is the surface moisture clinging to the outside of the meat.
The Thermodynamics of a Ruined Dinner: The Boiling Point Barrier
Let’s talk about the physics of water. Water is a stubborn, energy-hogging molecule. Under normal atmospheric conditions, water boils at 212°F (100°C). This is a hard, physical ceiling. Liquid water cannot get hotter than 212°F. Once it reaches that temperature, any additional heat energy applied to it does not raise its temperature; instead, that energy is used to trigger a phase change, converting the liquid water into steam.
In physics, this phenomenon is governed by something called the latent heat of vaporization. And water’s latent heat of vaporization is absolutely massive—it requires about 2,257 kilojoules of energy per kilogram just to turn boiling water into steam.
Why does this matter for your Friday night ribeye?
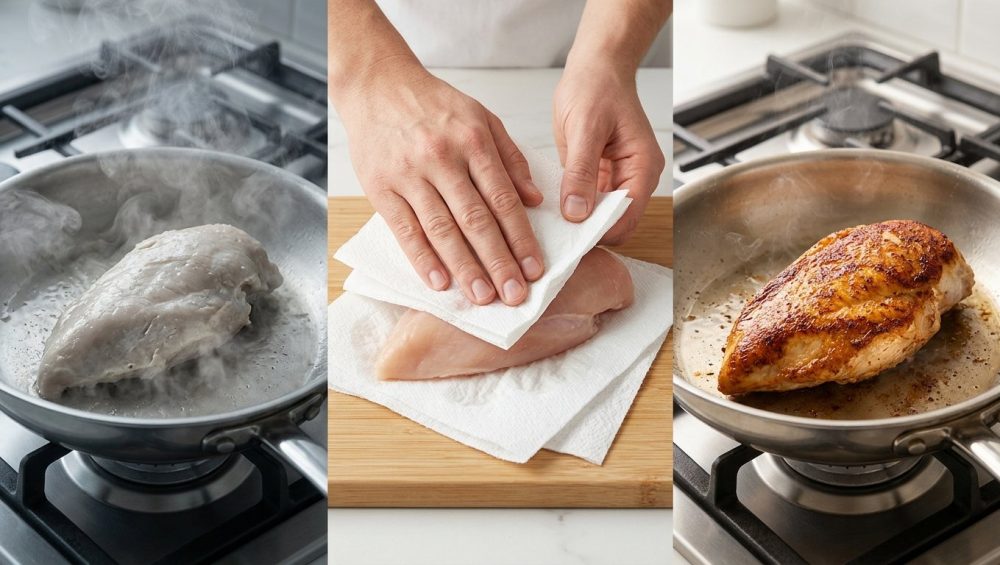
When you take a steak straight out of its vacuum-sealed plastic packaging, it is covered in surface moisture. If you do not dry it off and simply toss that wet steak into a 400°F skillet, the heat from the pan immediately attacks the water on the surface of the meat. But because of the latent heat of vaporization, the pan’s thermal energy is entirely hijacked. Instead of driving the surface temperature of the meat up to the 280°F required for the Maillard reaction, the pan exhausts all of its stored heat energy just trying to boil off that surface water.
Until every last microscopic drop of liquid water has evaporated, the surface of your steak is physically trapped at 212°F (100°C)—the boiling point.
At 212°F, meat proteins denature, contract, and squeeze out even more internal juices, adding more water to the pan. You are effectively steaming the meat. This is the exact same underlying mechanism that explains [why your chicken won’t brown] when you crowd the pan with wet poultry. The meat turns a sad, boiled gray, the internal temperature overcooks, and by the time the water finally evaporates and the pan recovers its heat, your steak is well-done shoe leather.
This is the tragedy of the gray steak. It is not a failure of your stove. It is a failure of moisture management. The exact same physical law applies to all meats, which is why your [ground beef steams instead] of developing those crispy, caramelized, deeply savory edges we all crave.
The Paper Towel Mandate: Your Zero-Cost Kitchen Miracle
Now that we know water is the enemy of the sear, the solution is embarrassingly simple, completely free, and takes exactly ten seconds. You must aggressively dry your proteins before they ever touch the heat.
I call this the Paper Towel Mandate. It is a non-negotiable rule in my kitchen, and it needs to become one in yours.
When you pull your steak, chicken breasts, pork chops, or fish fillets out of the fridge, unwrap them and place them on a cutting board. Take two heavy-duty paper towels and press them firmly into the surface of the meat. Do not just lightly dab it like you are powdering your nose. Press down. Flip the meat over and dry the other side. Dry the edges. Dry the fat cap.
You want the surface of the meat to feel tacky and completely matte. If it is glistening, it is too wet.
By mechanically removing the surface moisture with a paper towel, you are giving your pan a massive head start. When that bone-dry steak hits the hot skillet, the pan’s heat energy does not have to waste time battling the latent heat of vaporization. It immediately goes to work driving the surface temperature past the 212°F boiling point and straight into the 280°F+ Maillard zone. You get an instant, aggressive sear, a beautiful crust, and a steak that finishes cooking before the center has a chance to turn gray and tough.
Beyond the Towel: The Weekend Perfectionist’s Guide to Dry Brining
The paper towel method is your ultimate weeknight survival hack. It is fast, efficient, and gets the job done when time is money. But on the weekends, when you have the luxury of time and want to achieve absolute culinary perfection, we need to take moisture management to the next level.
Enter the dry brine.
If you want a crust so thick and flavorful it rivals a high-end steakhouse, you need to harness the power of your refrigerator. A refrigerator is not just a cold box; it is a highly efficient dehumidifier. The air inside your fridge is constantly circulated and incredibly dry.
Here is how you execute [the magic of dry brining] for the ultimate steak:
- Unwrap and Dry: Start by thoroughly drying the steak with paper towels.
- Salt Generously: Season the steak heavily with kosher salt on all sides. Do not use standard table salt; the fine grains are too dense and will make the meat overly salty. Kosher salt provides the perfect texture and coverage.
- Elevate and Expose: Place the salted steak on a wire cooling rack set over a baking sheet. The wire rack is crucial because it allows the dry air to circulate underneath the meat.
- Refrigerate Uncovered: Leave the steak uncovered in the fridge for at least 12 hours, ideally 24 to 48 hours.
The Science of the Dry Brine
When you first apply the salt, you will notice that within 15 minutes, the surface of the steak becomes incredibly wet. This is osmosis in action. The salt draws the internal moisture out of the muscle fibers and onto the surface of the meat.
If you were to cook the steak right now, it would be a disaster. But if you wait, the magic happens. That extracted liquid dissolves the surface salt, creating a concentrated, highly seasoned brine. Over the next few hours, the meat reabsorbs this salty liquid deep into the muscle tissues. This internal seasoning not only flavors the meat all the way through but also alters the protein structures, which is [the secret to tender meat] that retains its juices during cooking.
Meanwhile, the dry, circulating air of the refrigerator evaporates all the remaining surface moisture. After 24 hours, you will pull out a steak that looks slightly darker and has a deeply tacky, leathery surface known as a pellicle. This pellicle is the ultimate foundation for the Maillard reaction. Because it is completely devoid of surface water, the steak will sear the absolute microsecond it touches the hot pan.
The “No Toxic Crap” Rule: Why Your Pan is Sabotaging You
We have handled the moisture. Now we must address the heat. And this brings me to my absolute biggest pet peeve in the modern home kitchen: cheap, toxic, non-stick cookware.
I am going to be brutally honest with you. If you are trying to sear a steak in a $15 lightweight non-stick skillet you bought at a big-box store, you are not just ruining your dinner—you are actively creating a health hazard in your home. I am a fierce advocate for [banishing toxic kitchen gear] from the kitchen, and the traditional non-stick pan is public enemy number one when it comes to high-heat cooking.
The Danger of Polytetrafluoroethylene (PTFE)
Traditional non-stick pans are coated with a synthetic fluoropolymer called polytetrafluoroethylene, commonly known by the brand name Teflon. These pans are fantastic for gently scrambling eggs on a Sunday morning over medium-low heat. They are categorically disastrous for searing meat.
To achieve a proper Maillard crust, your pan needs to be preheated to around 400°F to 500°F. Here is the terrifying reality: PTFE coatings begin to structurally break down at temperatures above 500°F (260°C). When this chemical breakdown occurs, the coating releases toxic fumes into the air. At 680°F (360°C), the pan emits at least six toxic gases, including known carcinogens like PFIB and MFA.
Inhaling these fumes causes a temporary but severe condition known as polymer fume fever, colloquially referred to as “Teflon flu,” which presents with chills, headaches, chest tightness, and fever. Furthermore, these fumes are notoriously lethal to pet birds.
You cannot achieve a professional sear in a pan that literally self-destructs at searing temperatures. It is impossible.
The Heavy Metal Champions: Cast Iron, Carbon Steel, and Stainless
To cook like an expert without a culinary degree, you need to invest in durable, safe, high-thermal-mass cookware. You need pans that can absorb a massive amount of heat, hold onto it, and transfer it efficiently to the cold meat without dropping in temperature.
1. Cast Iron: The undisputed king of the steakhouse sear. Cast iron is incredibly dense. It takes a long time to heat up, but once it gets hot, it stays hot. When you drop a thick steak into a preheated cast iron skillet, the pan does not flinch. The temperature remains stable, ensuring an uninterrupted Maillard reaction.
2. Carbon Steel: The lighter, more agile cousin of cast iron. Understanding the [thermodynamics of carbon steel pans] will change your culinary life. They offer the same high-heat capacity and natural, polymerized non-stick properties of cast iron, but they heat up and cool down slightly faster, giving you more precise control over the cooking process.
3. Multi-Clad Stainless Steel: A high-quality, tri-ply stainless steel skillet is a workhorse. It will not warp under high heat, and it creates the best fond (the caramelized brown bits stuck to the bottom of the pan) for making pan sauces.
The Execution: Nailing the Perfect Crust Without Sticking
So, you have a bone-dry, paper-towel-patted steak, and you have a heavy, non-toxic skillet. Now comes the execution.
Preheating and the Leidenfrost Effect
You must preheat your pan before adding the oil or the meat. Adding food to a cold pan is a guaranteed way to ensure it sticks and tears. Understanding that [preheating the pan changes everything] is the hallmark of a confident home cook.
If you are using stainless steel, you need to utilize the water drop test to ensure the pan is ready. Heat the dry stainless steel pan over medium-high heat. Flick a tiny drop of water into the pan. If the water fizzles and aggressively boils away, the pan is not hot enough. If the pan is too hot, the water might shatter into dozens of tiny droplets.
But when the pan hits the perfect searing temperature (around 350°F to 400°F), the water drop will form a perfect, cohesive bead that dances and glides across the surface of the metal like a hockey puck. This is known as the Leidenfrost effect. The bottom of the water droplet vaporizes instantly, creating a microscopic cushion of steam that suspends the rest of the water above the hot metal. By [mastering the leidenfrost effect], you ensure that your meat will sear beautifully and release cleanly from the stainless steel without tearing.
Choosing the Right Fat
Do not use extra virgin olive oil to sear a steak. Extra virgin olive oil has a low smoke point (around 350°F to 375°F). If you drop it into a 450°F cast iron skillet, it will instantly burn, turn acrid, and make your steak taste like bitter charcoal.
You need a high-smoke-point fat. Avocado oil (smoke point of 520°F), refined grapeseed oil (420°F), or clarified butter/ghee (450°F) are your best friends here. They can withstand the intense thermal environment required for the Maillard reaction without breaking down into nasty, bitter compounds.
Lightly coat the dried steak with the oil, rather than pouring pools of oil into the pan. This prevents dangerous splattering and ensures perfectly even contact with the hot metal.
The Art of the Flip
Drop the steak into the pan, laying it away from you so any stray oil splatters hit the back of the stove, not your forearms. Then, leave it alone.
Do not poke it. Do not press down on it with a spatula (you will just squeeze out the juices). Let the heat do its job. The meat will naturally stick to the pan at first as the proteins bind to the metal. As the Maillard reaction progresses and the crust forms, the proteins will alter their structure and naturally release from the pan. When the steak is ready to flip, it will let go with minimal resistance.
Troubleshooting the Gray Steak: Other Rookie Mistakes to Avoid
Even if you dry your meat perfectly, there are a few other common pitfalls that can ruin your sear. Let’s troubleshoot them.
The Pan Crowding Disaster
If you are cooking dinner for a family of four and try to cram four large steaks into a single 10-inch skillet, you are going to fail. Every piece of cold meat you add to a pan acts like an ice cube in a glass of warm water; it aggressively pulls heat out of the metal.
If you crowd the pan, the temperature of the cooking surface will plummet below the 280°F Maillard threshold. Furthermore, all four steaks will release a small amount of internal moisture. Because the pan is no longer hot enough to instantly vaporize that moisture, the water will pool in the confined spaces between the cuts of meat. Once again, you are boiling your dinner.
Cook in batches, or use two separate skillets. Give your meat room to breathe.
The Myth of Room Temperature Meat
You have probably read recipes telling you to leave your steak on the counter for an hour to “come to room temperature” before cooking. From a thermodynamic standpoint, this is largely a myth.
A thick steak sitting on a counter for an hour will only see its internal temperature rise by a few measly degrees. It does not actually reach room temperature unless you leave it out for a highly unsafe amount of time. The reason steaks left on the counter seem to sear better is actually because the surface moisture has had an hour to evaporate into the ambient air. You can achieve the exact same (and much safer) result in ten seconds with a paper towel.
Salting Timing
If you are not dry brining your meat overnight, you must be careful about when you apply your salt. Salt draws out moisture. If you salt your steak and let it sit on the counter for 10 minutes, you will see a pool of water form on the surface. If you throw it in the pan right then, you hit the boiling point barrier, and the meat steams.
You have two choices: Salt the meat at least 45 minutes in advance (so it has time to draw the moisture out and reabsorb it), or salt it the absolute second before it hits the hot pan, before the salt has time to extract any liquid. This timing trick is exactly how you [make juicier burgers] with an incredible crust, too.
The Final Step: Patience and the Rest
You have managed the moisture. You have preheated the heavy, non-toxic pan. You have achieved a glorious, deeply browned, aromatic crust. You pull the steak from the skillet, and it looks like a masterpiece.
Now, you must do the hardest thing in the culinary world: absolutely nothing.
You must let the steak rest. While the meat cooks, the intense heat causes the muscle fibers to contract, squeezing the internal moisture toward the cooler center of the steak. If you take a knife and slice into that meat the second it comes off the stove, all of those pressurized juices will flood out onto your cutting board. Your beautiful crust will get soggy from underneath, and the meat you actually chew will be dry and tough.
Transfer the steak to a warm cutting board and leave it alone for five to ten minutes. As the meat cools slightly, the muscle fibers relax and widen, allowing the internal juices to redistribute evenly throughout the entire cut. When you finally slice into it, the juices stay inside the meat where they belong, and the crust remains shatteringly crisp.
Claiming Your Steak Independence
Cooking a mind-blowing, restaurant-quality steak at home does not require a culinary degree, a professional kitchen, or a trust fund. It simply requires an understanding of the basic rules of engagement. Water is the enemy of heat. Heat is the catalyst for flavor.
By taking ten seconds to thoroughly dry your meat with a paper towel, you eliminate the thermodynamic barrier that has been ruining your crusts for years. You stop wasting your pan’s energy on boiling water, and you start investing it in creating deep, savory, roasted flavors.
You are entirely capable of producing spectacular, flawless food in a standard home kitchen. Whether you are executing an elaborate dry-brined weekend feast or just trying to elevate your [simple weeknight dinners], the science remains the same. Respect the Maillard reaction, ditch the toxic non-stick pans, manage your moisture, and never, ever skip the paper towel. Now go get your pan hot.






