
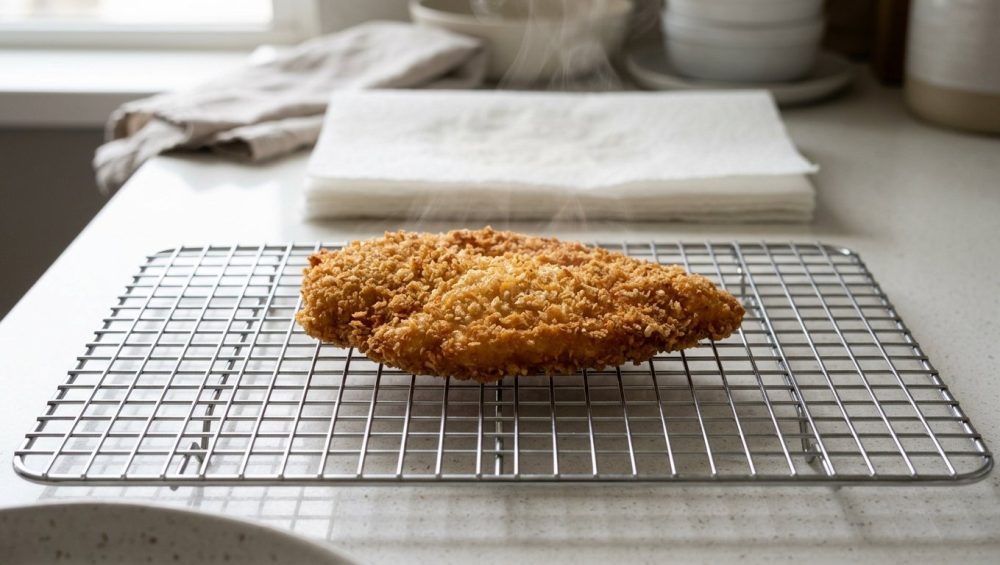
Picture this: You’ve just spent the better part of your Saturday afternoon transforming your kitchen into a makeshift Southern diner. You lovingly bathed your chicken in seasoned buttermilk, painstakingly dredged every nook and cranny in spiced flour, and babysat a vat of bubbling oil like it was a newborn child. The chicken emerges from the Dutch oven looking like an absolute masterpiece—shatteringly crisp, deeply golden, and smelling like a culinary triumph.
You proudly transfer your golden trophies onto a plate lined with a double layer of paper towels to “drain the grease,” just like your grandmother taught you. You turn your back for five minutes to whisk together a quick gravy. But when you return to plate your masterpiece, tragedy has struck. The top of the chicken is still somewhat crispy, but the bottom? The bottom has devolved into a greasy, flabby, pathetic sponge that peels away from the meat the second you pick it up.
Congratulations. You just assassinated your own dinner.
If this sounds familiar, take a deep breath and pour yourself a glass of wine. You aren’t a bad cook; you’ve just fallen victim to one of the most pervasive, universally accepted kitchen myths of all time. The paper towel is not your friend. In fact, when it comes to hot, freshly fried foods, the paper towel is an insidious saboteur.
To understand why your breading turns to mush, we have to stop looking at cooking as a chore and start looking at it as what it truly is: a high-speed, high-stakes thermodynamics experiment. Today, we are going to dive deep into the physics of frying, the thermodynamics of steam, and why tossing out your paper towels in favor of a heavy-duty cooling rack will instantly elevate your weekend cooking projects to professional-restaurant status.
The Physics of the Fry: What Actually Happens in the Hot Oil
To understand why the paper towel ruins your food, you first have to understand how that glorious crust is formed in the first place. Most home cooks operate under the assumption that deep frying is simply the process of hot oil soaking into the food to cook it. This couldn’t be further from the truth. If your food is actively soaking up oil while it’s submerged, you aren’t frying; you’re just making a greasy sponge.
Deep frying is actually an incredibly violent mass-transfer and phase-change reaction [1]. When you drop a piece of room-temperature, moisture-rich chicken into a pot of oil heated to 350°F (175°C), the surface moisture of the food undergoes an instantaneous phase change. It flash-boils, turning from liquid water into water vapor (steam) in a fraction of a second [1].
Here is the most critical piece of physics you need to remember: when liquid water turns into steam, it expands to roughly 1,600 times its original volume [1].
This massive, rapid expansion creates immense outward pressure. All those vigorous bubbles you see dancing around your chicken when you drop it into the fryer? That isn’t the oil boiling. Oil doesn’t boil at 350°F. Those bubbles are the violent, high-speed jets of steam escaping from the food [1].
The Majestic Steam Shield
This outward rush of steam does something miraculous: it creates a physical barrier—a microscopic steam shield—that actively repels the surrounding oil. As long as the internal moisture of the food is turning into steam and pushing outward, the hot oil physically cannot penetrate the crust [1].
While this steam shield is protecting the interior of the meat, the intense heat of the oil is rapidly dehydrating the exterior flour coating. Once the surface moisture is driven off, the temperature of the crust skyrockets past the boiling point of water, triggering the Maillard reaction. This complex chemical dance between amino acids and reducing sugars is what gives your fried chicken that deep mahogany color and complex, savory flavor.
So, while the chicken is in the hot oil, the physics are working perfectly in your favor. The steam is pushing out, the oil is staying out, and the crust is drying into a shatteringly crisp shell.
But the second you pull that chicken out of the oil with your spider skimmer, the thermodynamic environment violently shifts. And this is exactly where the paper towel sets its trap.
The Paper Towel Trap: A Lesson in Thermodynamics and Heartbreak
Let’s track the exact sequence of events that occurs the moment your beautifully fried chicken leaves the 350°F oil and enters the 70°F air of your kitchen.
First, the rapid heat transfer stops. Because the food is no longer submerged in a high-heat environment, the remaining moisture inside the chicken stops flash-boiling into steam. As the steam production halts, that protective outward pressure drops to zero [1].
The Vacuum Effect and Oil Absorption
As the steam inside the microscopic pores of the crust begins to cool, it condenses back into a liquid state. Because liquid water takes up 1,600 times less space than steam, this rapid condensation creates a partial vacuum inside the crust [1].
Nature abhors a vacuum. That negative pressure desperately wants to pull something inside to fill the void. If there is residual oil sitting on the surface of your chicken, that vacuum will suck the oil straight into the breading [1]. This is a verified scientific fact: the vast majority of oil absorption in fried foods does not happen while the food is in the fryer—it happens during the first 60 seconds of cooling [1].
The Microscopic Steam Room
Now, let’s introduce the paper towel to this delicate thermodynamic equation. You take your hot, oil-slicked chicken and place it directly onto a flat layer of paper towels on a dinner plate.
While the top of the chicken is exposed to the open air (allowing residual steam to vent harmlessly toward your ceiling), the bottom of the chicken is sitting flush against a flat, insulating surface. The chicken is still incredibly hot, and it is still radiating heat and residual moisture.
Because the paper towel is flat against the plate, there is absolutely zero airflow beneath the chicken. The heat and moisture radiating from the bottom of the crust have nowhere to go. They hit the paper towel, become trapped, and instantly condense into liquid water.
You have just successfully built a microscopic steam room for the underside of your dinner.
The crust, which you spent so much time carefully dehydrating in the hot oil, is now sitting in a sauna of its own making. The dehydrated starches in the flour dredge act like a sponge, immediately reabsorbing that condensed water. Within three minutes, the bottom of your chicken goes from a rigid, crispy shell to a soggy, gelatinous paste.
The Capillary Failure of Cellulose
“But wait!” you might argue. “The paper towel is there to absorb the grease!”
Let’s talk about how paper towels actually work. Paper towels absorb liquids through capillary action, drawing fluids into the microscopic spaces between their cellulose fibers. This works brilliantly for wiping up a spilled glass of water on your countertop. It works terribly for draining hot, viscous frying oil [1].
First, paper towels saturate incredibly quickly. Once the area directly beneath the chicken reaches its maximum absorption capacity, the oil has nowhere else to go. The paper towel stops being an absorbent tool and instead becomes a greasy, wet mat.
Because of the vacuum effect we discussed earlier, your cooling chicken is actively trying to suck moisture and oil back into its crust. If it is sitting flush against a saturated, grease-soaked paper towel, it will simply drink that oil right back up. You are essentially force-feeding the grease back into your food.
Furthermore, standard household paper towels are not designed to withstand high-heat, high-friction culinary environments. When exposed to hot oil and jagged, crispy breading, paper towels break down rapidly, shedding hundreds of microscopic cellulose fibers directly onto your food [1]. If you want a mouthful of bleached paper pulp with your dinner, by all means, keep using them. But if you want professional results, you need to change your hardware.
The Wire Rack Revolution: Maximizing Airflow and Convective Cooling
If the enemy of crispy food is trapped steam and pooling oil, the solution is glaringly obvious: elevation and airflow.
When you pull your fried chicken out of the hot oil, you should never place it on a flat surface. Instead, you must immediately transfer it to a heavy-duty wire cooling rack set inside a rimmed baking sheet. This simple, inexpensive setup completely alters the thermodynamic environment of the cooling process, saving your crust from the soggy fate of the paper towel.
The Physics of Convective Airflow
When you place hot food on an elevated wire rack, you expose 100% of its surface area to the ambient air of your kitchen. The heat radiating from the bottom of the chicken warms the air immediately beneath it. Because hot air is less dense than cold air, it naturally rises, escaping through the gaps in the wire grid. As the hot air rises, cooler, drier air is pulled in from the sides to replace it.
This creates a continuous, natural convection current around the entire piece of chicken. The residual steam venting from the bottom of the crust is carried away by this airflow before it ever has a chance to condense into water. The crust remains completely dry, and the starches stay rigidly locked in their dehydrated state.
Defeating the Vacuum with Gravity
But what about the excess oil? This is where the wire rack truly shines.
Remember that as the chicken cools, the internal vacuum effect threatens to pull surface oil back into the crust [1]. When the chicken is resting on a wire rack, gravity becomes your best friend. The residual oil on the surface of the chicken naturally coalesces into droplets at the lowest points of the crust. Because there is no flat surface pushing back against the chicken, those oil droplets simply fall off, dripping harmlessly through the wire grid and onto the baking sheet below.
By allowing gravity to physically separate the oil from the food before the vacuum effect can pull it inward, you drastically reduce the overall grease content of your final dish [1]. Your chicken ends up lighter, significantly crispier, and vastly more pleasant to eat. Once you understand the magic of a wire rack, you will never let a paper towel touch your fried foods again.
The Dark Side of Cheap Racks: A Brutally Honest Kitchenware Warning
Now, before you sprint to the nearest discount big-box store to buy the cheapest wire rack you can find, we need to have a serious conversation about kitchenware materials. As your resident Sassy Sous-Chef, I have a zero-tolerance policy for toxic, poorly manufactured garbage in the kitchen.
The culinary equipment industry is flooded with cheap, corner-cutting products that are practically designed to fail, and cooling racks are some of the worst offenders. If you buy a flimsy, five-dollar rack, you aren’t just wasting your money; you are actively introducing chemical hazards into your food.
The Flaking Chrome Catastrophe
The vast majority of cheap cooling racks on the market are made of low-grade iron or carbon steel that has been thinly plated with chrome or nickel to make it look shiny. These racks are an absolute nightmare.
When you place screaming-hot, 350°F fried chicken onto a cheap chrome-plated rack, the underlying steel and the outer plating expand at different rates due to thermal shock. Over time, this causes the cheap chrome plating to crack, blister, and flake off. Where do those microscopic shards of heavy metal end up? Stuck directly to the bottom of your dinner.
Furthermore, once that plating cracks, the cheap iron core is exposed to the moisture in the air and the salt from your food. It will begin to rust almost instantly. If you make the mistake of putting a chrome-plated rack in the dishwasher, the alkaline detergents will accelerate this crevice corrosion, leaving you with a rusty, flaking, unusable grid of garbage.
The Non-Stick Nightmare
Even worse than chrome-plated racks are the ones coated in dark, non-stick Teflon (PTFE) finishes. I cannot stress this enough: non-stick coatings have absolutely no business being on a wire cooling rack.
PTFE coatings begin to degrade and release toxic fumes when exposed to high heat. While your cooling chicken might not be hot enough to instantly vaporize the coating, the real danger comes if you ever decide to use that rack in the oven (for example, to bake crispy wings or roast a chicken). Much like ruining your nonstick pans with metal spatulas or overheating them on a gas burner, baking on a cheap non-stick wire rack will cause the coating to degrade, blister, and leach toxic forever-chemicals (PFAS) directly into your food.
Just like cheap baking sheets warp and buckle the second they hit a 400°F oven, cheap wire racks will warp, sag, and drop your beautiful food into the grease drippings below.
The Only Material You Should Buy: 304 Stainless Steel
If you want to cook like a professional, you need to buy professional-grade materials. When shopping for a wire rack, you must look for exactly one phrase: “100% 304 Grade Stainless Steel” (sometimes labeled as 18/8 Stainless Steel).
Grade 304 stainless steel is a highly stable, non-reactive culinary alloy that contains 18% chromium and 8% nickel. This specific metallurgical composition creates a passive oxide layer on the surface of the metal that makes it virtually immune to rust, corrosion, and pitting.
A heavy-duty, tightly cross-hatched 304 stainless steel rack contains no toxic coatings, no cheap plating, and no hidden hazards. It will never rust in your dishwasher. It will never flake metal into your food. It can withstand 500°F oven temperatures without breaking a sweat, meaning you can use it for roasting meats just as easily as you use it for cooling fried foods. It is a buy-it-once, use-it-forever tool that will instantly upgrade the quality of everything you cook.
Beyond Chicken: Other Culinary Masterpieces You’re Ruining
Once you grasp the thermodynamic principles of steam and airflow, you will realize that the paper towel trap extends far beyond just fried chicken. Almost every crispy, savory dish you make requires proper convective cooling to survive the journey from the pan to the dining table.
The Tragedy of Soggy Bacon
Let’s talk about weekend breakfasts. Frying a beautiful batch of thick-cut, applewood-smoked bacon is an art form. While I sometimes suggest cooking it in water to gently render the fat before letting it crisp up in its own grease, the final step is always the most critical.
If you pull your gorgeous, rigid strips of bacon out of the skillet and lay them flat on a paper towel, you are committing a breakfast crime. The residual heat will trap the steam, and within minutes, your bacon will turn chewy, limp, and sad. Transferring your bacon to a stainless steel wire rack allows the excess rendered pork fat to drip away while the ambient airflow locks the protein structure into a shatteringly crisp state.
The Tempura and Fritter Fiasco
Delicate, airy batters like Japanese tempura or beer-battered fish are incredibly susceptible to the steam room effect. These batters rely on a highly aerated, fragile matrix of gelatinized starches to provide their signature crunch. Because the walls of these batter bubbles are so thin, they take almost no time to reabsorb moisture. Placing a delicate zucchini fritter or a piece of tempura shrimp on a paper towel is a guaranteed death sentence for the crust. They require immediate, 360-degree airflow the second they leave the oil.
The Roasted Vegetable Rule
This principle of airflow and steam management doesn’t just apply to deep frying; it applies to your oven, too. When you roast vegetables on a flat sheet pan, the side of the vegetable touching the pan is constantly fighting against trapped steam. If you overcrowd the pan, the vegetables will literally steam themselves in their own evaporating moisture. This is the exact same reason your roasted veggies turn mushy instead of developing those beautiful, dark, caramelized edges. To get maximum crispness, you need space for the steam to escape—and sometimes, elevating them on an oven-safe wire rack is the ultimate hack for a perfect, 360-degree roast.
Pro Tips for Shatteringly Crispy Results
Now that you have banished the paper towel to its rightful place (cleaning up spills) and invested in a heavy-duty stainless steel wire rack, let’s talk about the actual cooking process. A wire rack can save a perfectly fried piece of chicken from getting soggy, but it cannot fix chicken that was fried incorrectly in the first place.
If you want to achieve mind-blowing, professional-level crunch in a standard home kitchen, you must master a few fundamental techniques.
1. Moisture is the Enemy of Browning
We already established that water expands 1600 times when it turns to steam, creating a barrier against the oil. While we need some internal moisture to cook the meat, excess surface moisture is a disaster.
If you take a piece of chicken straight from its packaging, dripping with liquid, and drop it into hot oil (or even a hot sauté pan), all the thermal energy of the pan will be wasted trying to boil off that surface water. The temperature of your oil will plummet, and your food will steam instead of fry. If you don’t pat the meat dry first, your chicken won’t brown properly, and you will be left with pale, rubbery skin.
Always dry your proteins thoroughly. Better yet, implement a dry brine: salt your chicken heavily and leave it uncovered on your wire rack in the fridge overnight. The salt will penetrate the meat, while the dry air of the refrigerator will completely dehydrate the skin, guaranteeing a superior crunch.
2. The Starch Hydration Rest
If you are dredging your chicken in flour, you cannot simply toss it in the powder and immediately throw it into the fryer. The starches in the flour need time to physically hydrate and bond to the proteins on the surface of the meat.
If your breading always falls off in the fryer, it’s because you skipped the resting phase. After you dredge your chicken, place it on your wire rack and let it sit at room temperature for 15 to 20 minutes. You will actually see the dry, powdery flour turn into a tacky, paste-like coating as it absorbs the buttermilk and egg wash. This tacky paste locks onto the chicken and will not blow off when it hits the expanding steam of the deep fryer.
3. The Magic of Alkaline Chemistry
If you want to take your crust to the absolute limits of culinary science, you need to alter the pH of your breading. The Maillard reaction (the chemical process responsible for browning and crisping) occurs much faster and much more violently in alkaline environments.
For extra crispy chicken, you need to add a tablespoon of aluminum-free baking powder to your flour dredge. The baking powder raises the pH of the crust, accelerating the browning process. Furthermore, when the baking powder hits the hot oil, it releases tiny bubbles of carbon dioxide gas, creating microscopic pockets of air within the crust. This results in a lighter, lacier, and vastly crunchier texture.
4. Rigorous Temperature Management
Frying is an exercise in thermal momentum. You are fighting a constant battle between the heat of your burner and the cold mass of your food.
If you drop too much cold chicken into your pot at once, the temperature of the oil will crash from 350°F down to 275°F. At this low temperature, the outward pressure of the steam shield is incredibly weak. The crust takes forever to dehydrate, and the oil begins to seep in. If your fried chicken always turns out dry, your oil temperature is likely dropping too low; you are being forced to leave the chicken in the oil for far too long just to get the crust to brown, completely overcooking the delicate breast meat in the process.
Fry in small batches. Never fill the surface area of your pot more than halfway. And most importantly, use a high-quality, fast-reading digital thermometer to monitor your oil temperature constantly. Do not rely on the cheap analog dial thermometer that came with your pot. Sometimes your meat thermometer is lying to you because the bimetallic coil inside analog dials can be off by as much as 30 degrees. Invest in a digital thermocouple probe and maintain absolute control over your thermal environment.
5. The Double-Fry Technique
If you want a crust that will stay crispy for hours—even after being tossed in a heavy, sticky sauce—you need to adopt the Korean double-fry method.
The first fry is done at a slightly lower temperature (around 325°F) for a longer period. This initial fry cooks the meat through and begins the process of rendering the fat out of the chicken skin, but it doesn’t fully brown the exterior.
You then remove the chicken, place it on your wire rack, and let it rest for 10 minutes. During this rest, the residual internal heat pushes the remaining moisture from the center of the meat out toward the crust, softening it slightly.
You then crank your oil heat up to 375°F and drop the chicken back in for a second, rapid fry (about 2 to 3 minutes). This high-heat blast violently drives off that newly migrated moisture, hyper-dehydrating the crust and locking it into an impermeable, glass-like shell. When you pull it out for the second time and rest it on your wire rack, you will have achieved a level of crispness that most professional restaurants can only dream of.
The Final Word
Cooking is not magic. It is not an innate talent reserved for people with fancy culinary degrees, and it certainly doesn’t require thousands of dollars of commercial equipment. Cooking is simply the application of heat to matter, governed by the undeniable laws of physics and chemistry.
When you understand the science behind what is happening in your pots and pans, you gain absolute control over your food. You stop guessing, you stop hoping, and you stop ruining perfectly good dinners with well-intentioned but scientifically flawed habits.
The paper towel is a fantastic tool for wiping down your countertops, but it has no place underneath your hard-earned fried chicken. By swapping out that damp, insulating mat for the 360-degree convective airflow of a heavy-duty stainless steel wire rack, you are working with the laws of thermodynamics instead of fighting against them.
So the next time you decide to tackle a weekend frying project, do yourself a favor. Prep your ingredients properly, manage your oil temperature like a hawk, and let gravity and airflow do the heavy lifting when the cooking is done. Your tastebuds, your dinner guests, and your shatteringly crisp chicken will thank you. Now get out of here and go fry something spectacular.






