
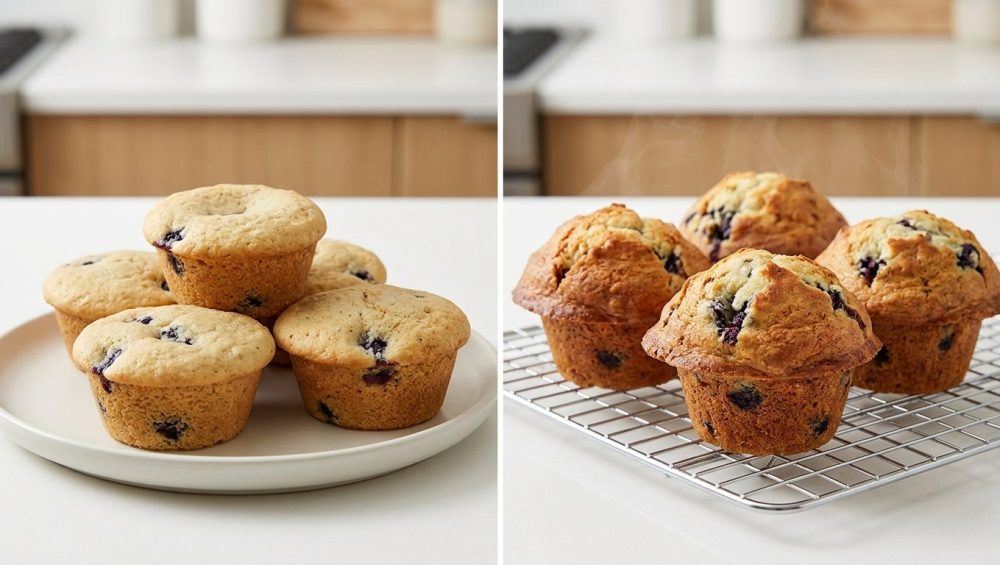
Look, we need to have a very serious, brutally honest conversation about your muffins. You know exactly the ones I am talking about. You spend your precious, hard-earned Saturday morning meticulously whisking together organic flour, farm-fresh eggs, and a pint of ridiculously overpriced farmers-market blueberries. You carefully portion the batter into your tin, slide it into a standard 350°F oven, and wait for the culinary magic to happen. But when the timer finally goes off, you pull out a tray of sad, flat, deflated little hockey pucks.
They taste fine, sure. You will still eat them with a cup of coffee because you are not a monster. But they look like cupcakes that simply gave up on their dreams. They lack that glorious, towering, crusty, bakery-style dome that makes a muffin actually look like a professional pastry. You stare at them and wonder why the bakeries in town can produce muffins that look like majestic mountains, while yours look like a Kansas landscape.
I am here to tell you that it is not your fault. It is not because you lack a fancy culinary degree from a pretentious French institute. It is not because you failed to sift your dry ingredients three times under the light of a full moon. The reason your muffins are flat is because you are blindly following the biggest, most pervasive, and most destructive lie in modern home baking: the 350°F default baking temperature. As a busy professional who learned to cook through relentless trial, error, and setting off the smoke detector a few too many times, I have absolutely zero patience for outdated advice that sets home cooks up for failure. Today, we are going to fix this. We are going to dive deep into the thermal dynamics of your oven, and I am going to teach you a ridiculously simple, science-backed temperature manipulation trick that will instantly transform your baking.
The Anatomy of a Sad, Flat Muffin (And Why the 350°F Default is Ruining Your Life)
To understand how to fix the problem, we first have to understand why everything in the culinary world seems to be baked at 350°F. The “moderate oven” is a historical hangover. Back in the days when our great-grandmothers were cooking on unpredictable wood-fired stoves, they needed a safe, middle-of-the-road temperature guideline that would thoroughly cook the inside of a dish without instantly incinerate the outside. When modern, thermostatically controlled gas and electric ovens were invented, recipe developers simply stuck with 350°F because it was familiar, safe, and practically foolproof for general cooking.
But for muffins? Baking at a static 350°F is an absolute death sentence for the dome.
When you place a tin of room-temperature batter into a 350°F oven, the heat penetrates the batter at a slow, agonizingly sluggish pace. The edges of the muffin, the center of the muffin, and the top of the muffin all heat up and rise at the exact same leisurely speed. Because there is no sudden, aggressive burst of heat to set the outer structure, the batter expands evenly outward and slightly upward, eventually settling into a flat, uninspiring plateau. The structure of the crumb sets before the leavening agents have a chance to violently push the center skyward. If you want a bakery-style dome, you have to stop playing it safe. You have to introduce a calculated element of thermal shock.
The Science of the Dome: What the Heck is Oven Spring?
Baking is not magic. It is not an elusive art form reserved for people wearing tall white hats. Baking is just thermodynamics, chemistry, and physics. To get that iconic, towering bakery dome, you need to master a fundamental baking concept known as “oven spring.”
Oven spring is the rapid, explosive expansion of volume that occurs during the very first few minutes of the baking process. When your cold or room-temperature batter hits an environment of intense, high heat, the gases trapped inside the batter expand violently. This expansion pushes the batter upward rapidly, long before the structural proteins and starches have a chance to solidify and lock the shape into place. To maximize oven spring, we rely on two primary forces: chemical leavening and steam production.
The Magic of Double-Acting Baking Powder
Let’s talk about your chemical leavener. Almost all modern baking powder sold in grocery stores today is “double-acting.” This means it is formulated to react and release carbon dioxide (CO2) gas in two distinct, carefully timed phases.
The first reaction happens the very second the powder gets wet. When you mix your wet ingredients (milk, eggs, butter) with your dry ingredients (flour, sugar, baking powder), a mild acid in the powder—typically monocalcium phosphate—reacts with the sodium bicarbonate at room temperature. This creates thousands of tiny little starter bubbles throughout the batter in a process called nucleation.
But the real architectural magic happens inside the oven. The second phase of the reaction is triggered exclusively by heat. The secondary acid in the baking powder—often sodium aluminum sulfate or sodium acid pyrophosphate—requires temperatures between 105°F and 140°F (40°C to 60°C) to activate and release the bulk of its carbon dioxide. If you bake your muffins at a sluggish 350°F, that heat penetrates the batter slowly, and the gases expand lazily. But if you blast that batter with an initial surge of 425°F heat? The temperature of the batter spikes rapidly. The secondary reaction is instantaneous and aggressive, resulting in a violent, beautiful release of CO2 gas that pushes the center of the batter skyward.
Steam Power: The Unsung Hero of the Bakery
While baking powder gets all the glory, we cannot ignore the sheer lifting power of steam. Water is a massive component of your muffin batter, coming from your milk, your eggs, and the water content naturally found in butter. At 212°F (100°C), water vaporizes into steam.
In the realm of baking, steam is an incredibly powerful physical leavener. In fact, commercial bakeries actually utilize expensive ovens that inject bursts of steam directly into the baking chamber to maximize oven spring and create glossy, blistered crusts. While you might not have a ten-thousand-dollar steam-injected oven in your home kitchen, you can harness the water already inside your batter. The hotter the initial oven temperature, the faster the water near the surface of the tin vaporizes. This rapid vaporization creates intense upward pressure, acting as an invisible hand physically pushing the top of the muffin toward the heating element.
Setting the Architecture: Protein Coagulation and Starch Gelatinization
Expanding gases are useless if the structure of the muffin cannot hold them. As the batter heats up, two critical structural changes occur: starches swell and burst (a process called gelatinization, happening between 140°F and 176°F), and the proteins from the eggs and flour coagulate and harden.
Here is where the high heat blast truly shines. When you subject the muffin tin to 425°F, the extreme heat causes the outer edges of the muffin—the parts making direct contact with the hot metal tin—to set and solidify almost immediately. So, you suddenly have a solid, impenetrable outer ring, an immense amount of aggressively expanding CO2 and steam, and a center that is still liquid and malleable. Because the edges are locked in place, that violently expanding gas has only one possible direction to go: straight up. The liquid center bursts through the top of the crust, creating that beautiful, craggy, towering dome.
The “High Heat Blast” Technique: Your New Secret Weapon
Now that you understand the thermodynamic physics happening inside your oven, it is time to execute the technique. The beauty of the High Heat Blast is that it requires absolutely zero changes to your existing recipe ingredients. You do not need to buy weird dough conditioners, and you do not need to alter your ratios. You simply need to take control of your oven dial.
The 425°F Awakening
Before you even think about mixing your batter, preheat your oven to 425°F. If you know your oven runs notoriously cold, do not be afraid to push it to 450°F. Once you place the filled muffin tin into the oven, you are going to set a timer for exactly 5 minutes. No more, no less.
This five-minute window is the critical period for oven spring. During these 300 seconds, the extreme heat will rapidly activate the secondary phase of the double-acting baking powder, flash-vaporize the surface moisture into steam, and instantly set the outer edges of the muffin against the hot metal tin. The center will erupt upward, forming the dome. Furthermore, this intense heat triggers the Maillard reaction—a complex chemical process where amino acids and reducing sugars react to create hundreds of new flavor compounds and a deeply caramelized, golden-brown crust.
The 350°F Coast to the Finish Line
When that five-minute timer goes off, you must exercise extreme discipline. Do not open the oven door. I repeat: do not touch the oven door. Simply reach up to the control panel and lower the temperature dial to 350°F.
The oven will naturally and gradually cool down to the new temperature over the next few minutes. Meanwhile, the muffins will continue to bake through to the center. By dropping the heat, you ensure that the inside of the muffin cooks to a tender, moist perfection without the outside turning into a charred, blackened brick. You will let them coast at this lower temperature for another 12 to 15 minutes, depending on the size of your tin and the density of your batter, until a toothpick inserted into the center comes out clean.
Why Changing Your Recipe is a Rookie Mistake
When home cooks struggle with flat baked goods, their first instinct is usually to start blindly altering the recipe. I see this constantly, and it drives me absolutely up the wall. People assume that if their muffins aren’t rising, they simply need to dump in an extra tablespoon of baking powder. Do not do this. Excessive chemical leaveners will not give you a better dome; they will cause the batter to over-expand and then violently collapse, leaving you with a sunken, concave crater. Worse, unreacted baking powder leaves a nasty, metallic, soapy aftertaste in your mouth that completely ruins the flavor of the pastry.
Other beginners try to add an extra cup of flour, assuming that a stiffer, heavier batter will hold its shape better. Listen to me carefully: unless you use a <a href="https://citchenware.com/blog/the-curators-corner/why-your-cakes-are-dense-the-magic-of-a-digital-kitchen-scale/">digital kitchen scale</a> to measure your ingredients down to the exact gram, you have no business messing with a baker’s carefully calculated hydration ratios. Adding arbitrary amounts of extra flour will only throw off the fat-to-liquid balance, resulting in a dense, dry, unswallowable lump that requires a gallon of milk to wash down.
You do not need a new recipe. You do not need to buy expensive, hard-to-find ingredients. You simply need better technique and a fundamental respect for how heat interacts with your food.
The Sassy Sous-Chef’s Mandatory Gear Check: Ditch the Toxic Trash
We cannot talk about high-heat baking without addressing the elephant in the room: your equipment. I have a very strict, non-negotiable “No-Go” rule in my kitchen when it comes to cheap, toxic gear. If you want professional results, it is time for <a href="https://citchenware.com/blog/the-curators-corner/a-brutally-honest-masterclass-on-upgrading-your-cooking-skills-and-banishing-toxic-kitchen-gear/">banishing toxic kitchen gear</a> from your home entirely.
The Danger of “Mystery Metal” and Peeling Teflon
If you are currently baking in a scratched, peeling, lightweight, mystery-metal muffin tin that you bought on clearance at a discount store in 2014, I want you to walk into your kitchen, pick it up, and throw it directly into the garbage can. I am not exaggerating for dramatic effect.
Cheap non-stick coatings, particularly older models manufactured using PFOA and low-grade PTFE (Teflon), are notoriously unstable at high temperatures. While they might survive a gentle 350°F bake, when you blast a compromised, scratched Teflon pan at 425°F, the chemical coating can begin to break down and degrade. This degradation process can release toxic fumes and off-gas forever chemicals directly into your food and the air you breathe. I firmly believe that anyone can cook like an expert, but you cannot do it if you are actively baking PFAS into your blueberry streusel. I won’t stand for it.
Furthermore, blasting your pans with <a href="https://citchenware.com/blog/the-art-of-the-kitchen/stop-ruining-your-nonstick-pans-why-cooking-spray-is-the-enemy/">aerosol cooking spray</a> will only ruin whatever finish is left. The propellants and emulsifiers in those cheap sprays polymerize under high heat, leaving a sticky, impenetrable yellow residue on your bakeware that is virtually impossible to scrub off without damaging the pan further. Use butter, use high-quality oil, or simply use unbleached paper liners.
The Only Muffin Pans You Actually Need
Beyond the health hazards, thin, cheap aluminum pans are fundamentally terrible at conducting and holding heat. Just like your <a href="https://citchenware.com/blog/the-curators-corner/why-your-baking-sheets-keep-warping-and-what-to-buy-instead/">flimsy baking sheets warp</a> and buckle when exposed to high temperatures, a cheap, thin muffin tin will fail to absorb and transfer that crucial 425°F heat to the batter. If the heat transfer is poor, the edges of the muffin will not set quickly enough, and the entire High Heat Blast technique falls apart.
To get the perfect dome, you need heavy-gauge bakeware with serious thermal mass. I highly recommend investing in uncoated aluminized steel, commercial-grade carbon steel, or high-quality pans featuring non-toxic, PTFE-free ceramic or silicone-reinforced surfaces (such as those made by USA Pan or Caraway). These heavy-duty materials absorb the intense heat of the oven and immediately, efficiently transfer it to the edges of the muffin batter, setting the architectural structure instantly.
If you prefer to use pure silicone muffin pans for their guaranteed non-toxic properties and easy release, that is perfectly fine. However, you must manage your expectations. Silicone is a thermal insulator, not a thermal conductor. It will not transfer heat to the batter as aggressively as heavy-gauge metal. While you will still get a decent rise using the 425°F trick, your oven spring won’t be quite as explosive, and the edges of your muffins will lack that slightly crispy, deeply caramelized texture that metal provides.
Saboteurs: 5 Things That Will Ruin Your High Heat Blast
Even if you have the perfect heavy-gauge pan and you execute the temperature drop flawlessly, there are still several ways you can sabotage your own success. Baking is a science of variables, and if you ignore the variables, the equation breaks down. Here are the five most common saboteurs that will ruin your chances of achieving the perfect dome.
Saboteur 1: The Expired Leavener
Chemical leaveners do not last forever. They lose their potency over time, especially if exposed to humidity. If your canister of baking powder has been sitting open in the back of your pantry since the last presidential election, it is completely dead and utterly useless. It will not react with the liquid, it will not produce carbon dioxide gas, and your high heat blast will be entirely for nothing.
Before you bake, test your baking powder. Drop a half-teaspoon of the powder into a small bowl of hot water. If it does not immediately fizz and bubble aggressively, throw it in the trash and go to the grocery store. Do not skip this step.
Saboteur 2: The Overmixed Batter Sabotage
Muffin batter is not bread dough. You are not making a baguette, and you are not trying to develop a strong network of gluten. If you beat the living daylights out of your batter using those <a href="https://citchenware.com/blog/the-curators-corner/why-your-silicone-spatulas-taste-like-soap-and-what-to-buy-instead/">cheap silicone spatulas</a> that bend backward and absorb every odor in your kitchen, you will agitate the proteins in the flour and create a tough, rubbery, elastic matrix of gluten strands.
This gluten network is detrimental to oven spring. When the batter is too elastic, the expanding gases struggle to push through it smoothly. Instead of a uniform rise, the gas forces its way through the path of least resistance, tunneling violently through the batter. This leaves you with weird, hollow wormholes inside your muffin, a dense, chewy texture, and a lopsided, mutated top. When combining your wet and dry ingredients, mix them gently with a wooden spoon or a sturdy whisk just until the dry flour streaks disappear. If your dollar-store <a href="https://citchenware.com/blog/the-curators-corner/why-your-whisk-leaks-dishwater-and-what-to-buy-instead/">whisk leaks dirty dishwater</a> into your bowl because the handle is broken, you’ve already failed. Use proper tools, and remember: lumpy batter is good batter. Walk away before you overmix it.
Saboteur 3: The Cold Oven Catastrophe
You absolutely must preheat your oven fully. And let me let you in on a little industry secret: do not trust your oven’s preheat beep. Most home ovens are filthy liars. They beep when the ambient air near the internal thermometer sensor hits 425°F, but the heavy metal walls, the racks, and the floor of the oven are still stone cold.
If you put your muffins in immediately after the beep, the moment you open the door, all that hot air escapes, and the cold oven walls cannot recover the temperature fast enough. Your 425°F blast instantly becomes a 325°F whimper. You must wait at least 20 to 30 minutes after the preheat beep to ensure the physical thermal mass of the oven is completely saturated with heat. Buy a cheap, standalone stainless steel oven thermometer and hang it on the center rack. Do not put your muffins in until that analog dial reads exactly 425°F.
Saboteur 4: The Peeping Tom (Opening the Oven Door)
I know it is tempting to check on your creations. I know it smells amazing in your kitchen. But every single time you open that oven door to take a peek, you are committing culinary sabotage.
Opening the door for even three seconds releases a massive amount of ambient heat and, more importantly, vents out the crucial steam that is helping to lift your muffins. If you open the door during that critical five-minute high-heat window, the sudden drop in temperature and pressure will cause the fragile, unset structure of the expanding batter to collapse in on itself. Turn on the oven light and look through the glass. Keep the door shut until it is time to test them with a toothpick at the very end of the bake.
Saboteur 5: The Overfilled (or Underfilled) Tin
The biggest and most easily correctable mistake I see beginners make is underfilling the muffin cups. Traditional, old-school recipes often instruct you to fill the cups only two-thirds of the way full. Ignore this advice completely.
If you want a massive, bakery-style dome that spills gloriously over the edges, you need volume. You cannot create a mountain out of a molehill. You need to fill those cups all the way to the brim. Yes, the very top. You want so much batter in the well that it has absolutely no choice but to explode upward and outward when the heat hits it.
Furthermore, if you are making a smaller batch and have empty wells in your tin, do not leave them dry. Fill the empty wells halfway with water. This protects the pan from warping under the intense 425°F heat and adds a little extra ambient steam to the oven environment, which further aids in oven spring.
The Masterclass Step-by-Step: Executing the Perfect Domed Muffin
We have covered the physics, the chemistry, the gear, and the saboteurs. Now, let us put it all together into a foolproof, step-by-step masterclass checklist for your next weekend baking project.
Step 1: The True Preheat
Set your oven to 425°F. If your oven has a convection fan setting, be careful. Convection accelerates heat transfer significantly. Blasting a muffin at 425°F with a fan will set the crust too fast, causing the expanding center to violently rupture the side of the muffin (a flaw known as “peaking”). If using convection, drop the initial temperature to 400°F. Let the oven preheat for a full 30 minutes to saturate the thermal mass.
Step 2: Prepare the Pan
Grab your heavy-gauge, non-toxic, aluminized steel muffin tin. Either line it with high-quality parchment paper liners or thoroughly grease the wells and the top flat surface of the pan with real butter. Greasing the top surface ensures that when the dome expands over the edges, it doesn’t glue itself to the metal.
Step 3: The Dry Mix
Whisk your dry ingredients together in a large bowl. Remember, precision matters. Because <a href="https://citchenware.com/blog/the-art-of-the-kitchen/stop-scooping-your-flour-why-this-simple-mistake-ruins-your-baked-goods/">scooping your flour directly</a> from the bag with a measuring cup packs in way too much volume and guarantees a dense crumb, use a spoon to lightly sprinkle the flour into the cup, then level it off with a knife. Better yet, use that digital scale we talked about earlier.
Step 4: The Gentle Fold
In a separate bowl, whisk your wet ingredients until fully emulsified. Pour the wet ingredients into the dry ingredients. Using a sturdy wooden spoon, gently fold the batter together. Stop the very second the last streak of dry flour disappears. If you are adding fresh fruit, fold it in during the last two or three strokes. Use fresh produce—nobody wants to realize their <a href="https://citchenware.com/blog/kitchen-stories-solutions/why-your-berries-mold-so-fast-and-how-to-make-them-last/">berries mold so fast</a> when they are halfway through prepping a beautiful Sunday breakfast.
Step 5: The Pro-Level Rest Period
This is a professional bakery secret that will change your life. Once mixed, let the batter rest on the counter at room temperature for 15 to 30 minutes before filling the tins. Why? Because flour is composed of complex starches and proteins. When you mix flour with a liquid, it takes time for those starch granules to fully absorb the moisture.
Just like <a href="https://citchenware.com/blog/the-modern-recipe/stop-baking-flat-cookies-why-resting-your-dough-changes-absolutely-everything/">resting your dough</a> allows flour to hydrate fully resulting in thicker, chewier cookies, resting muffin batter allows the starches to swell and thicken the batter considerably. A thicker batter matrix traps the CO2 bubbles produced by the baking powder much more effectively, holding them in place so they don’t simply bubble up and escape before hitting the oven.
Step 6: The Spacing Trick and Toppings
Fill the cups all the way to the brim. If you are adding a decadent streusel topping, pile it high, especially when your <a href="https://citchenware.com/blog/kitchen-stories-solutions/why-your-brown-sugar-turns-into-a-brick-and-how-to-soften-it/">brown sugar turns into a brick</a> inside the pantry and you’ve finally managed to grate it down to a usable texture.
If you have multiple pans, utilize the “Every Other Well” spacing trick. Instead of filling all 12 wells in a single tin, fill only 6 of them in a staggered, zig-zag checkerboard pattern. Leaving empty spaces between the muffins allows the intense 425°F heat to circulate a full 360 degrees around each individual muffin, maximizing the edge-setting process and guaranteeing uniform, explosive oven spring across the entire batch.
Step 7: The Five-Minute Blast
Place the tin on the center rack of the fully saturated 425°F oven. Close the door immediately. Set a timer for exactly 5 minutes. Walk away. Do not look at them. Do not open the door.
Step 8: The Coast
When the five-minute timer sounds, do not open the door. Simply reach up to the control panel and lower the temperature to 350°F. Set a new timer for 12 to 15 minutes.
Step 9: The Finish
Check the muffins at the 12-minute mark. A wooden toothpick inserted into the absolute center of the tallest dome should come out clean, or with just one or two moist crumbs attached. Remove the tin from the oven and let the muffins cool in the pan for exactly 5 minutes before transferring them to a wire rack. If you leave them in the hot metal pan too long, the residual heat will overbake the edges and the trapped steam will make the bottoms soggy.
Troubleshooting: When Your Dome Still Looks Like a Pancake
If you follow this masterclass to the letter and your muffins still refuse to dome, we need to look at a few environmental edge cases.
First, consider your altitude. If you live at a high elevation, the atmospheric pressure is significantly lower. This means that the gases produced by your baking powder will expand much faster and much larger than they would at sea level. If they expand too quickly before the structure sets, the air bubbles will burst, and the muffin will collapse into a dense crater. High-altitude bakers often need to reduce their leavening agents by up to 25% and slightly increase their oven temperatures to set the structure even faster.
Second, evaluate the liquid content of your specific recipe. If you are using a recipe that is exceptionally wet or relies heavily on liquid sweeteners like maple syrup or honey, the batter might simply be too thin and heavy to hold the expanding gases, regardless of the heat blast. In this case, resting the batter for a full hour to maximize starch hydration is absolutely critical.
Finally, if your muffins are doming beautifully but the edges are turning dark brown or burning before the center is cooked, your oven simply runs too hot, or your pan is too dark. Dark-colored metal absorbs heat much more aggressively than light-colored metal. If you are using a dark pan, drop the initial blast temperature to 400°F and the finishing temperature to 325°F to compensate.
Final Thoughts: Claim Your Bakery-Style Glory
Look, I get it. On a chaotic Tuesday morning, time is money. You are probably grabbing a piece of toast, drinking lukewarm coffee over the sink, and running out the door. You don’t have time to meticulously monitor oven temperatures and hydrate starches.
But on a Sunday morning? When you actually have the time to slow down and enjoy the process of creating something beautiful from scratch? You deserve a muffin that looks like it belongs behind the pristine glass case of a ridiculously overpriced artisanal bakery. You deserve a muffin with a crusty, caramelized, towering dome that shatters perfectly when you bite into it, revealing a steaming, tender, impossibly fluffy crumb inside.
Baking does not have to be a stressful, tear-inducing chore filled with flat, disappointing failures. It is simply a matter of understanding the thermal dynamics of your kitchen, respecting the chemistry of your ingredients, and manipulating the environment to your advantage. You do not need a pastry degree to make mind-blowing food in a standard home kitchen. You just need high heat, heavy-gauge non-toxic gear, a little bit of scientific understanding, and a healthy dose of culinary sass.
Now go preheat that oven, throw out your peeling Teflon pans, check the expiration date on your baking powder, and claim your bakery-style glory.






